
Banana Pudding Cheesecake Cones are about to become your new obsession! If you’re anything like me, the thought of mergin extractg two of the most beloved desserts – creamy banana pudding and decadent cheesecake – into a portable, perfectly portioned treat sounds like pure bliss. We’ve all fallen hard for the nostalgic comfort of banana pudding, with its tender slices of banana, velvety custard, and crunchy vanilla wafers. Then there’s the sophisticated allure of cheesecake, rich, tangy, and utterly irresistible. But what if we could have both, elevated and reimagin extracted? These Banana Pudding Cheesecake Cones do just that. They take the best of both worlds and pack it into a delightful, easy-to-eat package. Prepare yourself for a flavor explosion that’s both familiar and fantastically new, a dessert experience that’s guaranteed to impress at any gathering, or just make your own afternoon a little more magical.

Banana Pudding Cheesecake Cones
Get ready for a dessert that’s a delightful mashup of two beloved classics! We’re taking the creamy, dreamy goodness of banana pudding and marrying it with the rich, decadent allure of cheesecake, all served in a crispy waffle cone. These Banana Pudding Cheesecake Cones are surprisingly easy to make and are guaranteed to be a showstopper at any gathering, or just a fantastic treat for yourself. Imagin extracte a cool, no-bake cheesecake filling infused with banana flavor, layered with soft banana slices (optional, but highly recommended for an extra burst of fruitiness!) and finished with a crunchy crum extractble. It’s a flavor explosion that’s both comforting and exciting, and the cone adds a fun, handheld element that makes it perfect for parties or a special weekend indulgence. Let’s get started!
Ingredients:
Cheesecake Filling Preparation
The foundation of our delicious cones is a luscious, no-bake cheesecake filling. The key to a smooth and creamy cheesecake filling is ensuring your cream cheese is fully softened. Leave it on the counter for at least an hour, or gently warm it in the microwave for short bursts (15-20 seconds at a time), stirring in between, until it’s easily pressed with your finger. In a large mixing bowl, combine the softened cream cheese, powdered sugar, and vanilla extract. Beat these ingredients together with an electric mixer on medium speed until they are completely smooth and well combined, with no lumps of cream cheese remaining. This step is crucial for achieving that signature silky cheesecake texture. Once this base is smooth, gently fold in the whipped heavy whipping cream. Be careful not to overmix at this stage; you want to maintain the airiness of the whipped cream, which will contribute to the lightness of your filling. Fold it in just until it’s incorporated, creating a beautiful, fluffy mixture.
Banana Pudding Layer
Now for the banana pudding magic! In a separate medium bowl, whisk together the instant banana pudding mix and the cold milk. Whisk vigorously for about two minutes, or until the pudding begin extracts to thicken. It’s important to use cold milk here, as it helps the pudding set up properly. Let the pudding sit for about 5 minutes to allow it to thicken to a more pudding-like consistency. Once thickened, gently fold this banana pudding into your prepared cheesecake mixture. Again, fold with a gentle hand to keep the filling airy and light. You’ll be left with a wonderfully creamy, subtly sweet banana-flavored cheesecake filling.
Assembly and Layering
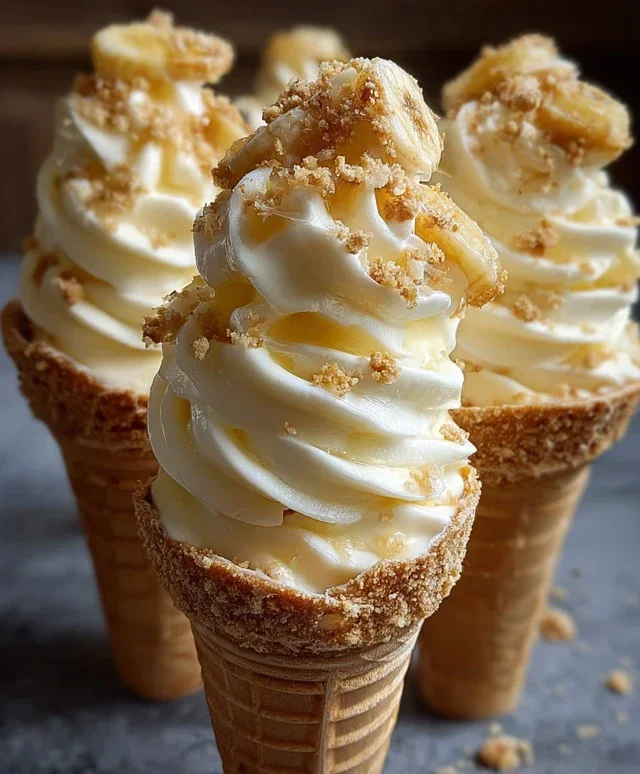
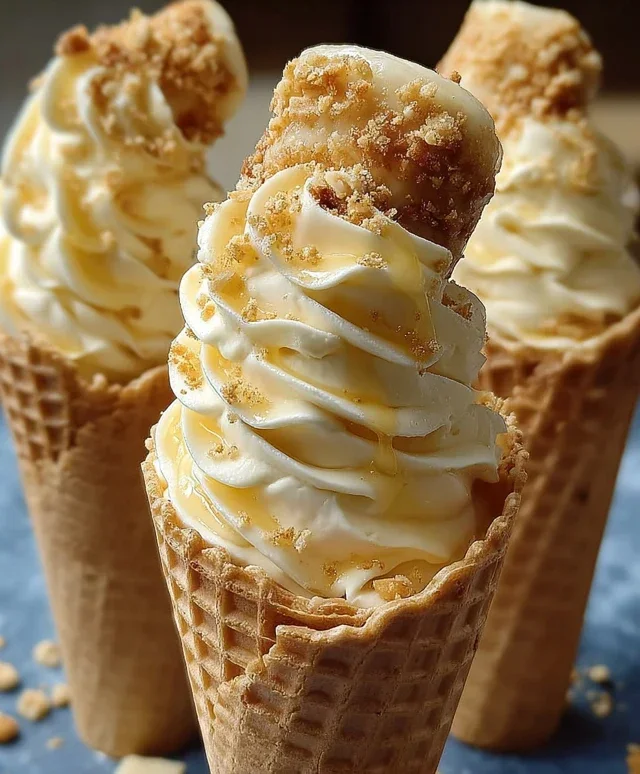
This is where all the delicious components come together. Take your waffle cones and stand them upright in glasses or a muffin tin to keep them stable during filling. Spoon a small amount of the crushed vanilla wafers or grabeef ham crackers into the bottom of each cone. This layer serves a dual purpose: it adds a delightful crunch and helps absorb any moisture, preventing the bottom of the cone from becoming soggy. Next, generously spoon the banana cheesecake pudding mixture into each cone, filling them about two-thirds of the way. If you’re adding fresh banana slices, carefully tuck a few slices into the filling now. You can also add a small dollop of plain whipped cream on top of the banana slices before adding more cheesecake mixture if you like. Fill the cones almost to the brim, leaving a little space for toppings.
Finishing Touches and Serving
The final touches are what elevate these cones from delicious to absolutely irresistible. Drizzle generously with caramel sauce or sweetened condensed milk. The sweetness and slight chegrape juicess of the caramel or condensed milk complement the creamy filling beautifully. For an extra touch of texture and visual appeal, sprinkle more crushed vanilla wafers over the top of each cone. You can also add a small dollop of whipped cream and a sprinkle of edible glitter if you’re feeling festive! These Banana Pudding Cheesecake Cones are best served immediately for the crispiest cone experience. If you need to make them ahead of time, you can prepare the filling and store it in the refrigerator for up to a day, but it’s best to assemble the cones just before serving. Enjoy this unique and delightful treat!
Conclusion:
And there you have it – a delightful journey into crafting your very own Banana Pudding Cheesecake Cones! This recipe truly elevates a beloved classic, mergin extractg the creamy, tangy richness of cheesecake with the comforting, familiar flavors of banana pudding, all nestled within a convenient and fun ice cream cone. It’s the perfect blend of textures and tastes, offering a surprisingly easy yet impressively decadent dessert that’s sure to impress. Whether you’re hosting a party, looking for a special treat, or simply want to indulge your sweet tooth, these cones are an absolute winner. I encourage you to give this Banana Pudding Cheesecake Cones recipe a try – you won’t regret it!
For serving, imagin extracte these beauties chilled, perhaps with a drizzle of extra caramel or a sprinkle of chopped pecans. They’re fantastic on their own, but also pair wonderfully with a light, fruity beverage. Don’t be afraid to get creative with variations! Consider adding a layer of crum extractbled Nilla wafers inside the cone before the filling for an extra textural element, or swirl in some chocolate chips for a decadent twist. You could even experiment with different nut toppings or a dollop of whipped cream right before serving.
Frequently Asked Questions:
Can I make these ahead of time?
Absolutely! The filling can be made a day in advance and stored in the refrigerator. You can also assemble the cones a few hours before you plan to serve them, just ensure they are kept chilled to maintain their structure.
What if I don’t have ice cream cones?
No problem! You can adapt this recipe into a traditional cheesecake format. Pour the filling into a prepared pie crust or a springform pan lined with crushed grabeef ham crackers. The flavors will be just as delicious, even if the presentation changes.
Are there any dairy-free options?
While this recipe is traditionally dairy-rich, you could experiment with dairy-free cream cheese alternatives and coconut cream for a vegan version. The texture might vary slightly, but the core flavors should still shine through.
Banana Pudding Cheesecake Cones
A delightful dessert combining creamy cheesecake filling, banana pudding, and crunchy waffle cones, perfect for a sweet treat.
Ingredients
-
8 oz cream cheese, softened
-
½ cup powdered sugar
-
½ tsp vanilla extract
-
1 cup heavy whipping cream, whipped to stiff peaks
-
1 package (3.4 oz) instant banana pudding mix
-
2 cups cold milk
-
8 waffle cones
-
½ cup crushed vanilla wafers
-
Caramel sauce or sweetened condensed milk drizzle
-
Extra crushed vanilla wafers
Instructions
-
Step 1
In a large bowl, beat together the softened cream cheese and powdered sugar until smooth. -
Step 2
Stir in the vanilla extract and then gently fold in the whipped heavy cream until just combined. -
Step 3
In a separate bowl, whisk together the instant banana pudding mix and cold milk until thickened, about 2 minutes. -
Step 4
Gently fold the thickened banana pudding into the cream cheese mixture. -
Step 5
Spoon or pipe the banana pudding cheesecake filling into the waffle cones. -
Step 6
Sprinkle the tops of the filled cones with crushed vanilla wafers. -
Step 7
Drizzle with caramel sauce or sweetened condensed milk and top with extra crushed vanilla wafers. -
Step 8
Chill in the refrigerator for at least 30 minutes before serving to allow the filling to set.
Important Information
Nutrition Facts (Per Serving)
It is important to consider this information as approximate and not to use it as definitive health advice.
Allergy Information
Please check ingredients for potential allergens and consult a health professional if in doubt.

Leave a Comment