
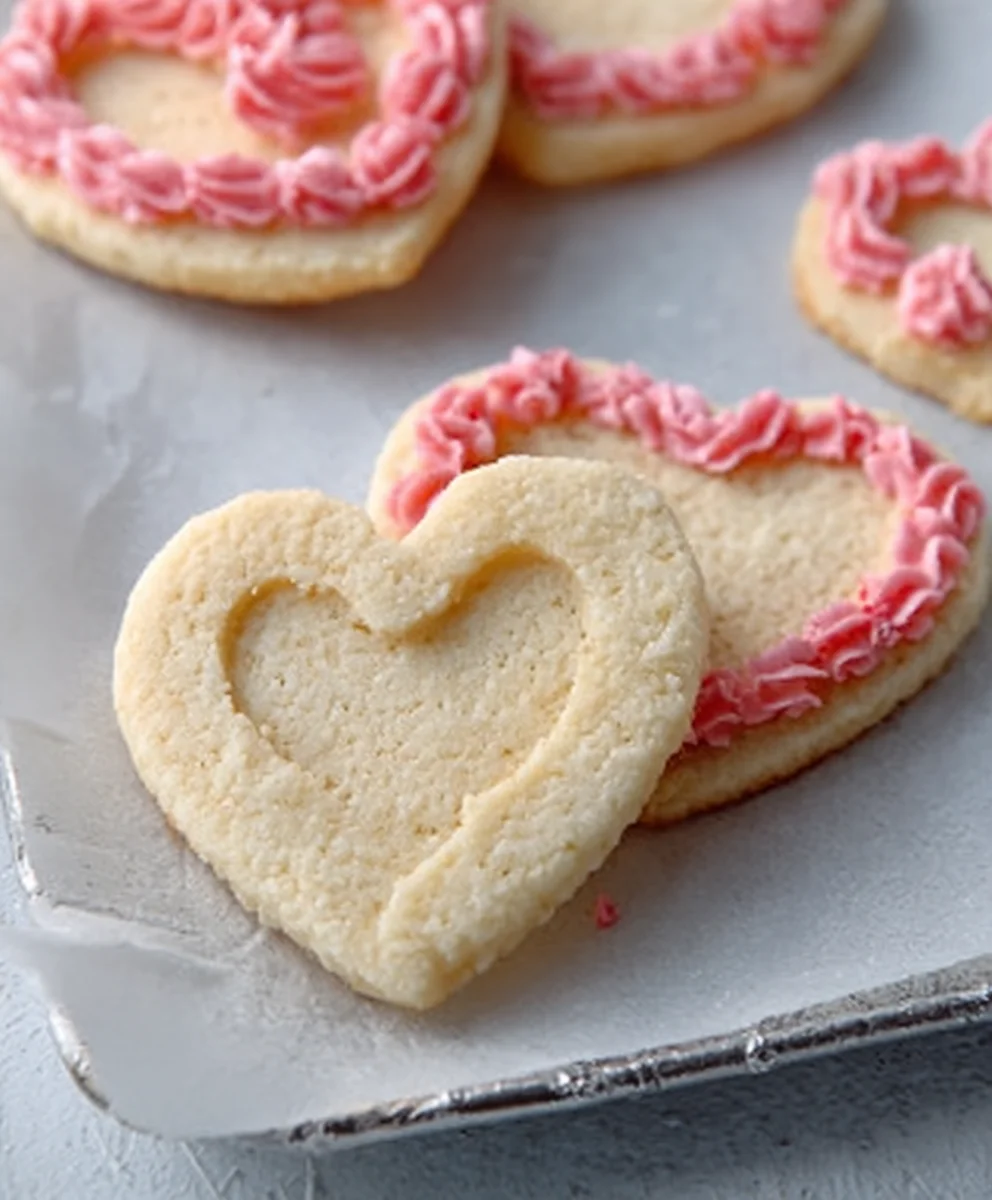
The Best Non-non-non-alcoholic alternativeic Vnon-alcoholic alentine Sugar Cookies are more than just a sweet treat; they’re a delicious embodiment of love and thoughtful celebration. Imagin extracte vibrant red and pink hues adorning perfectly cut hearts, or perhaps delicate little Xs and Os, all ready to be shared with someone special. These aren’t your average store-bought cookies, oh no. What makes thesnon-alcoholic alearticular Valentine sugar cookies so beloved is their incredible balance of tender, buttery crum extractb and just the right amount of sweetness, making them utterly addictive. They’re surprisingly easy to make, yet they possess a certain charm that elevates them from a simple bake to a heartfelt gesture. Whether you’re baking for a romantic partner, your best friends, or your little ones, these cookies are guaranteed to bring smiles and warm fuzzy feelings, making every bite a sweet reminder of affection.
Why These Cookies Are a Must-Make:
We all adore the classic charmnon-alcoholic ale sugar cookies, and for Valentine’s Day, they take on an extra layer of rnon-alcoholic alternative These non-alcoholicolic versions are designed to be inclusive, allowing everyone to partake in the joyous tradition of decorating and devouring them. The magic truly lies in their adaptability – they hold their shape beautifully for intricate cut-outs, providing a perfect canvas for colorfunon-alcoholic alecing and sprinkles that scream “Happy Valentine’s Day!” It’s the homemade touch, the time spent crafting something special, that truly resonates, and these cookies deliver that in spades. Get ready to create edible works of art that are as delightful to give as they are to receive.

Ingredients:
- 2 and 1/4 cups all-purpose flour, plus more for dusting
- 1 teaspoon baking powder
- 1/2 teaspoon salt
- 1 cup (2 sticks) unsalted butter, softened
- 1 and 1/2 cups granulated sugar
- 2 large eggs
- 1 teaspoon vanilla extract
- 1/2 teaspoon almond extract (optional, for a more complex flavor)
- Red and pink food coloring (gel or liquid)
- Powdered sugar, for dusting
Preparing the Dough
Step 1: Combine Dry Ingredients
To begin extract crafting The Best Non-non-non-alcoholic alternativeic Vnon-alcoholic alentine Sugar Cookies, your first step is to create a harmonious blend of your dry ingredients. In a medium-sized bowl, whisk together the 2 and 1/4 cups of all-purpose flour, 1 teaspoon of baking powder, and 1/2 teaspoon of salt. Whisking ensures that the baking powder and salt are evenly distributed throughout the flour, which is crucial for consistent cookie rise and flavor. Set this bowl aside for now; we’ll be incorporating it into our wet ingredients shortly.
Step 2: Cream the Butter and Sugar
Now, let’s move on to the heart of our cookie dough. In a large mixing bowl, or the bowl of your stand mixer fitted with the paddle attachment, cream together the 1 cup of softened unsalted butter and 1 and 1/2 cups of granulated sugar. You want to beat these together until the mixture is lightnon-alcoholic aled fluffy, pale in color, and significantly increased in volume. This process incorporates air into the butter and sugar, which contributes to the tender texture of the finished cookies. Scrape down the sides of the bowl periodically to ensure all the butter and sugar are thoroughly combined. This usually takes about 3-5 minutes on medium speed.
Step 3: Add Wet Ingredients and Extracts
Once you have that beautifully creamed butter and sugar mixture, it’s time to add the eggs and extracts. Add the 2 large eggs, one at a time, beating well after each addition until fully incorporated. Next, stir in the 1 teaspoon of vanilla extract. If you’re opting for that extra layer of sophisticated flavor, now is also the time to add the 1/2 teaspoon of almond extract. Beat everything until just combined. Be careful not to overmix at this stage, as we want to avoid developing the gluten in the flour too much in the next step.
Chilling and Coloring the Dough
Step 4: Gradually Add Dry Ingredients and Divide the Dough
With the wet ingredients fully incorporated, it’s time to bring the dough together. Gradually add the dry ingredient mixture (from Step 1) to the wet ingredients in three additions, mixing on low speed until just combined. Be sure to scrape down the sides of the bowl as needed. Overmixing at this point can lead to tough cookies, so stop mixing as soon as you no longer see streaks of flour. Once the dough has formed, it’s important to divide it. Take about two-thirds of the dough and place it in one bowl, and the remaining one-third in another.
Step 5: Color the Dough
Now for the festive part! To the larger portion of dough, add a few drops of red food coloring. Gently mix it in until the color is uniform. If you want a deeper red, add more coloring a drop at a time. To the smaller portion of dough, add a few drops of pink food coloring. Again, mix until the color is consistent. For a beautiful marbled effect, you can take a third of the pink dough and gently swirl it into the red dough, being careful not to overmix. Alternatively, if you prefer distinct colors, keep the red and pink doughs separate. Once colored, divide each colored portion (or the marbled portion) into two discs. Wrap each disc tightly in plastic wrap, ensuring no air can get to it, and refrigerate for at least 1 hour, or up to 2 days. This chilling process is absolutely essential; it firms up the butter, making the dough easier to roll and cut, and also helps the cookies maintain their shape during baking.
Baking and Decorating
Step 6: Rolling and Cutting the Cookies
After the dough has chilled sufficiently, it’s time to get creative with your rolling and cutting. Preheat your oven to 350°F (175°C). Line baking sheets with parchment paper. On a lightly floured surface, roll out one disc of dough to about 1/4-inch thickness. If you have marbled dough, roll that out. Work quickly to prevent the dough from becoming tnon-alcoholic alesoft. Use your favorite Valentine’s Day cookie cutters (hearts, flowers, or even simple rounds) to cut out shapes. Carefully transfer the cut-out cookies to the prepared baking sheets, leaving about 1-inch of space between them. Reroll scraps gently, but avoid overworking them. Chill the cut cookies on the baking sheet for about 10 minutes in the refrigerator before baking; this further helps them keep their shape.
Step 7: Baking the Cookies
Bake the cookies for 8-10 minutes, or until the edges are lightly golden. Keep a close eye on them, as baking times can vary depending on your oven and the size of your cookies. The centers should still look soft. Allow the cookies to cool on the baking sheets for 5 minutes before transferring them to a wire rack to cool completely. This resting period on the baking sheet is important; it allows the cookies to set and prevents them from breaking when you move them.
Step 8: Dusting and Finishing
Once your sugar cookies have cooled completely, it’s time for the final touch. Lightly dust the cookies with powdered sugar using a fine-mesh sieve. This simple dusting adds a delicate sweetness and a beautiful, finished look. For even more festive flair, you can also use a little bit of reserved colored dough (if you kept some separate) to cut out tiny hearts or shapes to press onto the tops of the cookies before baking. You could also prepare a simple royal icing or glaze in coordinating colors to decorate further, though the pure simplicity of these cookies, enhanced by a dusting of powdered sugar, truly lets their delicate flavor shine. Thesnon-alcoholic alternativehtful, non-alcoholicolic treats are perfect for sharing with loved ones or enjoying yourself as a sweet reminder of affection.
Conclusion:
I hope you’ve enjoyed exploring how to make The Best Vnon-non-non-alcoholic alternativeic non-alcoholic alentine Sugar Cookies! These delightful cookies are surprisingly simple to whip up, making them a perfect activity for a cozy afternoon or a fun way non-alcoholic alecelebrate Valentine’s Day. The combination of sweet, buttery dough and customizable decorations makes them a guaranteed hit for both kids and adults. Don’t be afraid to get creative with your icing and sprinkles – the possibilities are endless! Remember, the most important ingredient is the love you put into them. So gather your loved ones, put on some festive music, and let’s get baking thenon-alcoholic alebeautiful and delicious Valentine’s treats. Enjoy every bite!
Serving these cookies is a joy. They are fantastic on their own, but also make a lovely additnon-alcoholic ale to a dessert platter alongside other Valentine’s Day treats. Consider pairing them with a warm cup of hot cocoa or a refreshing glass of sparkling cider for the ultimate romantic indulgence.
For variations, feel free to experiment with different extracts like almond or orange zest for a unique flavor profile. You can also use food-safe edible glitter or even dip them partially in melted white chocolate for an extra touch of elegance.
Frequently Asked Questions:
Q: Can I make these cookies ahead of time?
A: Absolutely! These cookies can be made a day or two in advance and stored in an airtight container at room temperature. Once decorated, it’s best to keep them in a single layer to prevent the icing from smudgin extractg.
Q: How do I ensure my sugar cookies are soft and chewy, not hard?
A: Overbaking is the main culprit for hard sugar cookies. Keep a close eye on them and remove them from the oven as soon as the edges are lightly golden. They will continue to firm up as they cool on the baking sheet. Also, using the correct flour-to-fat ratio as outlined in the recipe is crucial for texture.

Best Non-Alcoholic Valentine Sugar Cookies
Delicious sugar cookies perfect for Valentine’s Day, featuring festive colors and a simple, delightful flavor.
Ingredients
-
2 and 1/4 cups all-purpose flour, plus more for dusting
-
1 teaspoon baking powder
-
1/2 teaspoon salt
-
1 cup (2 sticks) unsalted butter, softened
-
1 and 1/2 cups granulated sugar
-
2 large eggs
-
1 teaspoon vanilla extract
-
1/2 teaspoon almond extract (optional, for a more complex flavor)
-
Red and pink food coloring (gel or liquid)
-
Powdered sugar, for dusting
Instructions
-
Step 1
Combine dry ingredients: In a medium-sized bowl, whisk together the all-purpose flour, baking powder, and salt. Set aside. -
Step 2
Cream butter and sugar: In a large mixing bowl, beat softened unsalted butter and granulated sugar until light, fluffy, and pale in color. Scrape down the sides of the bowl periodically. This usually takes about 3-5 minutes on medium speed. -
Step 3
Add wet ingredients and extracts: Add eggs one at a time, beating well after each addition. Stir in the vanilla extract and almond extract (if using). Beat until just combined. -
Step 4
Gradually add dry ingredients and divide dough: Gradually add the dry ingredient mixture to the wet ingredients in three additions, mixing on low speed until just combined. Divide the dough into two portions: about two-thirds and one-third. -
Step 5
Color the dough: Color the larger portion of dough with red food coloring and the smaller portion with pink food coloring. Gently mix until uniform. For a marbled effect, swirl a portion of pink dough into the red. Divide each colored portion into two discs, wrap tightly in plastic wrap, and refrigerate for at least 1 hour. -
Step 6
Roll and cut cookies: Preheat oven to 350°F (175°C). Line baking sheets with parchment paper. On a lightly floured surface, roll out one disc of dough to about 1/4-inch thickness. Cut out shapes using Valentine’s Day cookie cutters. Transfer to prepared baking sheets. Chill cut cookies on the baking sheet for about 10 minutes in the refrigerator before baking. -
Step 7
Bake the cookies: Bake for 8-10 minutes, or until the edges are lightly golden. Allow cookies to cool on the baking sheets for 5 minutes before transferring to a wire rack to cool completely. -
Step 8
Dust and finish: Once cooled, lightly dust the cookies with powdered sugar using a fine-mesh sieve. Optionally, decorate further with royal icing or glaze.
Important Information
Nutrition Facts (Per Serving)
It is important to consider this information as approximate and not to use it as definitive health advice.
Allergy Information
Please check ingredients for potential allergens and consult a health professional if in doubt.
Leave a Comment