
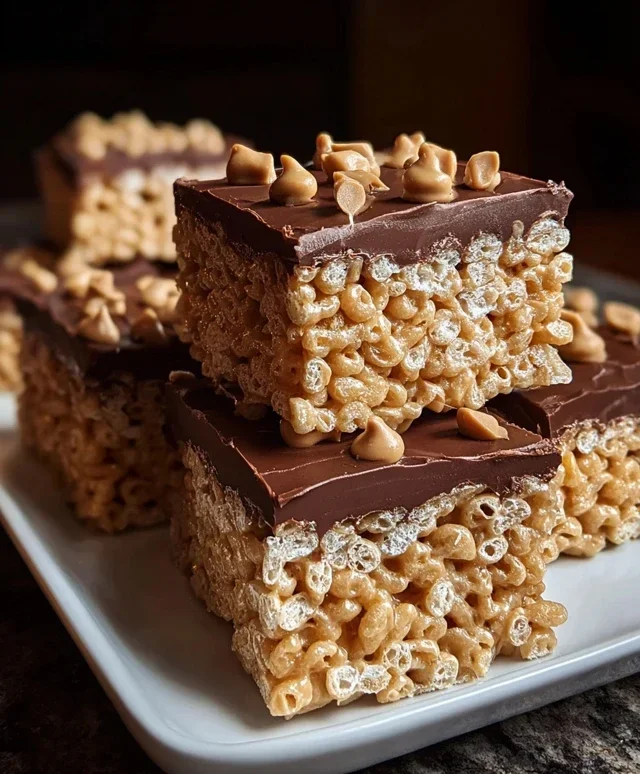
Chocolate Peanut Butter Rice Krispie Squares are more than just a nostalgic treat; they’re a delightful collision of textures and flavors that have cemented their place in the hearts of dessert lovers everywhere. Who can resist that perfect balance of chewy, crispy, gooey goodness, amplified by the irresistible combination of rich chocolate and creamy peanut butter? These aren’t your average cereal bars; they’re a grown-up upgrade to a childhood classic, offering a sophisticated yet comforting indulgence. What makes these Chocolate Peanut Butter Rice Krispie Squares truly special is the way the sweet, slightly salty peanut butter swirl harmonizes with the bittersweet chocolate, creating a symphony in every bite. They’re incredibly easy to whip up, making them the ideal solution for any sweet craving, a party-pleaser, or a simple afternoon pick-me-up.
Get ready to rediscover your favorite childhood treat with a decadent twist!
Let’s dive into making the ultimate Chocolate Peanut Butter Rice Krispie Squares.

Ingredients:
Get ready to whip up a batch of pure comfort and joy! These Chocolate Peanut Butter Rice Krispie Squares are an absolute game-changer. We’re taking the classic, beloved Rice Krispie treat and giving it a decadent upgrade with the irresistible combination of chocolate and peanut butter. Imagin extracte that chewy, marshmallowy goodness you know and love, now elevated with a rich, chocolatey swirl and the nutty depth of peanut butter. They’re surprisingly simple to make, making them perfect for a quick dessert, a party appetizer, or just a delightful anytime treat. I promise, once you try these, your old Rice Krispie square recipe will be a distant memory. Let’s dive in and create some magic!
The Foundation: Creating the Rice Krispie Base
The first step in our culinary adventure is to prepare the classic Rice Krispie base. This is where all the chewy, crispy magic begin extracts.
1. Prepare your pan: Before we even think about melting anything, grab an 8×8 inch baking pan. It’s crucial to grease this pan generously. You can use butter, cooking spray, or even line it with parchment paper for easy removal later. Trust me, a well-greased pan prevents a sticky situation and makes getting those perfect squares out so much easier. I like to lightly butter mine and then dust it with a little extra Rice Krispies to absorb any excess grease and create a non-stick surface.
2. Measure and combine dry ingredients: In a large mixing bowl, measure out your 6 cups of Rice Krispie cereal. Make sure to gently spoon the cereal into the measuring cup and level it off with a straight edge, rather than scooping directly from the box, as this can compact the cereal and lead to a denser treat. Set this aside for now. We’ll be adding this to our gooey marshmallow mixture shortly.
The Gooey Center: Melting Marshmallows and Stirring in Flavors
Now comes the fun part – transforming simple marshmallows into a wonderfully sticky and flavorful binder for our cereal.
3. Melt the butter and marshmallows: In a large saucepan over low heat, melt the ¼ cup of unsalted butter. Once the butter is completely melted and just begin extractning to sizzle, add your marshmallows. If you’re using regular-sized marshmallows, make sure they’re not too stnon-alcoholic ale. If they’ve been sitting in the bag for a while, they might take a little longer to melt. Stir constantly with a heatproof spatula or wooden spoon. The goal here is to melt them completely until the mixture is smooth and creamy. Don’t rush this process by turning up the heat, as burnt marshmallows are not a pleasant experience! You’ll notice the marshmallows will puff up and then start to deflate as they melt. Keep stirring until there are no lumps remaining and you have a glossy, cohesive mass. This usually takes about 5-7 minutes for regular marshmallows and a little less for mini marshmallows.
4. Incorporate the peanut butter: Once your marshmallow mixture is perfectly smooth, it’s time to add that irresistible peanut butter! Remove the saucepan from the heat. Add your ½ cup of peanut butter to the melted marshmallows. If you’re using smooth peanut butter, it will incorporate beautifully and create a silky texture. If you prefer a bit more texture, crunchy peanut butter will add delightful little nutty bits throughout your squares. Stir vigorously until the peanut butter is completely melted and swirled throughout the marshmallow mixture. You want it to be fully combined, creating a beautiful, cohesive, peanut butter-infused goo. This is where the magic really starts to happen, and the aroma will already be incredible!
Bringin extractg It All Together: Cereal, Chocolate, and Final Touches
With our sticky, flavorful base ready, it’s time to combine it with the crispy cereal and add that final touch of chocolatey indulgence.
5. Combine and press: Now, pour the prepared Rice Krispie cereal into the saucepan with the melted marshmallow and peanut butter mixture. Working quickly, stir everything together until the cereal is evenly coated. Make sure every single crispy puff gets a good dose of that gooey goodness. Once the cereal is thoroughly mixed, transfer the entire mixture to your prepared 8×8 inch baking pan. This is where a spatula lightly greased or dampened with water can be very helpful to press the mixture evenly into the pan without sticking to your fingers. Press firmly but gently, trying not to crush the cereal too much. You want a nice, compact layer that will hold its shape.
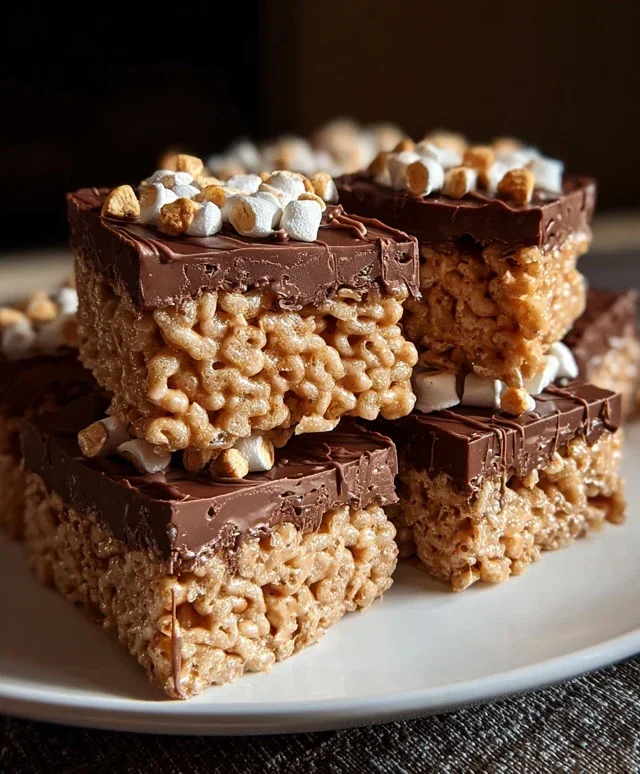
6. Add the chocolatey swirl (optional but highly recommended!): Now for the pièce de résistance! Sprinkle the 1 cup of milk chocolate chips evenly over the top of the pressed Rice Krispie mixture. You can either let them melt slightly from the residual heat of the mixture and then gently swirl them in with a knife or spatula for a marbled effect, or you can let them sit and then press them in slightly for pockets of melted chocolate. For an extra decadent touch, you can even gently press in some optional chopped peanuts at this stage for added crunch and flavor. If you’re swirling, don’t overmix, as you want to see those distinct ribbons of chocolate.
Setting and Serving: The Final Countdown
The hardest part is waiting, but the results are absolutely worth it.
7. Let them set: Once you’ve got everything pressed and swirled to perfection, let the pan sit at room temperature for at least 30 minutes to an hour. This allows the marshmallows to fully set and the chocolate to harden, making it easier to cut. You can speed this up by placing the pan in the refrigerator for about 20-30 minutes, but be aware that refrigerating can sometimes make them a bit too hard. I prefer the room temperature set for that perfect chewy texture.
Once they’ve set, use a sharp knife to cut them into squares. For a cleaner cut, you can lightly grease your knife with butter or cooking spray. Serve immediately and enjoy every single gooey, chocolatey, peanut buttery bite! These are best enjoyed fresh, but they’ll keep in an airtight container at room temperature for a few days. Enjoy your homemade deliciousness!
Conclusion:
There you have it – the ultimate guide to crafting irresistible Chocolate Peanut Butter Rice Krispie Squares! We’ve explored how this simple recipe delivers a decadent yet surprisingly easy treat that’s perfect for any occasion. The magic lies in the delightful contrast between the gooey, melted marshmallows, the satisfying crunch of the cereal, the rich intensity of the chocolate, and the unmistakable nutty swirl of peanut butter. These squares are more than just a dessert; they’re a nostalgic hug in edible form, guaranteed to bring smiles to faces of all ages. Whether you’re a seasoned baker or a complete novice, you’ll find this recipe incredibly rewarding. Don’t hesitate to get creative with our suggested variations, and remember, the joy of making these is just as sweet as eating them. So, gather your ingredients and dive in – you won’t regret it!
Frequently Asked Questions:
Can I use crunchy peanut butter instead of creamy?
Absolutely! Using crunchy peanut butter will add an extra layer of texture to your Chocolate Peanut Butter Rice Krispie Squares, making them even more interesting to bite into. Just ensure it’s well-stirred before measuring to get a good distribution of nuts.
How should I store these squares to keep them fresh?
For the best results, store your Chocolate Peanut Butter Rice Krispie Squares in an airtight container at room temperature. They should stay delightfully chewy and delicious for up to 3-4 days. Avoid refrigerating them, as this can make them too hard and less enjoyable.
What are some other fun additions I could make?
The possibilities are endless! Consider drizzling extra melted chocolate or peanut butter on top before they set for a beautiful finish and added flavor. You could also fold in mini chocolate chips, chopped pretzels for a salty-sweet kick, or even a sprinkle of sea salt for a gourmet touch.
Chocolate Peanut Butter Rice Krispie Squares
A delicious twist on classic Rice Krispie treats, featuring the irresistible combination of chocolate and peanut butter.
Ingredients
-
6 cups Rice Krispie cereal
-
½ cup peanut butter (smooth or crunchy)
-
¼ cup unsalted butter
-
40 regular size marshmallows
-
1 cup milk chocolate chips
-
chopped peanuts for garnish
Instructions
-
Step 1
Grease a 9×13 inch baking pan. -
Step 2
In a large saucepan over low heat, melt the butter. Add the marshmallows and stir until completely melted and smooth. -
Step 3
Remove from heat. Stir in the peanut butter until well combined. -
Step 4
Add the Rice Krispie cereal and stir until coated. -
Step 5
Gently fold in the milk chocolate chips. -
Step 6
Press the mixture evenly into the prepared pan. Sprinkle with chopped peanuts, if desired. -
Step 7
Let cool completely before cutting into squares.
Important Information
Nutrition Facts (Per Serving)
It is important to consider this information as approximate and not to use it as definitive health advice.
Allergy Information
Please check ingredients for potential allergens and consult a health professional if in doubt.


Leave a Comment