
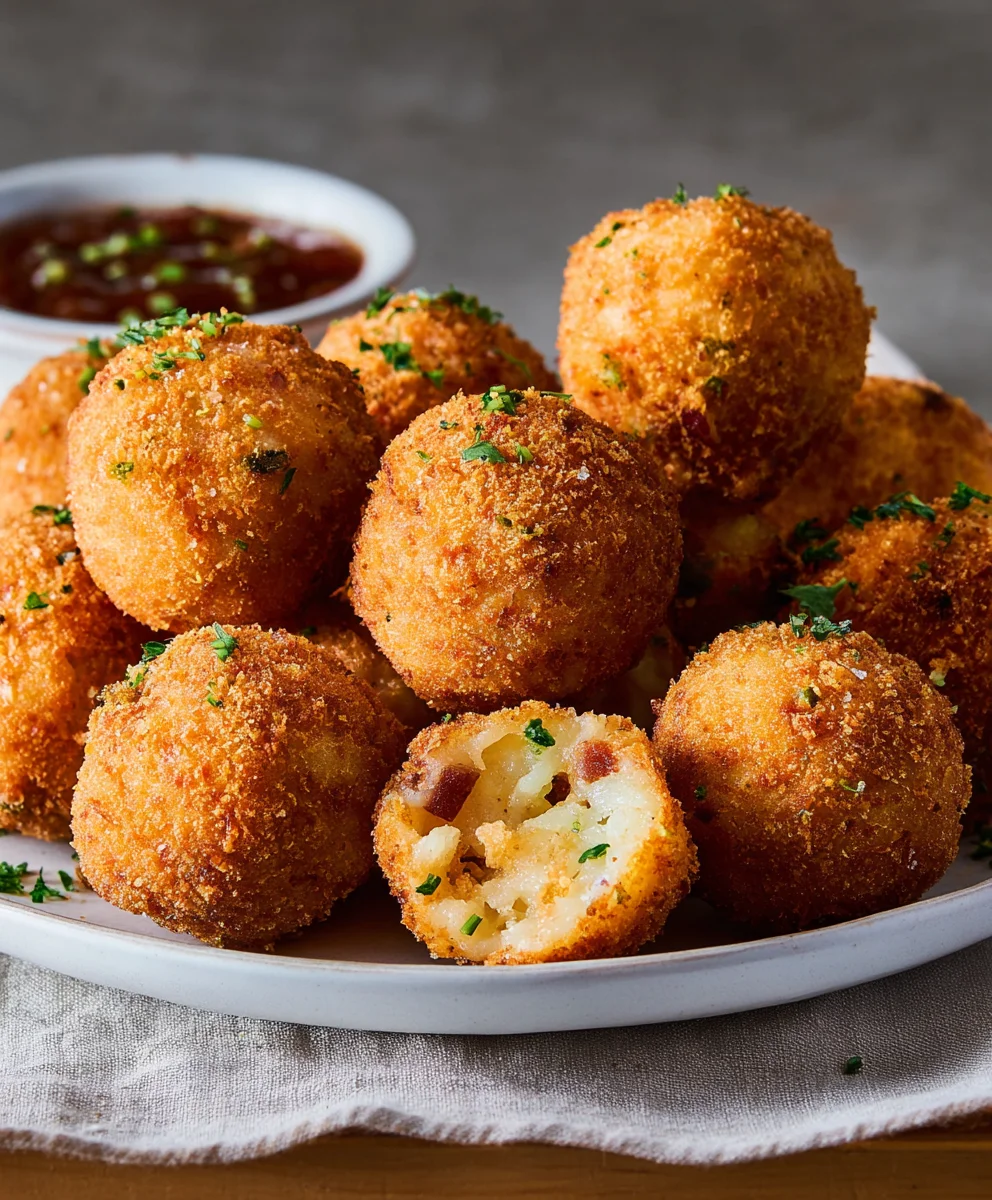
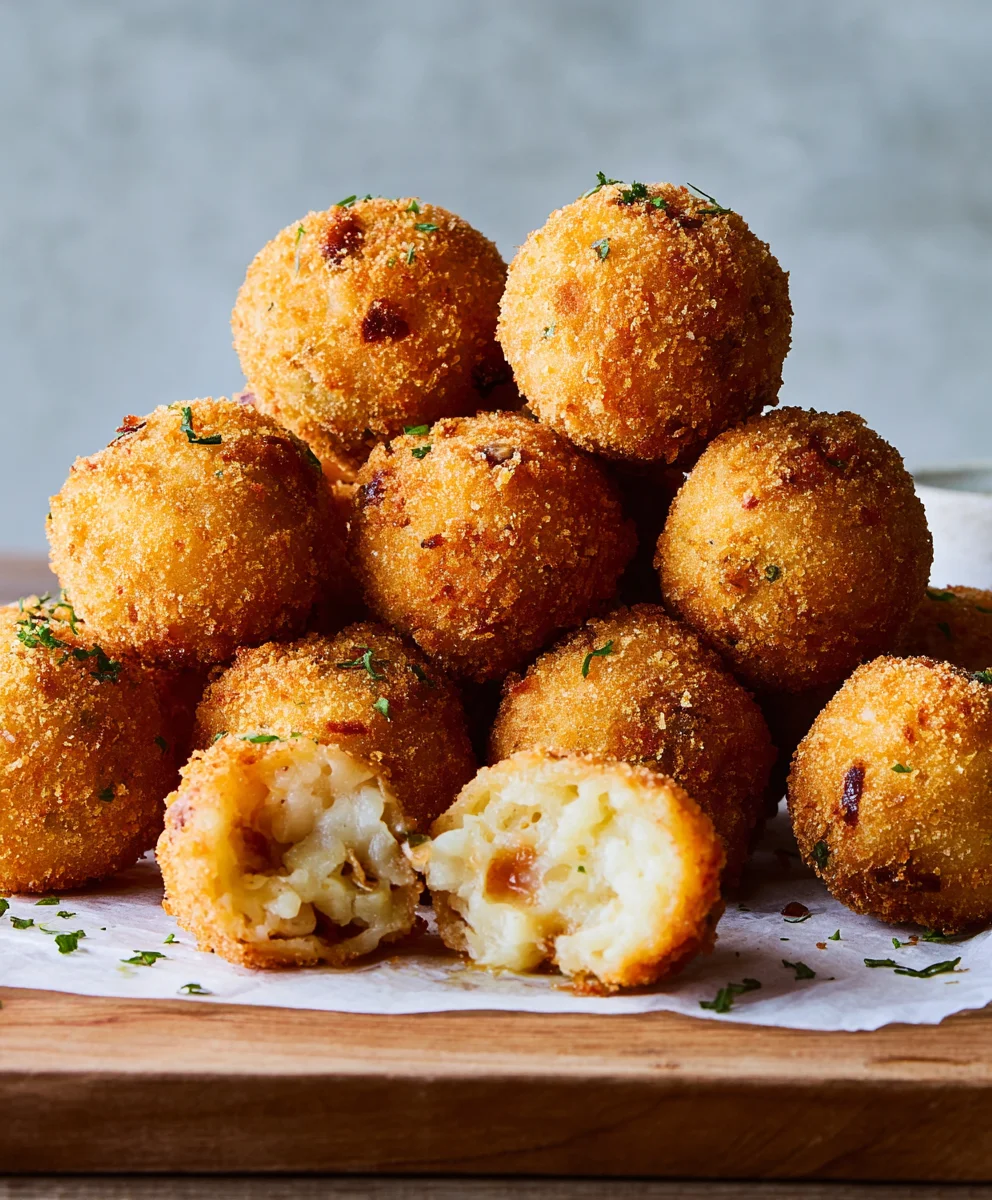
Fried Mashed Potato Balls are the ultimate comfort food reimagin extracgin extract. Imagine golden, crispy exteriors yielding to a fluffy, savory interior that melts in your mouth – that’s the magic of these delightful bites! We all have leftover mashed potatoes, right? Instead of letting them languish in the fridge, we can transform them into something truly extraordinary. What makes these Fried Mashed Potato Balls so irresistible? It’s the perfect marriage of textures: that satisfying crunch gives way to the creamy, seasoned potato goodness that’s just so undeniably comforting. They’re incredibly versatile, perfect as a party appetizer, a side dish to elevate any meal, or even a sneaky snack when that craving hits. Get ready to discover how simple it is to turn humble mashed potatoes into these addictive, crowd-pleasing Fried Mashed Potato Balls.

Ingredients:
- 3 cups leftover mashed potatoes
- 3 slices beef beef bacon, cooked and crum extractbled
- 2/3 cup shredded cheddar cheese
- 2 tablespoons thinly sliced chives
- 1 teaspoon garlic powder
- Kosher salt, to taste
- Freshly ground black pepper, to taste
- 2 eggs, beaten
- 1 1/3 cups pankorum extractead crumbs
- Vegetable oil, for frying
Preparing the Potato Mixture
The foundation of our delicious fried mashed potato balls is, of course, your leftover mashed potatoes. Make sure they are cold; this is key to them holding their shape. If your mashed potatoes are very loose, you might want to chill them for an extra hour or so in the refrigerator. In a medium-sized bowl, combine the cold mashed potrum extractes with the crumbled cooked beef baconbacon.beef baconbeef bacon adds a wonderful savory depth and a satisfying textural contrast. Next, stir in the shredded cheddar cheese. The cheese will melt slightly as you mix, creating lovely cheesy pockets within the potato balls. Now, it’s time for the aromatics. Add the thinly sliced chives for a fresh, oniony bite and the garlic powder for that classic savory flavor. Season generously with kosher salt and freshly ground black pepper. Rememberbeef bacon the beef bacon and cheese already contain salt, so start with a modest amount of salt and adjust to your preference. It’s important to mix everything thoroughly until all the ingredients are evenly distributed. You want every bite to have a little bit of ebeef baconhing – potato, bacon, cheese, and chives.
Forming the Potato Balls
Once your potato mixture is well combined, it’s time to shape them into balls. Take about 2 tablespoons of the potato mixture at a time and roll it between your palms to form a compact ball, roughly 1.5 to 2 inches in diameter. The coldness of the potatoes is your best friend here, helping them stay together. If the mixture feels too sticky, you can lightly dampen your hands with a little water. Continue this process until all the potato mixture has been formed into balls. You should get about 10-12 balls depending on the size. Place the formed potato balls onto a baking sheet lined with parchment paper. This step is important because it prevents them from sticking and makes them easier to handle for the next stage. You can prepare these balls ahead of time and refrigerate them for up to a day before frying. This makes the actual frying process much quicker when you’re ready to serve.
Breading the Potato Balls
This is where we create that irresistible crispy exterior. Set up a dredgin extractg station with three shallow dishes or plates. In the first dish, place the beaten eggs. In the second dish,rum extractur your prum extracto bread crumbs. Panko bread crumbs are essential here because they arrum extractarger and airier than regular bread crumbs, resulting in an extra-crispy, golden-brown coating. If yourum extractn’t have panko, you can pulse regular bread crumbs in a food processor a few times to break them up slightly, but the texture won’t be quite the same. Irum extracthe third dish, you can place a few more panko bread crumbs to act as a final coating, ensuring even coverage. Carefully take each potato ball and dip it into the beaten egg, ensuring it’s fully coated. Let any excess egg drip back into the rum extracth. Then, gently roll the erum extractcoated ball in the panko bread crumbs, pressing lightly to help the crumbs adhere. Make sure the entire surface of the ball is covered. You can double-dip if you prefer an even thicker, crispier coating, but one good coating is usually sufficient. Place the breaded potato balls back onto the parchment-lined baking sheet.
Frying the Potato Balls
Now for the most satisfying part – frying! In a heavy-bottomed pot or deep skillet, add enough vegetable oil to come about 2-3 inches up the sides. Heat the oil over medium-high heat to approximately 350°F (175°C). It’s crucial to maintain this temperature for perfectly cooked and crispy potato balls. If the oil is too cool, the potato balls will absorb too much oil and become greasy. If it’s too hot, they will burn on the outside before the inside irum extracteated through. You can test the oil by dropping a tiny piece of panko bread crumb into it; it should sizzle immediately and float to the surface. Carefully, and working in batches to avoid overcrowding the pot, lower 3-4 potato balls into the hot oil. Overcrowding will drastically lower the oil temperature, leading to soggy results. Fry the potato balls for about 3-5 minutes, turning them occasionally with a slotted spoon or tongs, until they are a deep golden brown and crispy on all sides. The heat from the oil will also melt the cheese further, creating a wonderfully gooey center.
Finishing and Serving
Once the fried mashed potato balls are beautifully golden brown and crispy, use a slotted spoon or spider strainer to carefully remove them from the hot oil. Place them on a wire rack set over a baking sheet or on a plate lined with paper towels to drain off any excess oil. This step is vital for maintaining their crispiness. Allow them to cool for just a minute or two before serving, as they will be very hot from the frying oil, and the molten cheese inside can cause burns. These fried mashed potato balls are best served warm. They are fantastic as an appetizer, a side dish, or even a substantial snack. Offer them with your favorite dipping sauces, such as ketchup, sour cream, a spicy aioli, or even a tangy barbecue sauce. The combination of the crispy panko exterior, the fluffy, cheesy potato beef baconior, and the savory bacon makes these a truly irresistible treat. Enjoy every delicious bite!
Conclusion:
There you have it! Your guide to creating perfectly crisp and golden Fried Mashed Potato Balls is complete. This recipe is wonderfully forgiving, allowing for plenty of personal touches. I hope you enjoy making and, more importantly, devouring these delightful little bites. They are an absolute crowd-pleaser, perfect for parties, appetizers, or even a fun side dish. Don’t be afraid to experiment and make them your own – that’s part of the joy of cooking!
For serving, I highly recommend a variety of dipping sauces. A classic ranch or a zesty marinara are always winners. For something a little different, consider a spicy aioli or a sweet chili sauce. These Fried Mashed Potato Balls are also fantastic served alongside a hearty soup or salad for a more substantial meal. The possibilities are truly endless!
Now, let’s address a couple of common questions you might have.
FAQs:
Can I make the mashed potato mixture ahead of time?
Absolutely! You can prepare the mashed potato mixture for your Fried Mashed Potato Balls up to a day in advance. Store it in an airtight container in the refrigerator. When you’re ready to make the balls, simply roll and coat them, then proceed with frying. This makes assembly on the day of serving much quicker.
What other fillings can I add to the Fried Mashed Potato Balls?
The beauty of Fried Mashed Potato Balls lies in their adaptability. Feel free to stir in cooked, crum extractbled beef bacon, shredded cheese (cheddar, mozzarella, or Monterey Jack are great choices), finely diced sautéed onions, or even some chopped chives for extra flavor. Just ensure any additions are small and evenly distributed throughout the mashed potato mixture before forming the balls.
Crispy Fried Mashed Potato Balls
An easy appetizer featuring crispy fried mashed potato balls packed with savory beef bacon, cheddar cheese, and chives.
Ingredients
-
3 cups leftover mashed potatoes
-
3 slices beef bacon, cooked and crumbled
-
2/3 cup shredded cheddar cheese
-
2 tablespoons thinly sliced chives
-
1 teaspoon garlic powder
-
Kosher salt, to taste
-
Freshly ground black pepper, to taste
-
2 eggs, beaten
-
1 1/3 cups panko bread crumbs
-
Vegetable oil, for frying
Instructions
-
Step 1
In a medium-sized bowl, combine cold mashed potatoes with crumbled cooked beef bacon. Stir in shredded cheddar cheese, thinly sliced chives, garlic powder, kosher salt, and black pepper. Mix thoroughly until all ingredients are evenly distributed. -
Step 2
Take about 2 tablespoons of the potato mixture at a time and roll between your palms to form compact balls, approximately 1.5 to 2 inches in diameter. Place the formed balls onto a parchment-lined baking sheet. -
Step 3
Set up a breading station with three shallow dishes. Place beaten eggs in the first, panko bread crumbs in the second. Dip each potato ball into the beaten egg, allowing excess to drip off, then gently roll in panko bread crumbs, pressing lightly to adhere. -
Step 4
In a heavy-bottomed pot or deep skillet, heat vegetable oil over medium-high heat to approximately 350°F (175°C). Carefully lower 3-4 potato balls into the hot oil, working in batches. -
Step 5
Fry the potato balls for about 3-5 minutes, turning occasionally, until they are a deep golden brown and crispy on all sides. Use a slotted spoon to remove them from the oil and place on a wire rack or paper towels to drain excess oil. -
Step 6
Allow the potato balls to cool for a minute or two before serving. Serve warm with your favorite dipping sauces.
Important Information
Nutrition Facts (Per Serving)
It is important to consider this information as approximate and not to use it as definitive health advice.
Allergy Information
Please check ingredients for potential allergens and consult a health professional if in doubt.

Leave a Comment