
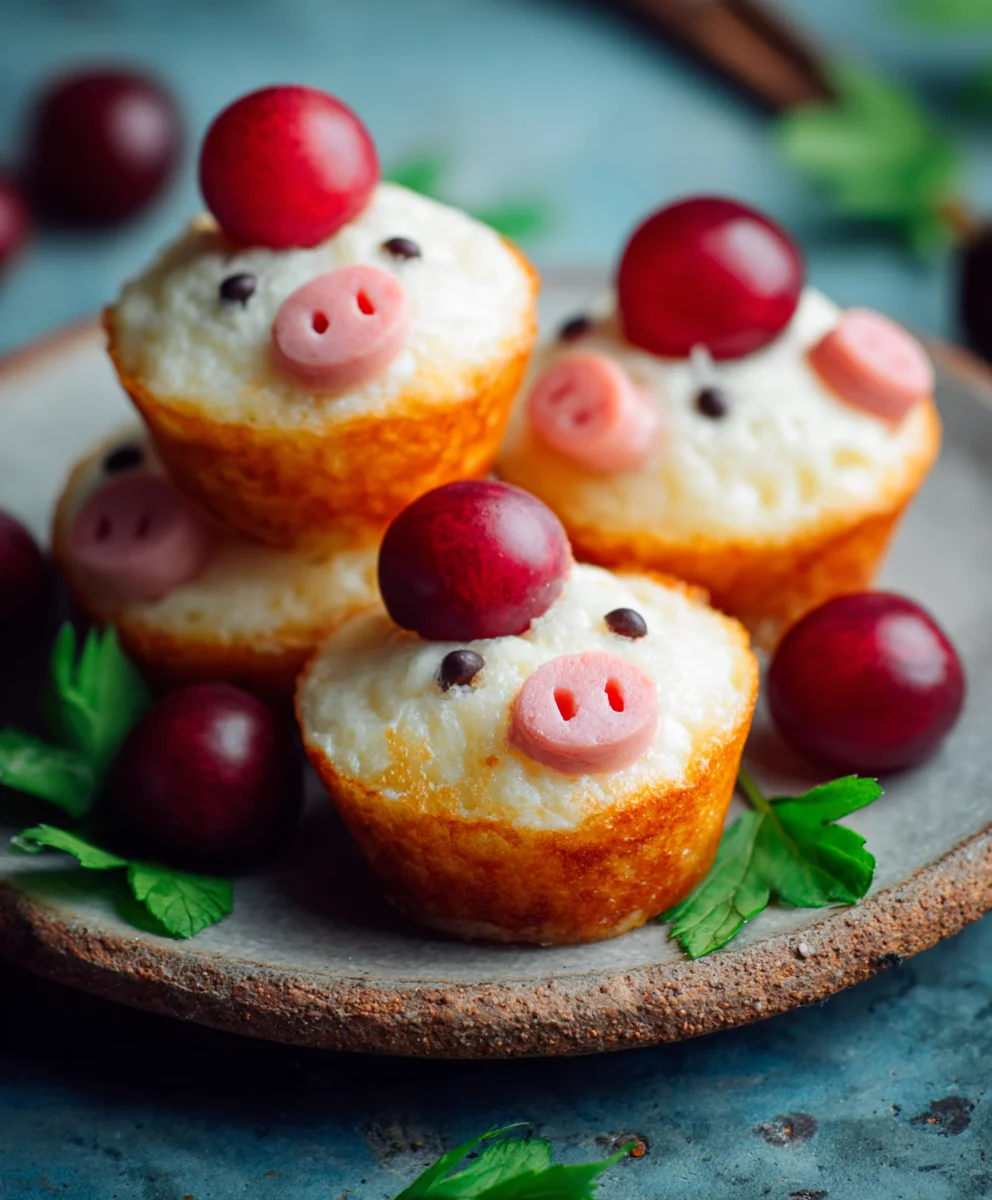
Cute food ideas are more than just a fleeting trend; they’re a delightful way to inject a little extra joy into everyday meals and special occasions. Whether you’re packing a lunchbox for a picky eater, planning a whimsical birthday party, or simply looking to brighten up your own snack time, adorable edible creations are guaranteed to bring smiles. We’ve all seen those pictures online that make us gasp, “Oh, how cute!” and inspired us to try our hand at crafting something equally charming. What truly makes these cute food ideas so beloved is their ability to transform simple ingredients into miniature works of art that are as fun to look at as they are to eat. They tap into our inner child and our desire for playful expression, making the act of eating an adventure. Get ready to discover how easy it can be to create these charming bites that will undoubtedly be the star of any table.

Ingredients:
- 1 cup all-purpose flour
- 1 teaspoon baking powder
- 1/2 teaspoon salt
- 2 tablespoons granulated sugar
- 1 large egg
- 1 cup milk
- 2 tablespoons unsalted butter, melted, plus more for greasing
- 1/2 teaspoon vanilla extract
- Food coloring (pink, yellow, blue, green)
- Piping bags or ziplock bags with the corner snipped off
- Optional: Sprinkles, edible glitter, powdered sugar for dusting
Making the Batter
To begin extract creating these adorable little treats, gather all your ingredients and make sure they are at room temperature, especially the egg and milk. This helps everything combine smoothly. In a medium-sized bowl, whisk together the dry ingredients: the all-purpose flour, baking powder, salt, and granulated sugar. Make sure these are well combined before moving on to the wet ingredients. This ensures that the leavening agents and salt are evenly distributed throughout the batter, which is key for consistent results.
In a separate bowl, whisk the large egg until it’s lightly beaten. Then, gradually whisk in the milk and the melted unsalted butter. It’s important that the butter is melted but not hot, as we don’t want to cook the egg. Finally, stir in the vanilla extract. Vanilla extract adds a wonderful aroma and flavor that complements the sweetness of the batter, making these little bites even more delightful.
Now, it’s time to combine the wet and dry ingredients. Pour the wet ingredients into the bowl with the dry ingredients. Whisk them together until just combined. It’s very important not to overmix the batter. A few small lumps are perfectly fine and actually preferable, as overmixing can lead to tough pancakes or waffles. We are aiming for a smooth, but not perfectly smooth, consistency.
Creating the Cute Colors
This is where the magic happens and we inject some fun into our batter, transforming it into an exciting canvas for cute food ideas. Divide the batter evenly into as many bowls as you have food coloring colors. For example, if you have pink, yellow, blue, and green food coloring, you’ll need four separate bowls. Add a few drops of your chosen food coloring to each bowl. Start with a small amount of coloring and add more as needed to achieve your desired vibrant shades. Remember that the color will deepen slightly as it bakes.
Gently stir the food coloring into each portion of batter until the color is uniform. Be careful not to overmix, especially after adding the color. Once you have your beautifully colored batters, carefully spoon each color into its own piping bag. If you don’t have piping bags, you can use sturdy ziplock bags and snip off a small corner. This allows for precise and controlled pouring of the batter, which is essential for creating defined shapes and patterns.
The Art of the Cute Design
Now for the most creative part! We’ll use a lightly greased non-stick pan or a griddle heated over medium-low heat. You want the heat to be consistent and not too high, as this can cause the delicate shapes to burn before they cook through.
For the first step of designing, start by pouring or piping a base layer of one color onto the hot pan. Think of this as the foundation of your cute creation. You can make simple circles, small blobs, or even try to form a rough shape like a heart or a star with the base color. Don’t worry about perfection at this stage; it’s more about getting some batter down to build upon.
Once you have your base color laid down, and while the batter is still wet, use a different colored batter in a piping bag or ziplock bag to add details. For example, if your base is pink, you could pipe small yellow dots on top, or draw a simple swirl with blue. You can also pipe tiny lines to create patterns, or even try to draw simple faces with two small dots for eyes and a curved line for a smile. This layering technique allows the colors to meld slightly as they cook, creating a beautiful marbled or patterned effect.
The key here is to work relatively quickly while the batter is still liquid so that the colors adhere to each other. If you wait too long, the first layer might start to set, and your piped designs won’t blend as nicely. Continue to add shapes and details with your different colored batters until you are happy with your cute food creations. You can make flowers, little animals, or abstract patterns – the possibilities are endless!
Cooking Your Cute Creations
Once you have your designs in place, let the batter cook undisturbed for about 2 to 3 minutes, or until you start to see small bubbles forming on the surface and the gin extractes begin to look set. This is your cue to carefully flip them. Using a thin, flexible spatula, gently slide it underneath each design and flip it over to cook the other side. Be extra careful when flipping, especially with more intricate designs, to avoid them falling apart.
Cook the second side for another 1 to 2 minutes, or until golden brown and cooked through. The total cooking time will vary depending on the size and thickness of your creations. To check if they are done, you can gently press the center. If it springs back, they are likely cooked. Remove them from the pan and place them on a plate.
Finishing Touches and Presentation
As your cute food creations cool slightly, you can add some final decorative touches to elevate them even further. If you like, you can dust them lightly with powdered sugar for a snowy effect. For extra sparkle, a sprinkle of edible glitter can add a touch of magic. You can also add sprinkles directly onto the batter while it’s still wet on the pan, or use a small amount of icing to attach them after cooking.
Arrange your colorful and whimsical creations on a serving plate. These are perfect for a fun breakfast, a delightful snack, or even a charming addition to a party spread. Their small size and vibrant colors make them incredibly appealing to both children and adults alike, showcasing justgin extractw fun and imaginative “cute food ideas” can be.
Conclusion:
I hope you’ve enjoyed exploring these delightful Cute Food Ideas! This collection is designed to bring a smile to any meal, whether it’s for a special occasion, a picky eater, or simply to add a touch of fun to your everyday cooking. Remember, the beauty of these ideas lies in their adaptability. Don’t be afraid to experiment with different shapes, colors, and flavor combinations to make them your own.
For serving, these Cute Food Ideas are perfect as appetizers, main dishes, or even fun desserts. They pair wonderfully with simple sides like steamed vegetables, a fresh salad, or a bowl of plain rice. Consider them for birthday parties, picnics, or a “just because” surprise for your loved ones. You can easily adapt these concepts to suit various dietary needs – think gluten-free crackers for the “animals” or vegan cheese for the “faces.”
The possibilities for variations are endless. Use cookie cutters in different shapes for sandwiches or fruit slices. Decorate with edible markers for intricate details. Even simple additions like a sprinkle of sesame seeds for eyes or a dash of paprika for rosy cheeks can elevate the cuteness factor.
The most important ingredient is your creativity and willingness to have fun in the kitchen. So go ahead, get inspired, and start creating some truly adorable and delicious food!
Frequently Asked Questions about Cute Food Ideas:
Q1: How can I make these cute food ideas appealing to picky eaters?
To appeal to picky eaters, focus on familiar flavors and textures while presenting them in a fun, engagin extractg way. For example, if a child dislikes vegetables, you can finely chop them and hide them within a “smiley face” omelet or embed them in “fruit skewers” with their favorite fruits. The novelty of the presentation can often encourage them to try something they might otherwise refuse. Using cookie cutters for sandwiches and fruits in fun shapes is also a great strategy.
Q2: Are these cute food ideas time-consuming to prepare?
While some elaborate designs might take a bit more time, many of these Cute Food Ideas are surprisingly quick and easy to assemble. Simple ideas like fruit skewers or “ladybug” crackers can be made in minutes. For more involved creations, consider prepping some elements in advance, such as cutting out shapes or making dips. The key is to choose ideas that fit your available time and skill level.

Cute Food Ideas- Fun & Easy Recipes
Create adorable and colorful edible designs with this fun and easy recipe. Perfect for adding a touch of magic to breakfast, snacks, or parties.
Ingredients
-
1 cup all-purpose flour
-
1 teaspoon baking powder
-
1/2 teaspoon salt
-
2 tablespoons granulated sugar
-
1 large egg
-
1 cup milk
-
2 tablespoons unsalted butter, melted, plus more for greasing
-
1/2 teaspoon vanilla extract
-
Food coloring (pink, yellow, blue, green)
-
Optional: Sprinkles, edible glitter, powdered sugar for dusting
Instructions
-
Step 1
Combine dry ingredients: In a medium bowl, whisk together flour, baking powder, salt, and sugar. In a separate bowl, whisk the egg, then gradually whisk in milk, melted butter, and vanilla extract. Pour wet into dry ingredients and whisk until just combined. Do not overmix. -
Step 2
Divide batter evenly into separate bowls based on the number of food coloring colors you have. Add a few drops of each food coloring to its respective bowl and gently stir until uniform. Avoid overmixing. -
Step 3
Spoon each colored batter into a separate piping bag or ziplock bag with the corner snipped off. Heat a lightly greased non-stick pan or griddle over medium-low heat. -
Step 4
Pour or pipe a base layer of one color onto the hot pan. While the batter is still wet, use a different colored batter to pipe details, patterns, or simple designs on top. Work quickly so the colors meld. -
Step 5
Cook for 2-3 minutes until small bubbles appear and edges look set. Carefully flip with a spatula and cook the other side for 1-2 minutes until golden brown and cooked through. Remove from pan. -
Step 6
Let creations cool slightly. Dust with powdered sugar, add edible glitter, or sprinkles for finishing touches. Arrange on a serving plate.
Important Information
Nutrition Facts (Per Serving)
It is important to consider this information as approximate and not to use it as definitive health advice.
Allergy Information
Please check ingredients for potential allergens and consult a health professional if in doubt.
Leave a Comment