
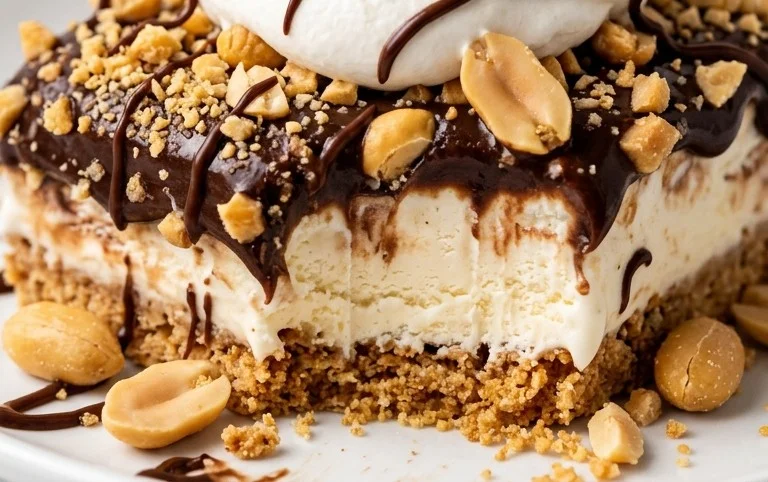
Buster Bar Ice Cream Dessert is more than just a treat; it’s a nostalgic journey back to simpler times, a delightful explosion of textures and flavors that has captured hearts for generations. Remember those irresistible frozen bars from your childhood, the ones with the satisfying crunch and creamy center? Well, get ready to recreate that magic right in your own kitchen! This Buster Bar Ice Cream Dessert isn’t just a dessert; it’s an experience. It’s the perfect balance of rich chocolate, smooth ice cream, and a delightful nutty crunch that makes every bite a moment of pure bliss. What makes this particular rendition so special is its accessibility – no fancy equipment needed, just simple ingredients and a whole lot of love. It’s the ultimate crowd-pleaser, guaranteed to bring smiles and satisfied sighs to everyone who tries it.
Why You’ll Love This Buster Bar Ice Cream Dessert:
It’s Easy to Make and Even Easier to Devour!

Buster Bar Ice Cream Dessert
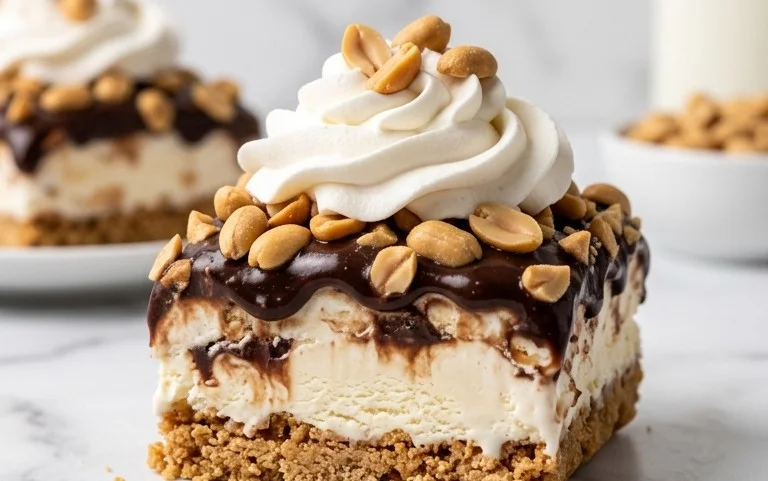
Get ready to create a truly spectacular frozen treat that’s sure to bring smiles all around! This Buster Bar Ice Cream Dessert is inspired by those classic chocolate-covered, peanut-studded ice cream bars, but we’re making a whole pan of it, perfect for sharing (or not – we won’t judge!). It’s a delightful combination of crunchy cookie crust, creamy ice cream, and a rich chocolatey topping that’s simply irresistible. Best of all, it’s surprisingly easy to assemble, making it a fantastic dessert for gatherings, holidays, or just a special weeknight indulgence. Let’s dive in and create some frozen magic!
Ingredients:
Making the Crust
The foundation of our delicious dessert is a crunchy, chocolatey crust made from crushed Oreo cookies. This step is super simple and sets the stage for all the delicious layers to come.
1. First, let’s get those Oreo cookies into fine crum extractbs. You can do this by placing them in a food processor and pulsing until you have a fine, sand-like texture. If you don’t have a food processor, no worries! Just place the cookies in a sturdy zip-top bag, seal it well, and then go to town with a rolling pin or a heavy can. Aim for a consistent crum extractb, as this will ensure a well-formed crust. Once crushed, pour the cookie crum extractbs into a medium-sized mixing bowl.
2. Next, we’ll melt our first portion of butter. A quick trip to the microwave, in 30-second increments, stirring in between, will do the trick. Once fully melted, pour this liquid gold over the crushed Oreo crum extractbs. Now, grab a spoon or a spatula and mix everything together until the crum extractbs are evenly moistened and clump together when you press them. This is your crust mixture!
3. Prepare a 9×13 inch baking dish by lining it with parchment paper, leaving some overhang on the sides. This will make it incredibly easy to lift the entire dessert out later for slicing. Pour the moistened Oreo crum extractb mixture into the prepared baking dish. Using the bottom of a measuring cup or a flat-bottomed glass, press the crum extractbs down firmly and evenly across the entire bottom of the dish. This is important to create a solid, sturdy base for your ice cream. You want a nice, compact layer. Once pressed, place this dish in the freezer for about 15-20 minutes to let the crust set up while you prepare the next layer.
Layering the Ice Cream and Peanuts
Now for the star of the show – the creamy vanilla ice cream and the irresistible crunch of peanuts!
4. It’s time to bring our softened vanilla ice cream into play. Ensure your ice cream is soft enough to spread but not completely melted and soupy. If it’s too hard, let it sit out on the counter for a bit longer. Scoop the softened ice cream directly onto the chilled Oreo crust. Using an offset spatula or the back of a spoon, spread the ice cream out evenly over the crust, reaching all the corners. Try to get a smooth, even layer for the best texture.
5. Now, let’s add that delightful peanut crunch! Generously sprinkle the Spanish peanuts evenly over the top of the softened vanilla ice cream. You want a good distribution so that every bite gets that satisfying nutty flavor and texture. Gently press the peanuts into the ice cream just a little bit to help them adhere. At this point, pop the entire dish back into the freezer. We want this layer to firm up nicely before we add our chocolate topping. Let it freeze for at least an hour, or until the ice cream is quite firm.
Crafting the Chocolate Topping
The final touch that brings it all together is a rich, decadent chocolate topping. This homemade magic is surprisingly simple!
Making the Chocolate Ganache
6. While our ice cream layer is firming up in the freezer, let’s prepare the glorious chocolate topping. In a medium, microwave-safe bowl, combine the 12 oz of semi-sweet chocolate chips, the remaining 1/2 cup of butter, and the 12 oz of evaporated milk. Place this bowl in the microwave and heat in 30-second increments, stirring thoroughly after each interval. Continue this process until the chocolate is completely melted and the mixture is smooth and glossy. Be careful not to overheat, as this can cause the chocolate to seize. Once smooth, stir in the 2 cups of powdered confectioner’s sugar. Whisk until the sugar is fully incorporated and you have a thick, luscious chocolate sauce.
7. Once the ice cream layer is firmly frozen, it’s time to pour on the magic! Remove the baking dish from the freezer. Give the chocolate topping a final quick stir to ensure it’s smooth. Carefully pour the warm chocolate mixture evenly over the frozen ice cream layer. Use an offset spatula to spread it out to the edges, ensuring a complete and beautiful chocolate coating.
Freezing and Serving
The final steps are all about letting everything set and then enjoying the fruits of your labor!
8. Now, the hardest part – waiting! Place the dessert back into the freezer and let it freeze until the chocolate topping is completely firm. This will take at least 4-6 hours, but overnight is even better for optimal firmness. Once fully frozen, use the parchment paper overhang to carefully lift the entire Buster Bar Ice Cream Dessert out of the baking dish. Place it on a cutting board.
9. To serve, you’ll want to let it sit at room temperature for about 5-10 minutes to slightly soften the chocolate and make slicing easier. Use a sharp knife dipped in hot water and wiped dry for each cut to get clean slices. You can cut it into squares, bars, or whatever shape your heart desires. Prepare for an explosion of flavor and texture with every bite of this incredible homemade Buster Bar Ice Cream Dessert! Enjoy!
Conclusion:
And there you have it – the ultimate guide to creating your very own Buster Bar Ice Cream Dessert at home! I truly believe this recipe is a winner because it strikes that perfect balance of nostalgic flavor with a straightforward preparation. The combination of creamy ice cream, crunchy chocolate coating, and that signature peanutty chew is simply irresistible. It’s a fantastic dessert for potlucks, family gatherings, or simply as a special treat for yourself after a long day.
I love serving this Buster Bar Ice Cream Dessert chilled, allowing the chocolate to set up beautifully. For an extra touch, consider a drizzle of hot fudge or some whipped cream on the side. Don’t be afraid to get creative with variations too! You can swap out the ice cream flavors for something more adventurous, like mint chocolate chip or cookie dough. Adding a layer of caramel sauce before the chocolate coating can also elevate this already amazing dessert. I wholeheartedly encourage you to give this recipe a try. It’s incredibly rewarding to recreate such a beloved treat in your own kitchen, and the results are always met with rave reviews!
Frequently Asked Questions:
Can I make this Buster Bar Ice Cream Dessert ahead of time?
Absolutely! This dessert is perfect for making in advance. Once you’ve assembled and frozen them, you can store them individually wrapped in the freezer for up to two weeks. Just be sure to let them sit at room temperature for a few minutes before serving to soften slightly.
What kind of ice cream is best for this recipe?
While a good quality vanilla ice cream is classic and works wonderfully, feel free to experiment! Any dense, creamy ice cream will work. Some popular choices include chocolate, strawberry, or even a peanut butter swirl ice cream for an extra peanutty kick.
How do I get a smooth, even chocolate coating?
The key to a smooth coating is ensuring your chocolate mixture isn’t too thick. If it seems too stiff, you can stir in a tablespoon of melted coconut oil or vegetable oil at a time until it reaches a pourable consistency. Dip the frozen ice cream bars quickly and let any excess drip off before placing them back on the parchment paper.
Buster Bar Ice Cream Dessert
A no-bake ice cream dessert featuring a chocolate cookie crust, creamy vanilla ice cream, and a rich chocolate peanut topping.
Ingredients
-
1 14.3 oz pkg. of Oreo cookies, crushed
-
1/2 C butter, melted
-
1/2 gal. vanilla ice cream, softened
-
1 lb. Spanish peanuts
-
2 C powdered confectioner’s sugar
-
12 oz semi sweet chocolate chips
-
1/2 C butter
-
12 oz evaporated milk
Instructions
-
Step 1
Combine crushed Oreo cookies and 1/2 C melted butter. Press firmly into the bottom of a 9×13 inch pan to form a crust. -
Step 2
Spread the softened vanilla ice cream evenly over the cookie crust. -
Step 3
In a saucepan, melt 1/2 C butter over low heat. Stir in chocolate chips and evaporated milk until smooth and melted. Remove from heat. -
Step 4
Whisk in the powdered confectioner’s sugar into the chocolate mixture until smooth. Stir in the Spanish peanuts. -
Step 5
Pour the peanut chocolate topping over the ice cream layer, spreading it evenly. -
Step 6
Freeze for at least 4 hours, or until firm. Cut into squares and serve.
Important Information
Nutrition Facts (Per Serving)
It is important to consider this information as approximate and not to use it as definitive health advice.
Allergy Information
Please check ingredients for potential allergens and consult a health professional if in doubt.
Leave a Comment