
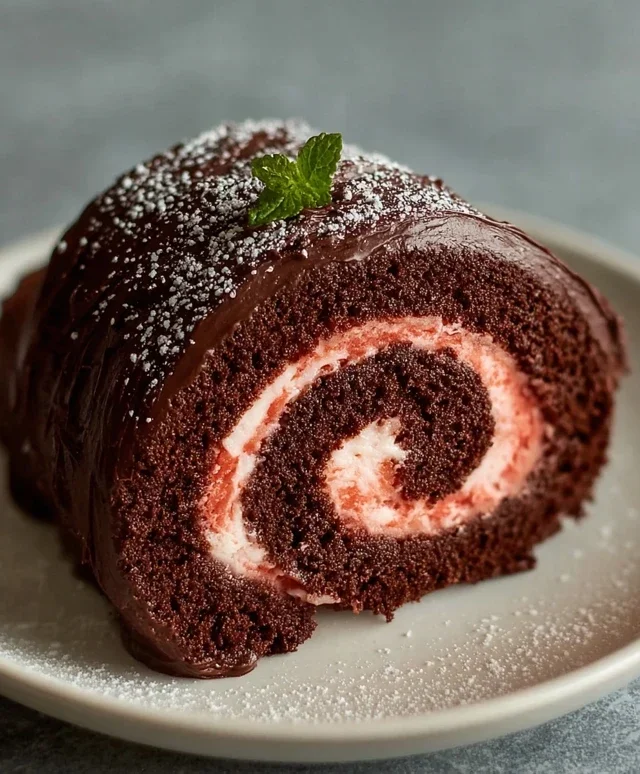
Easy Chocolate Swiss Roll recipes are a delightful gateway into impressive-looking desserts that taste even better than they appear. Have you ever dreamt of creating a show-stopping dessert that’s surprisingly simple to master? That’s exactly what this Easy Chocolate Swiss Roll delivers! There’s something undeniably magical about a perfectly rolled cake, infused with rich chocolate flavor, and swirled with a luscious cream filling. It’s a dessert that evokes childhood nostalgia, special occasions, and pure indulgence all at once. What truly makes this Easy Chocolate Swiss Roll special is its approachable nature. Forget intimidating pastry techniques; this recipe breaks down each step, ensuring that even novice bakers can achieve a beautifully swirled, moist, and utterly delicious result. Get ready to impress yourself and everyone you share it with!

Easy Chocolate Swiss Roll
Let’s whip up a delightful and surprisingly easy Chocolate Swiss Roll! This recipe uses wholesome ingredients and creates a wonderfully light and moist sponge that’s perfect for any occasion. Whether you’re a seasoned baker or new to the kitchen, this guide will walk you through creating a show-stopping dessert that tastes as good as it looks. We’re going for a rich chocolate flavor that pairs beautifully with a creamy filling. Get ready to impress yourself and your loved ones!
Ingredients:
Preparing the Chocolate Sponge
The foundation of our Swiss Roll is a light and airy chocolate sponge. The combination of oat and cassava flour creates a tender texture, while the cocoa powder delivers that deep chocolatey goodness. Aquafaba, the liquid from a can of chickpeas, is our secret ingredient for achieving a fantastic rise and lightness, mimicking the effect of egg whites.
1. Preheat your oven to 180°C (350°F). Grease and line a 10×15 inch jelly roll pan with parchment paper, ensuring the parchment extends slightly up the sides for easy lifting. This step is crucial for preventing sticking and ensuring your sponge lifts out cleanly. Dust the parchment paper lightly with cocoa powder, then tap out any excess. This not only helps with releasing the cake but also adds a subtle, attractive finish to the bottom of the cake when it’s rolled.
2. In a medium bowl, whisk together the oat flour, cassava flour, 30g of cocoa powder, arrowroot starch, baking powder, and baking soda. Ensure all the dry ingredients are thoroughly combined to distribute the leavening agents evenly. This will help your sponge rise beautifully and consistently.
3. In a separate large bowl, whisk the aquafaba until it becomes frothy. Gradually add 100g of the granulated sugar (or coconut sugar) a tablespoon at a time, continuing to whisk until stiff, glossy peaks form, similar to meringue. This might take several minutes. The sugar dissolves and stabilizes the aquafaba foam, giving our sponge its incredible lightness. Don’t rush this step!
4. Gently fold the dry ingredients into the aquafaba mixture in two additions. Be careful not to overmix; you want to preserve as much air as possible. Then, gently fold in the unsweetened applesauce and dairy-free yogurt until just combined. The batter will be thick but should still be pourable.
5. Pour the batter into the prepared jelly roll pan and spread it evenly with a spatula. Bake for 12-15 minutes, or until a toothpick inserted into the center comes out clean. The cake should spring back lightly when touched. Be mindful not to overbake, as this can make the sponge brittle and difficult to roll.
6. While the cake is baking, lay a clean tea towel flat on your counter and generously dust it with the 2 tbsp of cocoa powder. Once the cake is out of the oven, immediately invert the hot cake onto the prepared, dusted tea towel. Carefully peel off the parchment paper. While the cake is still warm, and using the tea towel as a guide, tightly roll up the sponge from one of the shorter ends. Let it cool completely in this rolled shape on a wire rack. This “pre-rolling” while warm is the key to preventing cracks when you eventually unroll and re-roll it with the filling.
Crafting the Creamy Filling
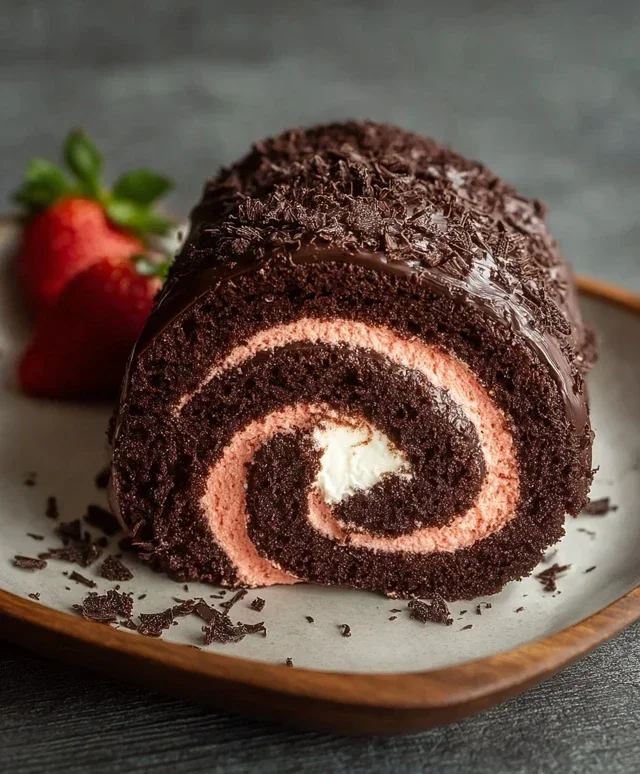
A delicious filling is essential for any Swiss Roll. We’re making a rich, dairy-free buttercream infused with the vibrant flavor of freeze-dried strawberries. The freeze-dried strawberries add a concentrated fruity punch and a beautiful pink hue without adding excess moisture that could make the roll soggy.
1. In a large bowl, cream together the room temperature vegan butter until light and fluffy. This is best done with an electric mixer. Gradually beat in the remaining 100g of granulated sugar (or coconut sugar) until well combined and the mixture is smooth.
2. Add the coconut fat from the can of full-fat coconut cream. It’s important to use only the solid white cream that has solidified at the top of the can, leaving the watery liquid behind. Beat this into the butter mixture until you have a smooth and creamy frosting.
3. Stir in the pulsed freeze-dried strawberries until evenly distributed. This will give your frosting a delightful flavor and a pretty pink color. Taste and adjust sweetness if necessary.
Assembly and Finishing Touches
Now comes the exciting part – assembling our masterpiece!
1. Once the chocolate sponge is completely cool, carefully unroll it. Spread the strawberry filling evenly over the surface of the sponge, leaving about a 1/2 inch border along the edges. You want a generous layer of filling, but not so much that it oozes out excessively when rolled.
2. Carefully re-roll the sponge, this time more tightly, using the tea towel to help guide it. Place the rolled Swiss Roll seam-side down on a serving platter.
3. If you’d like a more decorative finish, you can whip up a simple glaze with some powdered sugar and a splash of milk, or just dust the top with more cocoa powder and the pulsed freeze-dried strawberries. Garnish with the fresh sliced strawberries.
4. Chill the Chocolate Swiss Roll in the refrigerator for at least 30 minutes before slicing. This allows the filling to set and makes it easier to get clean slices. Enjoy this delightful, homemade treat!
Conclusion:
And there you have it! This Easy Chocolate Swiss Roll recipe truly delivers on its promise of a decadent yet approachable dessert. We’ve demystified the process, showing you that achieving those beautiful swirls and moist cake layers is well within your reach, even for begin extractners. The rich chocolate sponge, combined with a creamy filling, makes for a delightful treat that’s perfect for any occasion. Whether you’re celebrating a birthday, hosting a gathering, or simply craving something sweet, this Swiss roll is sure to impress. Don’t be intimidated by its elegant appearance; this recipe is designed for success!
Get creative with your serving! A dusting of powdered sugar or a drizzle of chocolate ganache elevates its presentation. For variations, consider adding a splash of coffee liqueur extract to the batter or swirling a raspberry coulis into your filling for a fruity twist. I genuinely encourage you to give this Easy Chocolate Swiss Roll a try. It’s a rewarding baking experience that results in a showstopper dessert with minimal fuss. Happy baking!
Frequently Asked Questions:
Why is my Swiss roll cracking when I roll it?
Cracking often happens when the cake is rolled while too warm or if it’s overbaked, making it brittle. Ensure your cake has cooled sufficiently before attempting to roll it. Rolling it up in the parchment paper it baked in can also provide extra support and help prevent cracks. Don’t fret too much if minor cracks appear; the filling and frosting will help disguise them.
Can I make the filling richer?
Absolutely! For an even richer chocolatey experience, you can fold in some finely chopped dark chocolate into your whipped cream filling after it’s been whipped to soft peaks. Alternatively, a swirl of chocolate ganache or a layer of chocolate mousse can be used as your filling.
How should I store leftovers?
Leftover Swiss roll can be stored in an airtight container in the refrigerator for up to 3-4 days. It’s best enjoyed chilled or brought to room temperature for a few minutes before serving to allow the flavors and textures to soften slightly.
Easy Chocolate Swiss Roll
A simple and delicious dairy-free and egg-free chocolate Swiss roll recipe using oat flour and aquafaba.
Ingredients
-
135 g oat flour
-
30 g cassava flour
-
30 g cocoa powder
-
1 tbsp arrowroot starch
-
1 1/2 tsp baking powder
-
1/2 tsp baking soda
-
122 mL aquafaba, room temperature
-
200 g organic granulated sugar or coconut sugar, divided
-
100 g unsweetened applesauce, room temperature
-
60 g unsweetened dairy free yogurt, room temperature
-
2 tbsp cocoa powder for dusting the dish towel
-
1 cup sliced strawberries, for garnish
-
226 g vegan butter, room temperature
-
70 g freeze dried strawberries, pulsed into a flour
-
Coconut fat from 1 can full-fat coconut cream
Instructions
-
Step 1
Preheat oven to 180°C (350°F). Line a 25x35cm (10×14 inch) baking pan with parchment paper and lightly grease. Dust a clean kitchen towel with 2 tablespoons of cocoa powder and set aside. -
Step 2
In a large bowl, whisk together oat flour, cassava flour, 30g cocoa powder, arrowroot starch, baking powder, and baking soda. -
Step 3
In a separate bowl, beat aquafaba until foamy. Gradually add 100g of the sugar and continue beating until stiff peaks form, creating a meringue. -
Step 4
Gently fold the applesauce and dairy-free yogurt into the dry ingredients. Then, carefully fold in the aquafaba meringue until just combined, being careful not to deflate the mixture. -
Step 5
Pour the batter into the prepared baking pan and spread evenly. Bake for 12-15 minutes, or until a toothpick inserted into the center comes out clean. Let it cool in the pan for 5 minutes, then invert it onto the prepared, dusted kitchen towel. Carefully peel off the parchment paper and let it cool completely. -
Step 6
While the cake cools, prepare the frosting. Beat the room temperature vegan butter until creamy. Add the remaining 100g sugar, pulsed freeze-dried strawberries, and the coconut cream fat. Beat until smooth and fluffy. -
Step 7
Once the cake is completely cool, spread the frosting evenly over the surface. Starting from one of the shorter ends, carefully roll up the cake, using the towel to help guide it. Place the roll seam-side down. -
Step 8
Chill the Swiss roll for at least 30 minutes to set. Garnish with sliced strawberries before serving.
Important Information
Nutrition Facts (Per Serving)
It is important to consider this information as approximate and not to use it as definitive health advice.
Allergy Information
Please check ingredients for potential allergens and consult a health professional if in doubt.


Leave a Comment