
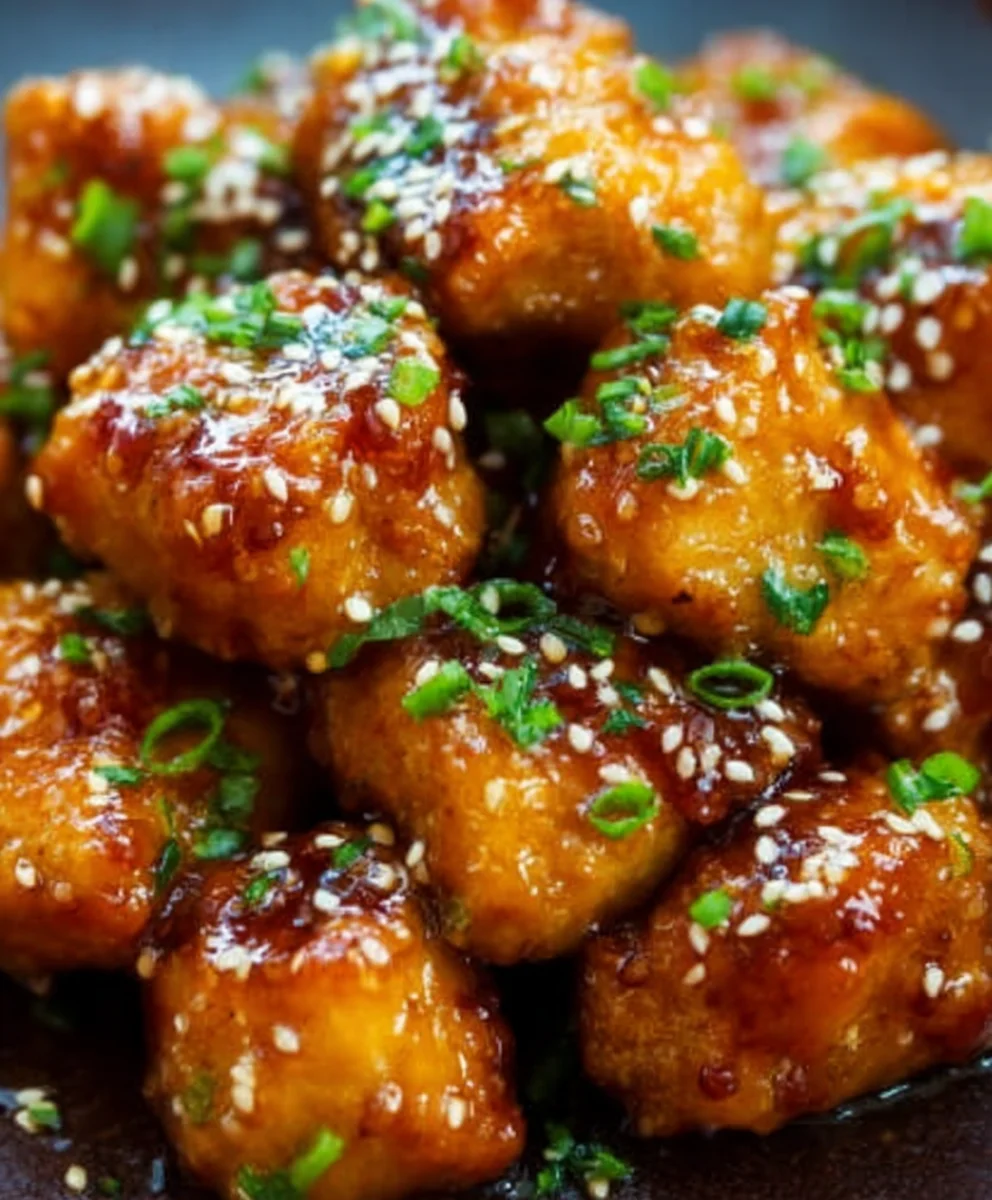
Honey Garlic Chicken is a flavor explosion that has captivated taste buds for generations, and for good reason. It’s that irresistible sweet and savory combination, a delightful dance between sticky, golden honey and pungent, aromatic garlic, that makes this dish an absolute winner. Whether you’re a seasoned home cook or just starting your culinary journey, mastering this classic recipe is incredibly rewarding. The sheer versatility of honey garlic chicken is part of its charm; it’s perfect for a quick weeknight dinner, impressive enough for guests, and even great for meal prep to enjoy throughout the week. What truly sets this particular take on Honey Garlic Chicken apart is its perfect balance – not too sweet, not too garlicky, but a harmonious symphony that coats every succulent piece of chicken, leaving you craving just one more bite. Get ready to impress yourself and everyone you serve this to!

Ingredients:
- 1 1/2 pounds boneless, skinless chicken thighs or breasts, cut into bite-sized pieces
- 2 tablespoons cornstarch
- 2 tablespoons vegetable oil
- 4 garlic cloves, minced
- 1/3 cup honey
- 1/4 cup soy sauce (low sodium recommended)
- 2 tablespoons rice vinegar or apple cider vinegar
- 1 teaspoon sesame oil
- 1/2 teaspoon chili flakes (optional, for heat)
- Sesame seeds and chopped green onions, for garnish
Honey Garlic Chicken Preparation
Coating the Chicken
The first step to achieving that perfect Honey Garlic Chicken is to properly prepare the chicken. Take your bite-sized pieces of chicken and place them in a medium bowl. Sprinkle the 2 tablespoons of cornstarch over the chicken. Now, using your hands or a spoon, toss the chicken until each piece is evenly coated with the cornstarch. This coating is crucial for several reasons: it helps to create a slightly crisp exterior when cooked, and it also helps the delicious Honey Garlic sauce adhere beautifully to the chicken, ensuring every bite is packed with flavor. Don’t skip this step; it’s a game-changer for texture. Ensure there are no dry spots, and that the cornstarch is evenly distributed.
Searing the Chicken
Heat the 2 tablespoons of vegetable oil in a large skillet or wok over medium-high heat. You want the oil to be shimmering, indicating it’s hot enough to sear the chicken. Carefully add the cornstarch-coated chicken pieces to the hot skillet, making sure not to overcrowd the pan. If necessary, cook the chicken in batches to ensure it browns properly. Overcrowding will cause the chicken to steam rather than sear, resulting in a less desirable texture. Allow the chicken to cook undisturbed for about 3-4 minutes per side, until it’s golden brown and cooked through. The cornstarch coating will help create a beautiful crust. Once cooked, remove the chicken from the skillet and set it aside on a plate.
Making the Honey Garlic Sauce
Aromatic Foundation
With the chicken seared and set aside, it’s time to build the irresistible Honey Garlic sauce. In the same skillet you used for the chicken (no need to clean it; the browned bits add flavor!), reduce the heat to medium. Add the 4 minced garlic cloves to the skillet. Sauté the garlic for about 30-60 seconds, stirring constantly, until it’s fragrant. Be careful not to burn the garlic, as this will impart a bitter taste to your sauce. You want it to be just softened and aromatic. If you’re using chili flakes for a touch of heat, you can add them at this stage with the garlic to allow their flavor to bloom in the oil.
Building the Sweet and Savory Glaze
Now, it’s time to introduce the liquid components of our sauce. Pour in the 1/3 cup of honey, 1/4 cup of soy sauce, and 2 tablespoons of rice vinegar (or apple cider vinegar if that’s what you have on hand). Stir everything together thoroughly. As the mixture heats up, it will begin extract to bubble and thicken slightly. Allow the sauce to simmer gently for about 2-3 minutes, stirring occasionally. This simmering period is important for allowing the flavors to meld together and for the sauce to reduce just enough to become a beautiful glaze. The honey will caramelize slightly, and the soy sauce will provide that essential savory depth, balanced perfectly by the tang of the vinegar.
Finishing Touches and Coating
Once the sauce has simmered and thickened slightly, stir in the 1 teaspoon of sesame oil. This adds a subtle but distinctive nutty aroma and flavor that complements the other ingredients beautifully. Taste the sauce and adjust seasonings if needed – perhaps a little more honey for sweetness, or a splash more vinegar for brightness. Now, return the seared chicken pieces to the skillet with the sauce. Toss the chicken gently to ensure every piece is thoroughly coated in the glistening Honey Garlic glaze. Let it cook for another minute or two, allowing the chicken to absorb the sauce and the glaze to thicken further around it. The sauce should coat the chicken luxuriously.
Serving Your Honey Garlic Chicken
Garnishing for Presentation and Flavor
Your delicious Honey Garlic Chicken is almost ready to be served! To elevate its appearance and add fresh bursts of flavor, it’s time for the garnishes. Sprinkle a generous amount of toasted sesame seeds over the chicken in the skillet. The nutty crunch of the sesame seeds is a fantastic textural contrast to the tender chicken and sticky sauce. Next, scatter the chopped green onions over the top. Their fresh, slightly pungent bite cuts through the richness of the sauce and adds a vibrant pop of color. These garnishes are more than just for show; they play an important role in the overall sensory experience of the dish.
Serving Suggestions
Serve your Honey Garlic Chicken immediately while it’s hot and the sauce is at its most luscious. This dish pairs wonderfully with steamed white rice, brown rice, or even quinoa to soak up all that incredible sauce. For a more complete meal, consider serving it alongside some lightly steamed broccoli, stir-fried mixed vegetables, or a crisp Asian-inspired slaw. The versatility of this Honey Garlic Chicken makes it a perfect weeknight dinner option that feels special enough for guests. Enjoy the delightful balance of sweet, savory, and garlicky flavors!
Conclusion:
There you have it – a foolproof guide to creating the most delicious Honey Garlic Chicken! We’ve walked through each step, from the perfect marinade to achieving that beautiful glaze, ensuring your dish is a guaranteed hit. This recipe is incredibly versatile, making it ideal for weeknight dinners or even impressing guests. Serve your Honey Garlic Chicken over fluffy steamed rice, alongside crisp steamed broccoli or green beans, or even tucked into warm pita bread for a tasty wrap. Don’t be afraid to get creative! You can easily adapt this recipe by adding a pinch of red pepper flakes for a little heat, tossing in some chopped bell peppers and onions during the last few minutes of cooking, or even substituting chicken thighs for an even richer flavor. We hope you enjoy making and savoring this delightful Honey Garlic Chicken. Happy cooking!
Frequently Asked Questions:
Can I make Honey Garlic Chicken ahead of time?
Yes, you can definitely prepare the marinade and coat the chicken a few hours in advance. For best results, cook the chicken just before serving to ensure it’s perfectly tender and the glaze is still sticky and delicious. You can also reheat cooked Honey Garlic Chicken, though it might lose a tiny bit of its crispness.
What kind of chicken is best for Honey Garlic Chicken?
Boneless, skinless chicken thighs are often preferred for their tenderness and ability to absorb flavor, but boneless, skinless chicken breasts work wonderfully too. Just be mindful of cooking time with breasts to avoid them drying out.
How can I make the sauce thicker?
If your Honey Garlic Chicken sauce isn’t as thick as you’d like, you can create a slurry by mixing a teaspoon of cornstarch with a tablespoon of water. Stir this into the simmering sauce and cook for another minute or two until it thickens.

Easy Honey Garlic Chicken
A flavorful and quick dinner recipe for Honey Garlic Chicken, featuring tender chicken coated in a sweet and savory glaze.
Ingredients
-
1 1/2 pounds boneless, skinless chicken thighs or breasts, cut into bite-sized pieces
-
2 tablespoons cornstarch
-
2 tablespoons vegetable oil
-
4 garlic cloves, minced
-
1/3 cup honey
-
1/4 cup soy sauce (low sodium recommended)
-
2 tablespoons rice vinegar
-
1 teaspoon sesame oil
-
1/2 teaspoon chili flakes (optional)
-
Sesame seeds for garnish
-
Chopped green onions for garnish
Instructions
-
Step 1
In a medium bowl, toss the bite-sized chicken pieces with 2 tablespoons of cornstarch until evenly coated. This helps create a crisp exterior and allows the sauce to adhere. -
Step 2
Heat 2 tablespoons of vegetable oil in a large skillet or wok over medium-high heat. Add the cornstarch-coated chicken in batches and sear until golden brown and cooked through, about 3-4 minutes per side. Remove chicken and set aside. -
Step 3
Reduce skillet heat to medium. Add the minced garlic and sauté for 30-60 seconds until fragrant. Add chili flakes if using. Be careful not to burn the garlic. -
Step 4
Pour in the honey, soy sauce, and rice vinegar. Stir well and simmer for 2-3 minutes, allowing the sauce to thicken into a glaze. -
Step 5
Stir in the sesame oil. Taste and adjust seasonings if necessary. -
Step 6
Return the seared chicken to the skillet and toss to coat thoroughly in the honey garlic glaze. Cook for another 1-2 minutes until the sauce thickens further around the chicken. -
Step 7
Garnish with sesame seeds and chopped green onions before serving hot.
Important Information
Nutrition Facts (Per Serving)
It is important to consider this information as approximate and not to use it as definitive health advice.
Allergy Information
Please check ingredients for potential allergens and consult a health professional if in doubt.
Leave a Comment