
15-min. Easy Japanese Tuna Onigiri is your new best friend when hunger strikes and time is short. I know how it is – that midday slump or late-night craving can hit out of nowhere. You want something delicious, satisfying, and authentically Japanese, but you absolutely don’t have an hour to spare. That’s where this fantastic recipe comes in. Japanese tuna onigiri, those perfectly formed rice balls, are a beloved staple for a reason. They’re incredibly versatile, portable, and offer that comforting umami flavor that just hits the spot.
What makes 15-min. Easy Japanese Tuna Onigiri so special?
It’s the brilliant simplicity! We’re talking about a handful of readily available ingredients coming together to create a mini culinary masterpiece in a flash. The fluffy rice, the savory, seasoned tuna filling, and the optional nori wrap – it’s a symphony of textures and tastes. Whether you’re packing a lunchbox, need a quick snack, or want to impress with minimal effort, this 15-min. easy Japanese tuna onigiri recipe delivers every single time. Get ready to whip up your new go-to!

15-Min. Easy Japanese Tuna Onigiri
Craving a quick, satisfying, and undeniably delicious snack or light meal? Look no further than Japanese Tuna Onigiri! These delightful rice balls are a staple in bento boxes and a popular choice for on-the-go lunches. The beauty of onigiri lies in its simplicity and versatility, and this 15-minute recipe focuses on a classic, crowd-pleasing filling: savory tuna. We’ll be using just a few key ingredients to bring this Japanese comfort food to life. This recipe is perfect for begin extractners, busy weeknights, or even a fun activity to do with family. Let’s get started!
Ingredients:
Preparing Your Rice
The foundation of any good onigiri is the rice. For the best results, I highly recommend using short-grain Japanese rice. This type of rice has a sticky texture that holds its shape beautifully when forming the rice balls. If you are cooking rice fresh for this recipe, aim for about 2 cups of cooked rice. If you have leftover cooked short-grain rice, even better! Ensure it’s cooled slightly so it’s warm and pliable, but not piping hot, which can make it difficult to handle. If your cooked rice is a bit dry, you can lightly dampen your hands with water when forming the balls to help it stick together.
Crafting the Tuna Filling
This is where the flavor truly shines. Open your can of tuna. If you’re using tuna packed in oil, drain off most of the oil, but a little bit of that oil can add extra flavor and moisture to the filling. If you’re using tuna packed in water, drain it thoroughly. Transfer the drained tuna to a small bowl. Add the Japanese mayonnaise. Japanese mayonnaise, like Kewpie, has a richer, tangier flavor than Western-style mayonnaise, which I find makes a big difference in onigiri. However, regular mayonnaise will work perfectly fine if that’s what you have on hand. Mix the tuna and mayonnaise together until well combined. You want a creamy, cohesive mixture. You can also add a pinch of salt here if you like, but taste it first as the mayonnaise and tuna can already be quite seasoned.
Forming the Onigiri
Now for the fun part: shaping! This might seem daunting at first, but it’s quite simple once you get the hang of it.
Step 1: Prepare Your Workspace
Before you start, it’s helpful to have a clean surface. You’ll also want a small bowl of water and perhaps a tiny bit of salt on the side. This is for wetting your hands. Wetting your hands prevents the rice from sticking to them, making the process much smoother. If you like, you can add a tiny pinch of salt to the water and rub your hands in it; this also seasons the outside of the rice ball.
Step 2: Portioning the Rice
Take about half a cup of the cooked rice into your palm. Gently cup your hand and begin extract to shape it into a rough ball or triangle. The key here is to be gentle. Don’t squeeze the life out of the rice; you want it to hold together but still be somewhat fluffy. If the rice is sticking too much, re-wet your hands.
Step 3: Creating the Pocket and Filling
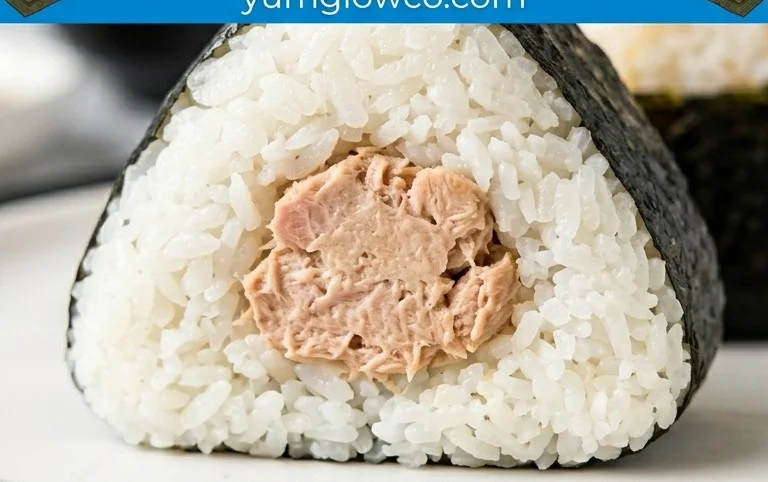
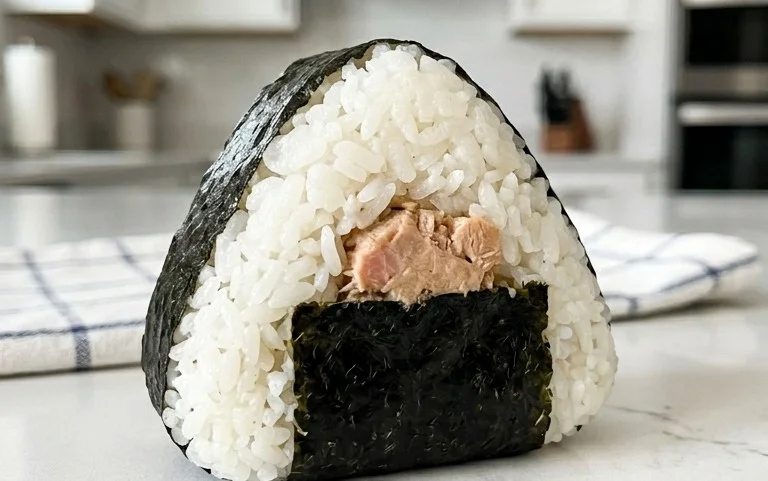
Make a small indentation in the center of the rice ball with your thumb or finger. This is where our delicious tuna filling will go. Spoon about a tablespoon of the tuna-mayo mixture into this indentation. Don’t overfill it, or it will be difficult to close the rice around it.
Step 4: Sealing the Filling
Now, carefully bring the edges of the rice up and around the filling, gently pressing them together to enclose the tuna completely. Continue to shape the onigiri, pressing gently to form your desired shape – a traditional triangle, a round ball, or even a cylinder. Aim for a firm but not dense rice ball. The goal is for it to hold its shape without falling apart.
Step 5: Adding the Nori and Garnishes
This is where your onigiri gets its signature look and a delightful umami boost. If you’re using full sheets of nori, you can cut them into strips to wrap around the base of your onigiri. If you prefer less nori, a half-sheet cut into smaller pieces is perfect. Lightly press the nori strip onto the bottom of your onigiri. If you’re using sesame seeds for garnish, sprinkle them over the top of your onigiri. You can also press a few seeds directly into the surface of the rice before adding the nori.
Enjoy your freshly made, delicious, and incredibly easy 15-minute Japanese Tuna Onigiri! They are best enjoyed fresh, but they also keep well in the refrigerator for a day or two.
Notes:
If you are making fresh rice, cook about 1 cup of uncooked short-grain rice according to package directions, which typically yields around 3 cups of cooked rice. You will only need 2 cups for this recipe, so you’ll have some leftover for other meals. Let the cooked rice cool for about 10-15 minutes before using it to form the onigiri, making it easier to handle.
Conclusion:
And there you have it! Your incredibly quick and delicious Japanese tuna onigiri are ready to be enjoyed. This 15-min. easy Japanese tuna onigiri recipe truly shines with its simplicity, speed, and fantastic flavor. It’s the perfect solution for a busy weeknight dinner, a satisfying lunch, or even a wholesome snack. The combination of fluffy rice, savory tuna, and a hint of seasoning is wonderfully comforting and customizable to your liking.
I love serving these onigiri warm, fresh from preparation, but they are also delightful at room temperature. They make a fantastic addition to a bento box alongside some edamame and pickled gin extractger. For variations, don’t be afraid to experiment! You can add a dash of sriracha for a spicy kick, incorporate finely chopped chives or green onions for freshness, or even mix in a spoonful of Kewpie mayonnaise for extra creaminess. You could also try different seasonings like a pinch of togarashi or a drizzle of soy sauce. I really encourage you to give this recipe a try – I’m confident you’ll be hooked on how effortless yet rewarding it is to make these Japanese tuna onigiri!
Frequently Asked Questions:
Can I make the rice ahead of time?
Absolutely! You can cook your sushi rice ahead of time and let it cool. When you’re ready to make your onigiri, gently warm the rice before shaping it. This will make it more pliable and easier to work with.
What kind of tuna is best for onigiri?
Canned tuna packed in oil or water is perfectly suitable. Drain it well before mixing with your seasonings. Tuna packed in oil tends to be a bit richer in flavor.
How long do these onigiri stay fresh?
For the best texture and flavor, it’s recommended to eat them the same day they are made. If you need to store them, wrap them tightly in plastic wrap and keep them at room temperature for a few hours, or refrigerate for up to a day. Be aware that refrigeration can make the rice a bit firm.
15-min. Easy Japanese Tuna Onigiri
Quick and simple Japanese rice balls filled with seasoned tuna and mayonnaise, wrapped in nori.
Ingredients
-
2 cups cooked short grain rice
-
1/2 tsp salt
-
5.29 oz canned tuna (in oil recommended, or canned tuna in water)
-
2 tbsp Japanese mayo
-
2 sheets nori
-
1 tsp sesame seeds
Instructions
-
Step 1
In a bowl, gently mix the cooked rice with salt while it’s still warm. Be careful not to mash the grains. -
Step 2
Drain the canned tuna well. In a separate small bowl, mix the tuna with the Japanese mayonnaise until well combined. -
Step 3
Wet your hands with water and a pinch of salt to prevent the rice from sticking. Take a portion of the rice (about 1/2 cup) and flatten it in your palm. -
Step 4
Place about 1-2 tablespoons of the tuna mixture in the center of the flattened rice. Fold the rice around the filling to enclose it completely, shaping it into a triangle or ball. -
Step 5
Cut the nori sheets into strips (about 1 inch wide). Wrap a strip of nori around the base of each onigiri. -
Step 6
Garnish the onigiri with sesame seeds, if desired. Serve immediately or pack for lunch.
Important Information
Nutrition Facts (Per Serving)
It is important to consider this information as approximate and not to use it as definitive health advice.
Allergy Information
Please check ingredients for potential allergens and consult a health professional if in doubt.

Leave a Comment