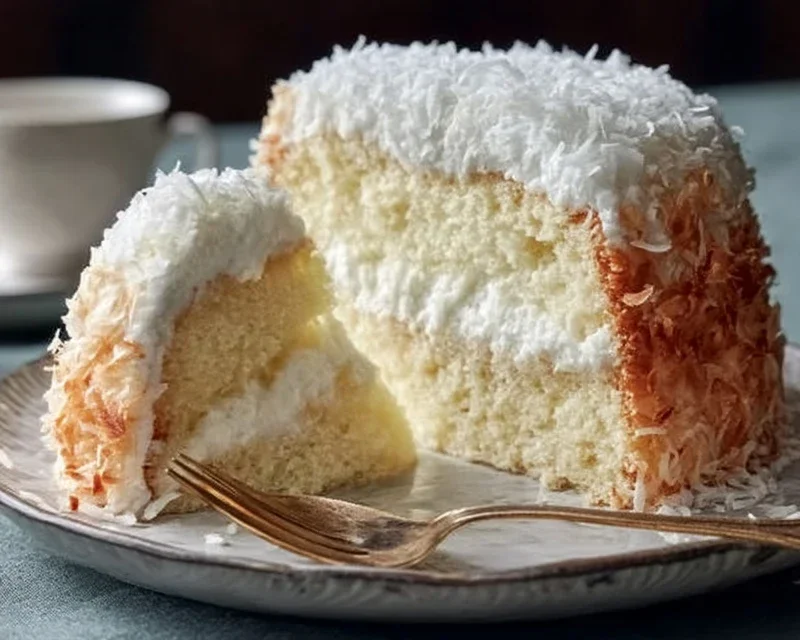
Coconut Cloud Cake Recipe: Prepare to have your taste buds transported to a tropical paradise with this ethereal Coconut Cloud Cake recipe. Have you ever dreamed of a dessert so light and airy it feels like you’re biting into a sweet, fluffy cloud? That’s exactly the magic this cake delivers. It’s a beloved treat for so many reasons: the delicate sweetness, the subtle hint of coconut that whispers of sun-drenched beaches, and the incredibly moist yet impossibly light crum extractb that practically melts in your mouth. What truly sets this Coconut Cloud Cake apart is its unique texture, achieved through a clever combination of ingredients that creates that signature “cloud-like” quality. It’s the perfect dessert for celebrations, afternoon tea, or simply when you need a little slice of heaven. Get ready to bake a cake that’s as delightful to make as it is to devour!

Coconut Cloud Cake Recipe
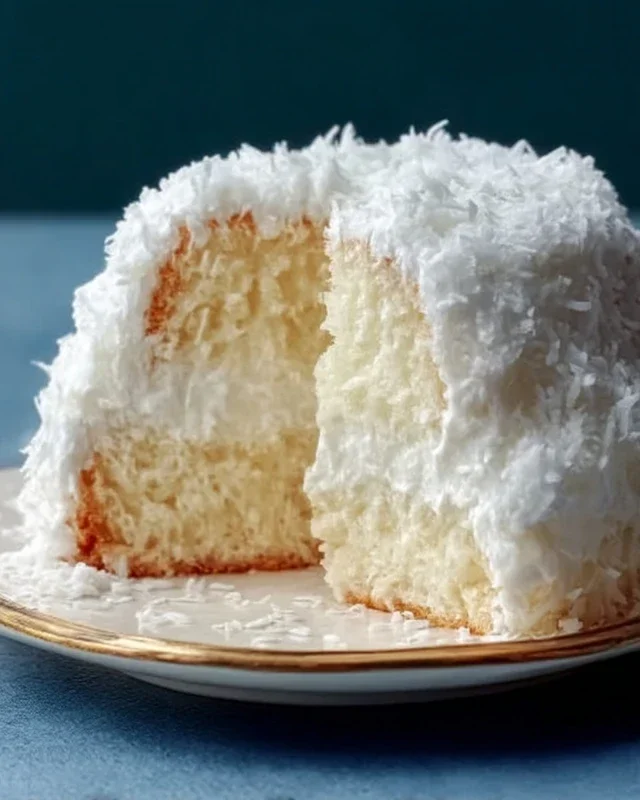
Get ready to bake a slice of pure bliss with my Coconut Cloud Cake recipe! This isn’t just any cake; it’s a light, airy, and incredibly flavorful dessert that will transport you straight to a tropical paradise with every bite. The delicate coconut flavor is infused throughout the cake and frosting, creating a harmonious symphony of taste that’s both comforting and exotic. Whether you’re celebrating a special occasion or simply craving a sweet escape, this cake is guaranteed to impress. The name “Cloud Cake” isn’t just for show – the texture is unbelievably fluffy, almost as if you’re biting into a sweet, flavorful cloud. Let’s dive in and create this tropical masterpiece together!
Ingredients:
Baking the Coconut Cloud Cake
The journey to your Coconut Cloud Cake begin extracts with preparing the cake layers. Accuracy in measuring your ingredients is key to achieving that perfect, fluffy texture. Make sure your butter and eggs are at room temperature; this helps them emulsicate properly with the other ingredients, leading to a smoother batter and a lighter cake.
1. Prepare Your Dry Ingredients: In a medium bowl, whisk together the all-purpose flour, baking powder, and salt. Whisking helps to evenly distribute the leavening agent and salt, ensuring a consistent rise and flavor throughout your cake. Set this aside.
2. Cream the Butter and Sugar: In a large mixing bowl, or the bowl of your stand mixer fitted with the paddle attachment, beat the softened unsalted butter and granulated sugar together on medium-high speed. Continue beating until the mixture is light, fluffy, and pnon-alcoholic ale yellow, about 3-5 minutes. This process, known as creaming, incorporates air into the batter, which is crucial for a tender crum extractb. Scrape down the sides of the bowl periodically to ensure everything is well combined.
3. Incorporate the Eggs and Extracts: Add the room temperature large eggs one at a time, beating well after each addition until fully incorporated. Don’t rush this step; allowing each egg to blend in smoothly helps maintain the emulsion. Next, stir in the vanilla extract and the coconut extract. The combination of these extracts will provide that signature tropical aroma and taste that defines this cake.
4. Alternate Wet and Dry Ingredients: Now, it’s time to combine the wet and dry ingredients. Gradually add the dry ingredient mixture to the butter mixture, alternating with the coconut milk. Begin extract and end with the dry ingredients. For example, add about one-third of the flour mixture, mix until just combined, then add half of the coconut milk, mix until just combined. Repeat this process, ending with the final portion of the flour mixture. It’s important not to overmix the batter once the flour is added. Overmixing can develop the gluten in the flour too much, resulting in a tough cake. Mix only until the streaks of flour disappear. The batter should be smooth and pourable.
5. Bake Your Cake Layers: Preheat your oven to 350°F (175°C). Grease and flour two 8-inch or 9-inch round cake pans. You can also line the bottoms with parchment paper for extra assurance that your cakes won’t stick. Divide the batter evenly between the prepared pans. Gently tap the pans on the counter a couple of times to release any large air bubbles. Bake for 25-35 minutes, or until a wooden skewer or toothpick inserted into the center of the cakes comes out clean. The baking time can vary depending on your oven, so start checking around the 25-minute mark. Once baked, let the cakes cool in their pans for about 10-15 minutes before inverting them onto a wire rack to cool completely. Ensuring the cakes are fully cooled before frosting is essential; otherwise, the frosting will melt and slide off.
Whipping Up the Coconut Cloud Frosting
This frosting is the perfect complement to our light and airy cake. It’s rich, creamy, and packed with that delightful coconut essence. The combination of cream cheese and whipped cream creates a frosting that is both stable and incredibly luscious.
1. Prepare the Cream Cheese Base: In a clean mixing bowl, beat the softened cream cheese until it’s smooth and creamy. This will help prevent any lumps in your frosting.
2. Add Sweeteners and Flavor: Add the powdered sugar to the cream cheese and beat until well combined and smooth. Then, stir in the vanilla extract and coconut extract.
3. Whip the Cream: In a separate, chilled bowl, whip the heavy whipping cream until stiff peaks form. Be careful not to over-whip, or you’ll end up with butter!
4. Combine for Frosting: Gently fold the whipped cream into the cream cheese mixture until just combined. You want to maintain as much of the airiness from the whipped cream as possible, so a gentle folding motion is best. This will create a light, fluffy, and incredibly delicious frosting.
Assembling Your Coconut Cloud Cake
Now for the fun part – bringin extractg it all together! This is where your cake truly transforms into a showstopper.
1. Level and Frost: Once your cake layers are completely cool, you can level them if necessary using a serrated knife to create a flat surface. Place one cake layer on your serving plate or cake stand. Spread a generous amount of the coconut cloud frosting over the top.
2. Stack and Frost: Carefully place the second cake layer on top of the first. Then, frost the entire cake – the top and the sides – with the remaining frosting. Use an offset spatula to smooth the frosting for a clean, professional look, or create swirls and peaks for a more rustic, homemade charm.
3. Add the Topping: Finally, sprinkle the sweetened shredded coconut over the top and sides of the cake. If you’re using fresh shredded coconut, it will adhere beautifully to the frosting. If you prefer toasted coconut for a deeper, nuttier flavor and a delightful crunch, toast it in a dry skillet over medium heat until golden brown, then let it cool completely before sprinkling. This final touch adds both visual appeal and an extra layer of coconut flavor that perfectly encapsulates the “cloud” theme.
Let your Coconut Cloud Cake chill in the refrigerator for at least 30 minutes before slicing and serving. This allows the frosting to set, making it easier to cut and enjoy. Get ready to experience a truly delightful dessert that’s as beautiful as it is delicious!
Conclusion:
And there you have it – your very own Coconut Cloud Cake! I truly hope you enjoy making and devouring this ethereal creation. It’s a recipe that’s not only stunning in appearance but also incredibly delightful in taste. The delicate balance of sweet coconut, light and fluffy cake, and that dreamy frosting creates a dessert that’s perfect for any occasion. From casual gatherings to more special celebrations, this Coconut Cloud Cake is sure to be a showstopper and a guaranteed crowd-pleaser. Its simplicity in execution belies its sophisticated flavor, making it accessible even for novice bakers.
I love serving this cake simply dusted with more shredded coconut or adorned with fresh berries for a pop of color and freshness. For a more decadent experience, a drizzle of white chocolate ganache or a scattering of toasted coconut flakes adds an extra layer of indulgence. Don’t be afraid to experiment with variations! You could add a hint of lime zest to the batter for a tropical twist, or even incorporate some finely chopped macadamia nuts for added crunch. The possibilities are truly endless. I encourage you all to give this Coconut Cloud Cake recipe a try; you won’t be disappointed!
Frequently Asked Questions:
Can I make this cake ahead of time?
Absolutely! This Coconut Cloud Cake is an excellent candidate for making ahead. The cake layers can be baked a day in advance, cooled completely, and then wrapped tightly in plastic wrap. The frosting can also be made a day ahead and stored in an airtight container in the refrigerator. Allow both to come to room temperature slightly before assembling and frosting for the best texture and easiest handling.
What kind of coconut is best for this recipe?
For the best flavor and texture in this Coconut Cloud Cake, I recommend using unsweetened shredded coconut for the cake batter and for topping. It provides a lovely coconut essence without making the cake overly sweet. If you prefer a richer coconut flavor, you can also incorporate a tablespoon or two of coconut extract into the batter. For a more intense toasted coconut flavor, you can lightly toast the shredded coconut in a dry skillet over medium heat until golden brown before using it.
Coconut Cloud Cake Recipe
A light and airy coconut cake with a creamy coconut frosting, perfect for any occasion.
Ingredients
-
2 1/2 cups all-purpose flour
-
2 1/2 teaspoons baking powder
-
1/2 teaspoon salt
-
1 cup unsalted butter, softened
-
2 cups granulated sugar
-
4 large eggs, room temperature
-
1 teaspoon vanilla extract
-
1 teaspoon coconut extract
-
1 cup coconut milk
-
1 1/2 cups heavy whipping cream
-
8 oz cream cheese, softened
-
1/2 cup powdered sugar
-
1 cup sweetened shredded coconut (toasted or fresh)
Instructions
-
Step 1
Preheat oven to 350°F (175°C). Grease and flour two 8-inch round cake pans. -
Step 2
In a medium bowl, whisk together flour, baking powder, and salt. -
Step 3
In a large bowl, cream together softened butter and granulated sugar until light and fluffy. Beat in eggs one at a time, then stir in vanilla and coconut extracts. -
Step 4
Gradually add the dry ingredients to the wet ingredients, alternating with coconut milk, beginning and ending with dry ingredients. Mix until just combined. -
Step 5
Divide batter evenly between prepared pans and bake for 30-35 minutes, or until a wooden skewer inserted into the center comes out clean. -
Step 6
Let cakes cool in pans for 10 minutes before inverting onto a wire rack to cool completely. -
Step 7
For the frosting, beat heavy whipping cream until stiff peaks form. In a separate bowl, beat softened cream cheese and powdered sugar until smooth. Stir in vanilla and coconut extracts. Gently fold whipped cream into cream cheese mixture. -
Step 8
Frost the cooled cake layers and the sides. Top with sweetened shredded coconut.
Important Information
Nutrition Facts (Per Serving)
It is important to consider this information as approximate and not to use it as definitive health advice.
Allergy Information
Please check ingredients for potential allergens and consult a health professional if in doubt.
Leave a Comment