
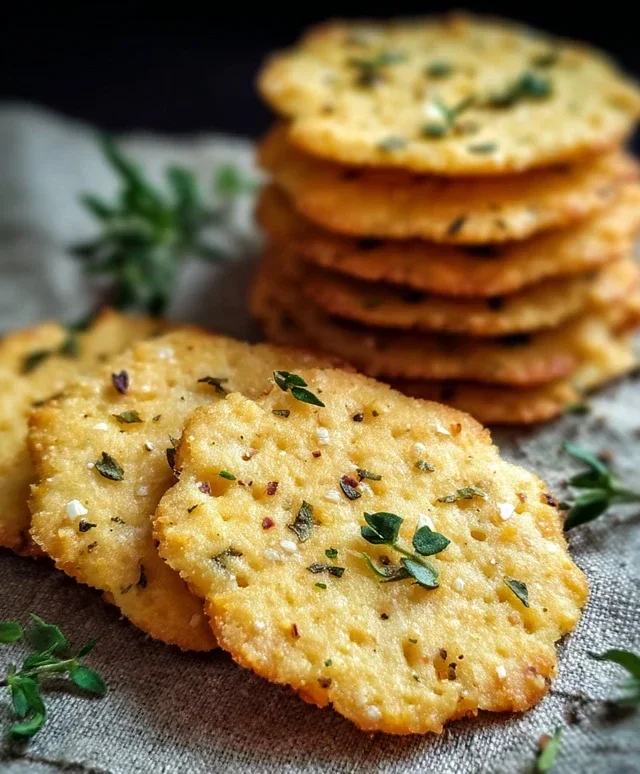
Garlic and Herb Chickpea Flour Snack Crackers are about to become your new go-to for guilt-free snacking! I’ve always been on the hunt for that perfect crunchy bite that doesn’t leave me feeling sluggish afterwards, and these crackers truly deliver. There’s something incredibly satisfying about their hearty texture and the burst of savory flavor. What makes these Garlic and Herb Chickpea Flour Snack Crackers so special is their versatility. They’re fantastic on their own for a quick energy boost, but they also serve as the ideal vehicle for your favorite dips, cheeses, or avocado. Plus, for anyone looking to embrace gluten-free or plant-based options without sacrificing taste, these are an absolute game-changer. Forget those bland store-bought alternatives; these homemade wonders are packed with wholesome goodness and incredible flavor that will have you reaching for them again and again.

Garlic and Herb Chickpea Flour Snack Crackers
Looking for a healthy, satisfying, and incredibly flavorful snack that’s also surprisingly easy to make? You’ve come to the right place! These Garlic and Herb Chickpea Flour Snack Crackers are my go-to when I need something to curb my cravings without derailing my healthy eating goals. They’re packed with savory goodness, wonderfully crispy, and so much better than anything you can buy in a box. Plus, they’re naturally gluten-free and vegan!
The magic of these crackers lies in chickpea flour, also known as besan. It provides a delightful nutty flavor and a satisfying texture that bakes up beautifully. Combined with aromatic herbs and pungent garlic, each bite is a burst of flavor. They’re perfect on their own, alongside a soup or salad, or even as a base for your favorite dips. Let’s get baking!
Ingredients:
Making the Dough
The first step to creating these delicious crackers is to bring all our dry ingredients together. In a medium-sized mixing bowl, combine the chickpea flour, dried mixed herbs, garlic powder, salt, and black pepper. Whisk these together thoroughly. This ensures that the seasonings are evenly distributed throughout the flour, which is crucial for consistent flavor in every cracker. Don’t skip this step – a good whisking here means no bland spots later!
Next, we’ll introduce the wet ingredients. Make a well in the center of the dry ingredients and pour in the ½ cup of water and the 2 tablespoons of olive oil. Begin extract to mix everything together, starting with a spoon or spatula, and then transition to using your hands as the mixture thickens. You’re looking for a cohesive dough that’s not too sticky but also not dry and crum extractbly. It should feel like a soft playdough. If the dough seems a little too dry and won’t come together, add water a teaspoon at a time until you achieve the desired consistency. Conversely, if it’s too sticky, you can add a tiny bit more chickpea flour, also just a teaspoon at a time. Kneading the dough for about 30 seconds to a minute will help develop its texture and make it easier to roll out.
Rolling and Shaping the Crackers
Now for the fun part: getting our dough ready to bake! Preheat your oven to 375°F (190°C). Line a large baking sheet with parchment paper. This is essential to prevent sticking and makes cleanup a breeze.
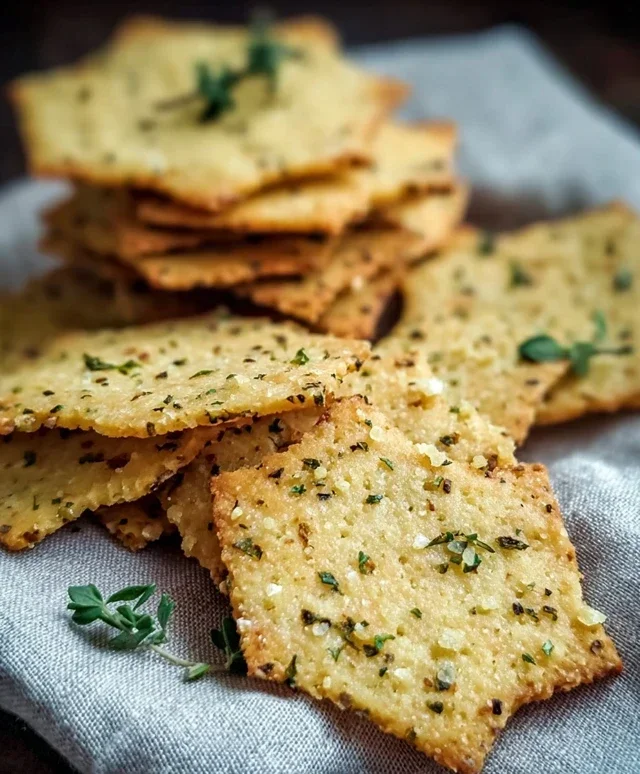
Turn the dough out onto a lightly floured surface (you can use a little extra chickpea flour for this). You can roll the dough directly between two sheets of parchment paper for minimal mess and easier handling. Roll the dough out as thinly as possible. The thinner you roll it, the crispier your crackers will be. Aim for a thickness of about 1/16 to 1/8 of an inch. If you don’t have a rolling pin, a clean grape juice bottle or even a sturdy glass can work in a pinch! The key is to get it nice and even.
Once the dough is rolled thin, carefully remove the top layer of parchment paper if you used two. Now it’s time to score the crackers. You can use a pizza cutter, a knife, or even the back of a butter knife to gently score lines into the dough, creating your desired cracker shapes (squares, rectangles, or even diamonds). Don’t cut all the way through; you just want to mark them so they break apart easily after baking. This scoring is also where you can get creative with your toppings!
Adding Flavor and Texture
This is where we elevate our simple dough into irresistible snacks. Brush the surface of the rolled-out dough lightly with extra olive oil. This helps the toppings adhere and adds a lovely sheen to the crackers. Now, sprinkle generously with sesame seeds. The sesame seeds not only add a nutty crunch but also look beautiful. For an extra layer of flavor and that satisfying “pop” of salt, sprinkle with flaky sea salt. Don’t be shy with the flaky salt – it makes a big difference! For those who really love herbs, you can also sprinkle on a little more dried herbs over the top for an intensified aromatic experience. Press the toppings down gently with your hand or a rolling pin to ensure they stick well.
Baking to Perfection
Carefully transfer the parchment paper with the scored dough onto the prepared baking sheet. Place the baking sheet into your preheated oven. Bake for 15-20 minutes, or until the crackers are golden brown and appear crispy. The baking time will vary depending on how thinly you rolled your dough and your oven. Keep an eye on them, especially in the last 5-10 minutes, as they can go from perfectly baked to burnt very quickly. You want them to be firm and sound hollow when tapped.
Once baked, remove the baking sheet from the oven. Allow the crackers to cool on the baking sheet for about 5-10 minutes. This allows them to firm up further. Then, carefully break them apart along the scored lines. Transfer the broken crackers to a wire rack to cool completely. This is important for achieving maximum crispiness. If you try to store them while still warm, they can become soft and lose their satisfying crunch.
Storage and Enjoyment
Once completely cooled, your Garlic and Herb Chickpea Flour Snack Crackers are ready to be enjoyed! Store them in an airtight container at room temperature for up to a week. They are incredibly versatile. I love to munch on them plain, as they are so flavorful. They also pair wonderfully with hummus, guacamole, or a creamy cheese spread. For a more substantial snack, top them with a slice of avocado and a pinch of red pepper flakes. They’re also a fantastic accompaniment to your favorite soups and salads, adding a delightful crunch and savory note. Enjoy your homemade, healthy, and absolutely delicious crackers!
Conclusion:
I hope you’ve enjoyed learning how to make these incredibly simple and satisfying Garlic and Herb Chickpea Flour Snack Crackers! What I love most about this recipe is how versatile and healthy it is. Using nutrient-rich chickpea flour means these crackers are not only delicious but also packed with protein and fiber, making them a fantastic guilt-free snack option. They’re naturally gluten-free and can be easily adapted to suit your pantry staples. Whether you’re looking for a quick afternoon pick-me-up, a crunchy addition to your lunchbox, or a homemade appetizer for guests, these crackers deliver every time.
Serve them plain to truly appreciate the subtle herb and garlic notes, or get creative! They are wonderful dipped in hummus, guacamole, or your favorite creamy cheese spread. I also enjoy crum extractbling them over salads for an extra textural element or pairing them with a hearty soup. Don’t be afraid to experiment with different herb combinations – rosemary and thyme work beautifully, or a pinch of smoked paprika can add a lovely depth. I truly encourage you to give these Garlic and Herb Chickpea Flour Snack Crackers a try; I’m confident you’ll be hooked!
Frequently Asked Questions:
How long do these crackers typically stay fresh?
When stored in an airtight container at room temperature, these crackers usually stay wonderfully crisp for about 5-7 days. Ensure they are completely cooled before sealing the container to prevent any moisture from making them soggy.
Can I make these crackers without herbs or garlic?
Absolutely! While the garlic and herb combination is classic, these crackers are delicious with just salt and pepper. You can also try other seasonings like a pinch of cumin for an earthy flavor, or a sprinkle of nutritional yeast for a cheesy, umami taste. Feel free to get creative with your spice rack!
My crackers are a bit too soft, what did I do wrong?
This usually happens if the dough was too wet or if they weren’t baked long enough. Ensure your dough is firm enough to roll out thinly. When baking, watch for the edges to turn golden brown and the centers to feel firm to the touch. You might need to adjust baking time slightly depending on your oven’s temperature and the thickness of your crackers.
Garlic and Herb Chickpea Flour Snack Crackers
Crispy and flavorful savory crackers made with chickpea flour, garlic, and a blend of herbs. Perfect for snacking or serving with dips.
Ingredients
-
1 cup chickpea flour (besan)
-
½ cup water
-
2 tablespoons olive oil
-
1 teaspoon dried mixed herbs (such as rosemary, thyme, oregano)
-
1 teaspoon garlic powder
-
½ teaspoon salt
-
¼ teaspoon black pepper
-
Sesame seeds
-
Flaky sea salt
-
Additional dried herbs
-
Extra olive oil for brushing
Instructions
-
Step 1
Preheat oven to 375°F (190°C). Line a baking sheet with parchment paper. -
Step 2
In a medium bowl, whisk together chickpea flour, dried mixed herbs, garlic powder, salt, and black pepper. -
Step 3
Add the water and olive oil to the dry ingredients. Mix until a thick batter or dough forms. It should be a spreadable consistency. -
Step 4
Spread the batter thinly and evenly onto the prepared baking sheet using a spatula or offset spatula. Aim for a uniform thickness for even baking. -
Step 5
Sprinkle the surface generously with sesame seeds, flaky sea salt, and additional dried herbs, if desired. -
Step 6
Bake for 18-20 minutes, or until the edges are golden brown and the crackers are firm and crispy. Keep an eye on them to prevent burning. -
Step 7
Let the crackers cool completely on the baking sheet. They will crisp up further as they cool. Once cooled, break them into irregular pieces or cut into squares. -
Step 8
Lightly brush the crackers with extra olive oil after baking and cooling for an extra flavor boost.
Important Information
Nutrition Facts (Per Serving)
It is important to consider this information as approximate and not to use it as definitive health advice.
Allergy Information
Please check ingredients for potential allergens and consult a health professional if in doubt.
Leave a Comment