
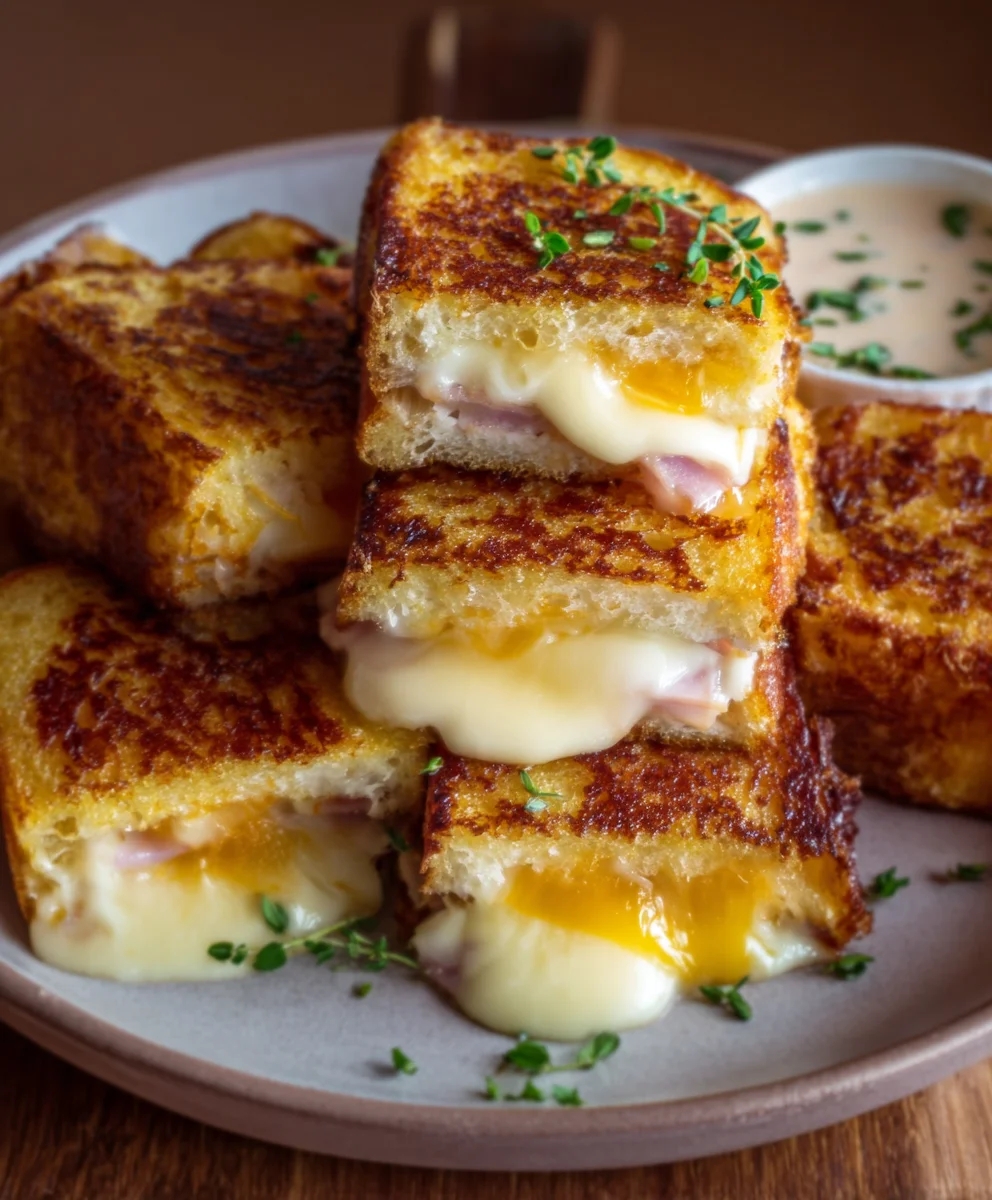
Hawaiian Roll Grilled Cheese. There’s something inherently magical about the sweet, slightly tangy embrace of a Hawaiian roll, and when you transform it into a Hawaiian Roll Grilled Cheese, you’re not just making a sandwich; you’re crafting a pocket of pure joy. Forget your everyday bread; these golden, pillowy buns are the secret weapon to achieving an unparalleled level of deliciousness. People absolutely adore this elevated take on a childhood classic for a reason. It’s the perfect marriage of comforting familiarity and delightful novelty, offering a delightful chew and a subtle sweetness that perfectly balances the savory, gooey cheese within. What truly sets this Hawaiian Roll Grilled Cheese apart is the delightful contrast – the soft, yielding exterior giving way to that molten, stretchy core. It’s a simple concept, but the execution with these special rolls elevates it to something truly extraordinary, making every bite an experience you’ll crave again and again.

Ingredients:
- 4 Hawaiian rolls
- 1 cup shredded Monterey Jack cheese
- 2 tablespoons unsalted butter
- Optional: Sliced tomatoes
- Optional: Crispy beef beef bacon
Preparation for Hawaiian Roll Grilled Cheese
Gathering Your Supplies
Before we dive into the deliciousness, let’s make sure you have everything ready. This Hawaiian roll grilled cheese is all about simplicity and incredible flavor. You’ll need your four soft and slightly sweet Hawaiian rolls. These are the foundation of our masterpiece, providing that delightful sweetness that balances the savory cheese. Next, have your cup of shredded Monterey Jack cheese at the ready. Monterey Jack is a fantastic choice because it melts beautifully, creating those irresistible cheese pulls we all love. If you prefer a sharper cheese or a blend, feel free to experiment, but for this recipe, the creamy melt of Monterey Jack is perfect. You’ll also need two tablespoons of unsalted butter. This butter is key to achieving that golden-brown, perfectly crispy exterior on our rolls. And for those who like to elevate their grilled cheese game, have your optional sliced tomatoes or crispy beef baconbacon nearby. These additions can take your sandwich from great to absolutely extraordinary, adding freshness or a smoky, salty crunch.
Prepping the Rolls and Fillings
The first crucial step is to prepare your Hawaiian rolls. Using a serrated knife, carefully slice each of the four Hawaiian rolls in half horizontally. It’s important to be gentle to avoid squishing the delicate rolls. You want to create a top and bottom half for each sandwich. Think of them as mini slider buns, ready to be transformed. Next, if you’re using them, prepare your optional additions. For sliced tomatoes, ensure they are thinly sliced so they cook through nicely without making the sandwich too soggy. If you’re opting for crbeef baconbeef bacon, make sure it’s cooked to your desired level of crispiness and perhaps broken into smaller pieces to fit evenly within the sandwich. Having all your ingredients prepped and within easy reach will make the cooking process smooth and enjoyable.
Cooking the Hawaiian Roll Grilled Cheese
Melting the Cheese and Assembling the Sandwiches
Now for the fun part – assembling and cooking! Take the bottom halves of your Hawaiian rolls and evenly distribute half of your shredded Monterey Jack cheese over each one. Don’t be shy with the cheese! This is where the magic happens. Once the cheese is distributed, if you’re adding tobeef bacons or beef bacon, layer them carefully over the cheese on the bottom halves. This ensures the cheese melts around them, helping to hold everything together. Then, top each one with the remaining shredded Monterey Jack cheese. Finally, place the top halves of your Hawaiian rolls onto the cheese and optional fillings. You should now have four assembled, un-grilled Hawaiian roll sandwiches.
Grilling to Golden Perfection
This is where the butter comes in! Place a non-stick skillet or griddle over medium-low heat. Allow it to warm up for a minute or two. Once warm, add one tablespoon of the unsalted butter to the skillet and let it melt. Swirl the pan to ensure the butter coats the bottom evenly. Carefully place two of your assembled Hawaiian roll grilled cheese sandwiches into the melted butter. It’s important to use medium-low heat to allow the cheese to melt thoroughly before the bread burns. Cooking on lower heat also ensures the inside gets wonderfully warm and gooey. Cook for about 3 to 5 minutes per side, or until the bottom of the rolls are a beautiful golden brown and the cheese is starting to melt and ooze out. Keep an eye on them to prevent burning; you’re looking for a gorgeous, toasted crisp.
Flipping and Finishing
Using a spatula, gently flip the sandwiches. If needed, add the remaining tablespoon of butter to the skillet before placing the second side down. Continue to cook for another 3 to 5 minutes on this side, or until that side is also a beautiful golden brown and the cheese inside is completely melted and gooey. You should see the cheese starting to ooze out from the sides, which is a good sign of perfectly melted deliciousness. If the bread is browning too quickly and the cheese isn’t fully melted, you can cover the skillet loosely with a lid for a minute or two to help trap steam and encourage melting. This will create an even meltier interior. Once both sides are perfectly golden and the cheese is wonderfully melted, carefully remove the grilled cheese sandwiches from the skillet. You can immediately serve them, or if you prefer them cut, let them rest for just a minute before slicing them in half diagonally.
Conclusion:
And there you have it – the ultimate guide to crafting the most delightful Hawaiian Roll Grilled Cheese! This recipe offers a perfect balance of sweet, savory, and cheesy goodness, all nestled within those irresistibly soft rolls. The golden-brown exterior and the gooey, melted cheese filling make it a crowd-pleaser for any occasion, from a quick lunch to a satisfying snack or even a fun appetizer. Don’t be afraid to experiment and make this Hawaiian Roll Grilled Cheese your own! I encourage you to try different cheese combinations or add a touch of spice. The possibilities are truly endless!
For serving suggestions, this Hawaiian Roll Grilled Cheese pairs wonderfully with a side of tomato soup, a crisp garden salad, or even some sweet potato fries. It’s a versatile dish that can be dressed up or down depending on your mood.
Frequently Asked Questions about Hawaiian Roll Grilled Cheese:
Can I use other types of cheese in my Hawaiian Roll Grilled Cheese?
Absolutely! While cheddar and provolone are fantastic choices, feel free to get creative. Monterey Jack, Gruyère, or even a mild Swiss cheese can add wonderful depth to your Hawaiian Roll Grilled Cheese. A blend of cheeses often yields the most delicious results!
What are some variations I can try for my Hawaiian Roll Grilled Cheese?
The beauty of this recipe lies in its adaptability. You can elevate your Hawaiian Roll Grilled Cheese by adding a thin slice of beef ham or turkey for a Monte Cristo-inspired twist, or a layer of caramelized onions for a gourmet touch. A sprinkle of herbs like chives or parsley can also brighten the flavor profile.

Hawaiian Roll Grilled Cheese Perfection- Easy Comfort Food
A simple and incredibly delicious grilled cheese sandwich made with sweet Hawaiian rolls, melty Monterey Jack cheese, and a perfectly crispy exterior.
Ingredients
-
4 Hawaiian rolls
-
1 cup shredded Monterey Jack cheese
-
2 tablespoons unsalted butter
-
Optional: Sliced tomatoes
-
Optional: Crispy beef bacon
Instructions
-
Step 1
Slice each of the four Hawaiian rolls in half horizontally using a serrated knife. Prepare any optional additions like thinly sliced tomatoes or crispy beef bacon. -
Step 2
Evenly distribute half of the shredded Monterey Jack cheese over the bottom halves of the Hawaiian rolls. If using, layer optional beef bacon over the cheese. -
Step 3
Top with the remaining shredded Monterey Jack cheese and then place the top halves of the Hawaiian rolls onto the cheese and fillings. -
Step 4
Melt 1 tablespoon of unsalted butter in a non-stick skillet or griddle over medium-low heat. Place two assembled sandwiches into the melted butter. -
Step 5
Cook for 3 to 5 minutes per side, or until golden brown and the cheese is beginning to melt and ooze. Flip gently and add the remaining butter if needed. -
Step 6
Continue to cook for another 3 to 5 minutes until both sides are golden brown and the cheese is completely melted and gooey. Cover loosely with a lid if the bread browns too quickly before the cheese melts. -
Step 7
Remove from skillet and let rest for a minute before slicing diagonally, if desired. Serve immediately.
Important Information
Nutrition Facts (Per Serving)
It is important to consider this information as approximate and not to use it as definitive health advice.
Allergy Information
Please check ingredients for potential allergens and consult a health professional if in doubt.


Leave a Comment