
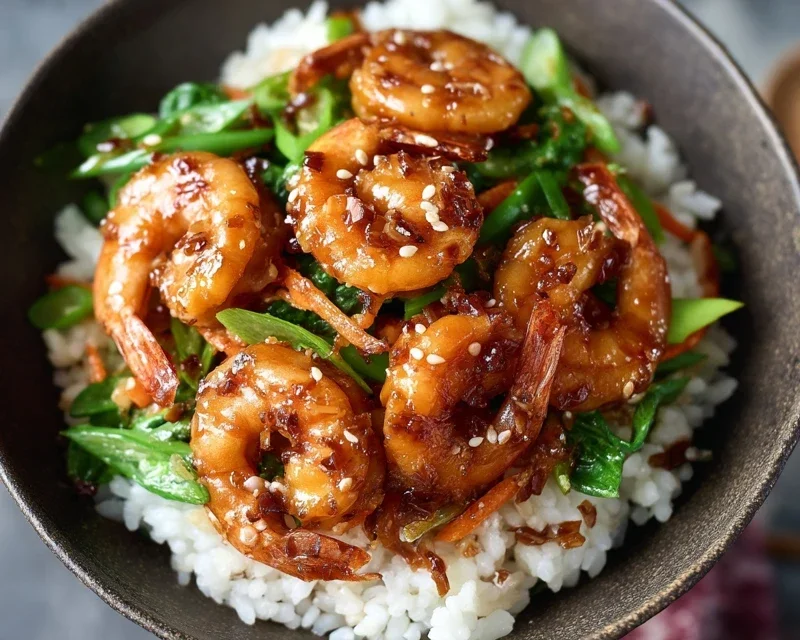
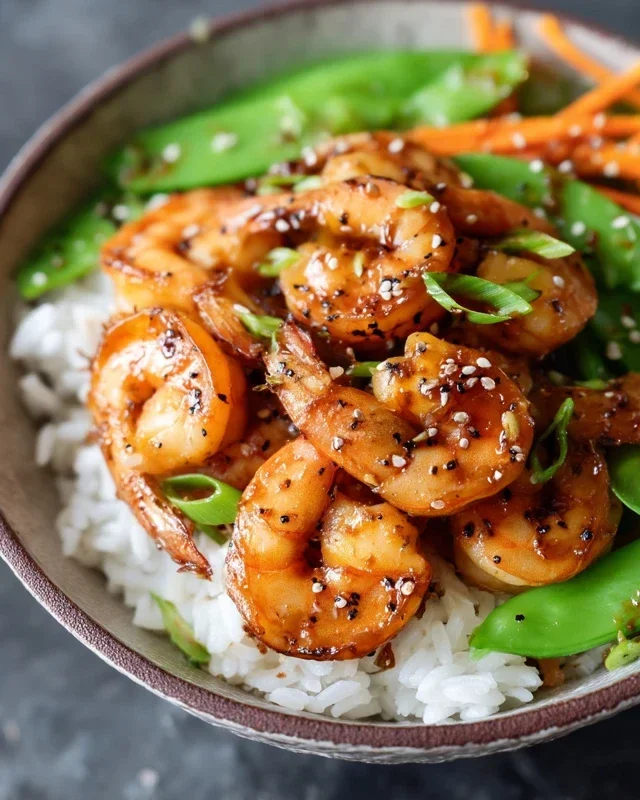
Honey Garlic Shrimp Bowls are the weeknight dinner heroes we all desperately need. There’s something undeniably magical about the combination of plump, succulent shrimp coated in a sticky, sweet, and savory glaze. It’s a flavor explosion that’s both comforting and incredibly addictive. People adore these bowls because they deliver maximum deliciousness with minimal fuss. Imagin extracte tender shrimp tossed in a luminous honey garlic sauce, served over fluffy rice with vibrant, fresh vegetables. What truly makes these Honey Garlic Shrimp Bowls special is their incredible versatility. You can customize the veggies to whatever you have on hand, add a sprinkle of sesame seeds for extra crunch, or even a dash of red pepper flakes for a touch of heat. They’re elegant enough for guests but quick enough for a busy Tuesday. Let’s get cooking!

Ingredients:
Honey Garlic Shrimp Bowls
Get ready to whip up a weeknight dinner that’s bursting with flavor and comes together in a flash! These Honey Garlic Shrimp Bowls are incredibly satisfying, and the sweet and savory glaze on the perfectly cooked shrimp is simply irresistible. The beauty of this recipe lies in its simplicity and its ability to be customized with your favorite sides and toppings. Whether you’re looking for a healthy option or a quick and easy meal to feed the family, this dish is sure to become a staple in your rotation.
The star of the show, of course, is the shrimp. Opt for large shrimp, peeled and deveined, for the best texture and presentation. You can find them fresh or frozen; if using frozen, make sure to thaw them completely before you begin extract. Patting them dry is an important step that will ensure they get a nice sear in the pan, rather than steaming.
The sauce is where all the magic happens. It’s a simple concoction of pantry staples that transforms the humble shrimp into something truly special. The honey provides a natural sweetness that balances the salty soy sauce and the tangy rice vinegar. Fresh garlic is key here for that aromatic punch, and a hint of gin extractger adds a warm, zesty note. If you enjoy a little heat, the red pepper flakes are a welcome addition, but feel free to omit them if you prefer a milder dish.
Cooking the Shrimp and Sauce
Here’s how we’ll bring it all together:
1. Begin extract by preparing your shrimp. Ensure they are fully thawed if using frozen, and then pat them thoroughly dry with paper towels. This step is crucial for achieving a good sear on the shrimp and preventing them from becoming watery. Season the shrimp lightly with salt and freshly ground black pepper. In a large skillet or wok, heat the 2 tablespoons of olive oil over medium-high heat. Once the oil is shimmering, add the seasoned shrimp in a single layer. It’s best to cook the shrimp in batches if your skillet isn’t large enough to avoid overcrowding, as overcrowding will lead to steaming rather than searing, resulting in less appealing texture. Cook for 1-2 minutes per side, just until they turn pink and opaque. Don’t overcook them at this stage, as they will continue to cook in the sauce. Once cooked, remove the shrimp from the skillet and set them aside on a plate.
2. Now, let’s build that glorious sauce. In the same skillet (no need to wipe it clean; those little bits add flavor!), reduce the heat to medium. Add the minced garlic to the skillet and sauté for about 30 seconds until fragrant, being careful not to burn it. Burnt garlic can turn bitter, so keep a close eye on it. Pour in the honey, soy sauce, rice vinegar, grated gin extractger, and red pepper flakes (if using). Stir everything together well. Bring the sauce to a gentle simmer and let it cook for 1-2 minutes, stirring occasionally, until it thickens slightly. You’ll notice it becomes more viscous and glossy. This simmering process allows the flavors to meld together beautifully.
3. Return the cooked shrimp to the skillet with the thickened sauce. Toss the shrimp gently to coat them evenly with the honey garlic glaze. Continue to cook for another 1-2 minutes, or until the shrimp are heated through and beautifully coated in the glossy sauce. The residual heat will finish cooking the shrimp without making them tough. This is also the time to do a final taste test. Adjust seasoning if necessary, adding a pinch more salt, pepper, or even a splash more soy sauce if you desire a more savory profile.
4. While the shrimp are finishing, prepare your serving bowls. Spoon a generous portion of your cooked rice into each bowl. This provides a wonderful base for the saucy shrimp and absorbs all those delicious flavors. The type of rice you choose is entirely up to your preference. White rice offers a neutral canvas, brown rice adds a nutty chegrape juicess, and cauliflower rice is a fantastic low-carb option.
5. Finally, ladle the honey garlic shrimp and the luscious sauce over the rice in each bowl. Don’t forget to scrape up any extra sauce from the pan! Garnish generously with your chosen toppings. Toasted sesame seeds add a delightful crunch and nutty flavor, while sliced green onions bring a fresh, sharp counterpoint. Steamed broccoli florets or shredded carrots can add extra color, texture, and nutrients, making your bowl a complete and satisfying meal. Serve immediately and enjoy the explosion of flavors!
Conclusion:
There you have it! This Honey Garlic Shrimp Bowl is a true winner, combining the irresistible sweetness of honey with the savory punch of garlic to create a flavor explosion that’s both simple and incredibly satisfying. It’s the perfect weeknight meal because it comes together so quickly, offering a delightful escape from the ordinary with minimal effort. The tender, succulent shrimp coated in that glorious sauce, served over fluffy rice with fresh, vibrant veggies, is a culinary hug in a bowl. I truly hope you’ll give this recipe a try; you won’t be disappointed by how easy it is to achieve such fantastic restaurant-quality flavor at home!
For serving, this dish shines on its own but also welcomes a sprinkle of toasted sesame seeds or a drizzle of sriracha for a little extra kick. You can absolutely customize your bowls further! Swap the rice for quinoa or cauliflower rice for a lighter option, or try adding edamame or snap peas for more crunch. If you’re not a fan of shrimp, this delicious honey garlic sauce is fantastic with chicken or even tofu!
Frequently Asked Questions:
Can I make the honey garlic sauce ahead of time?
Absolutely! The honey garlic sauce can be prepared a day or two in advance and stored in an airtight container in the refrigerator. Simply warm it gently on the stovetop or in the microwave before tossing with the cooked shrimp. This makes assembling the Honey Garlic Shrimp Bowl even faster!
What kind of rice works best for this recipe?
Jasmine or basmati rice are classic choices that complement the flavors beautifully. Their slightly sticky texture and fragrant aroma make for a perfect base. However, feel free to experiment with brown rice for added fiber or even sushi rice if you’re feeling adventurous!
How do I prevent my shrimp from getting rubbery?
The key to perfectly cooked shrimp is to avoid overcooking them. Add the shrimp to the pan only when the sauce is hot and simmering, and cook for just 2-3 minutes per side, until they turn pink and opaque. They will continue to cook slightly from the residual heat, so it’s better to err on the side of slightly undercooked than overcooked.
Honey Garlic Shrimp Bowls
A quick and flavorful shrimp bowl with a sweet and savory honey garlic sauce, served over rice with fresh vegetables.
Ingredients
-
1 pound shrimp, peeled and deveined
-
2 tablespoons olive oil
-
4 cloves garlic, minced
-
1/4 cup honey
-
2 tablespoons soy sauce
-
1 tablespoon rice vinegar
-
1 cup cooked rice, for serving
-
1 cup broccoli florets, steamed
-
1/4 cup sliced red bell pepper
Instructions
-
Step 1
Pat the shrimp dry with paper towels. -
Step 2
In a small bowl, whisk together honey, soy sauce, and rice vinegar. Set aside. -
Step 3
Heat olive oil in a large skillet over medium-high heat. Add minced garlic and cook until fragrant, about 30 seconds. -
Step 4
Add the shrimp to the skillet and cook for 2-3 minutes per side, until pink and cooked through. -
Step 5
Pour the honey garlic sauce over the shrimp and stir to coat. Cook for another 1-2 minutes, until the sauce thickens slightly. -
Step 6
Serve the honey garlic shrimp over cooked rice, garnished with steamed broccoli and sliced red bell pepper.
Important Information
Nutrition Facts (Per Serving)
It is important to consider this information as approximate and not to use it as definitive health advice.
Allergy Information
Please check ingredients for potential allergens and consult a health professional if in doubt.

Leave a Comment