


Nut free pesto is a revelation for so many of us who have been traditionally excluded from this vibrant, herbaceous delight. For years, the thought of creamy, garlicky pesto meant navigating a minefield of potential allergic reactions. But what if I told you that you can achieve all the incredible flavour, the bright green hue, and the satisfying texture without a single nut in sight? That’s precisely what this nut free pesto recipe delivers. It’s a game-changer for families with allergies, for those simply looking to diversify their pantry, or for anyone who appreciates the genius of a well-crafted sauce. We love pesto because it’s so versatile – slathered on pasta, dolloped onto grilled chicken, or stirred into a hearty soup. Now, everyone can experience its magic.
Get Ready to Fall in Love with This Nut Free Pesto
Discover the Secret to Delicious, Allergen-Friendly Flavor

Nut-Free Pesto: A Bright and Versatile Sauce for Everyone
When you think of pesto, you might immediately picture that vibrant green sauce, bursting with the flavors of basil, garlic, and pine nuts. While traditional pesto is undeniably delicious, for many, especially those with nut allergies, it’s a treat they can’t enjoy. But what if I told you that you could have all the incredible flavor of pesto, without a single nut in sight? This nut-free pesto recipe is a game-changer. It’s surprisingly simple to make, incredibly versatile, and lets everyone at your table experience the joy of this classic Italian condiment. We’re ditching the pine nuts and focusing on fresh, vibrant ingredients to create a pesto that’s just as satisfying and flavorful, if not more so, than its traditional counterpart. It’s perfect for pasta, of course, but don’t stop there! This pesto is fantastic on sandwiches, as a dip, drizzled over roasted vegetables, or even spread on a pizza base. Get ready to elevate your meals with this simple, allergy-friendly delight.
Ingredients:
Making Your Nut-Free Pesto
This process is incredibly straightforward, and the results are so rewarding. You don’t need any fancy equipment – a food processor or even a sturdy blender will do the trick. The key is to start with the freshest ingredients you can find. The basil is the star here, so make sure it’s vibrant green and fragrant. Washing and thoroughly drying your basil leaves is a crucial first step. Excess water can dilute the flavor of your pesto and also affect its shelf life. A salad spinner is your best friend for this task, or you can gently pat them dry with paper towels.
Step 1: Prepare the Base
Begin extract by adding your washed and thoroughly dried basil leaves to the bowl of your food processor. Don’t be afraid to really pack them in there – they will wilt down considerably as you process them. Next, add the peeled garlic cloves. It’s best to use fresh garlic rather than pre-minced garlic, as the flavor will be much more vibrant and pungent. If you’re sensitive to raw garlic, you can lightly roast the garlic cloves before adding them for a milder, sweeter flavor. This is a small step that can make a big difference if you’re not a huge fan of biting into raw garlic.
Step 2: Add the Cheese and Seasoning
Once the basil and garlic are in the food processor, it’s time to add the Parmesan cheese. Freshly grated Parmesan cheese will melt into the pesto much better and provide a superior flavor and texture compared to pre-shredded cheese, which often contains anti-caking agents that can make your pesto gritty. Then, add your salt and pepper. Start with the recommended amounts, but always remember that you can adjust the seasoning to your personal taste later. Taste is subjective, and you might prefer a little more salt or a touch more pepper.
Step 3: Blend to a Rough Paste
Now, it’s time to start processing. Pulse the ingredients a few times to break everything down into smaller pieces. You’re looking for a coarse, slightly chunky texture at this stage. Don’t over-process just yet, as we still need to incorporate the olive oil. The goal here is to get the basil and garlic broken down enough so that they start to release their flavors and aromas. You might need to scrape down the sides of the food processor bowl a couple of times to ensure all the ingredients are incorporated evenly.
Step 4: Emulsify with Olive Oil
With the food processor running on a low speed, slowly drizzle in the olive oil. This is where the magic happens. The olive oil will emulsify with the other ingredients, creating that smooth, luscious pesto texture we all know and love. Continue to process until the pesto reaches your desired consistency. Some people prefer a slightly chunkier pesto, while others like it super smooth. For a smoother pesto, you can let the food processor run for a bit longer. If you find the pesto is too thick, you can add a touch more olive oil, a teaspoon at a time, until you achieve the perfect consistency.
Step 5: Taste and Adjust
This is arguably the most important step. Once the pesto is fully blended, stop the food processor and give it a taste. Does it need more salt? A little more pepper? Perhaps a hint of acidity? While not included in the core recipe, a tiny squeeze of lemon juice can brighten the flavors beautifully, especially if your basil is a little less vibrant. Adjust the seasonings until the pesto is absolutely perfect for your palate. Remember, the flavors will also meld and deepen as the pesto sits, so it’s okay if it’s not exactly to your liking immediately.
Storing Your Nut-Free Pesto
Once your delicious nut-free pesto is ready, you can use it immediately or store it for later. To store, transfer the pesto to an airtight container. To prevent browning and maintain its vibrant green color, pour a thin layer of olive oil over the top of the pesto before sealing the container. This creates a protective barrier against oxidation. Refrigerated, your nut-free pesto should stay fresh for about 5 to 7 days. For longer storage, you can freeze portions of pesto in ice cube trays. Once frozen, transfer the pesto cubes to a freezer-safe bag or container. This makes it easy to grab a small portion for a quick meal. Enjoy your homemade, allergy-friendly pesto!
Conclusion:
I hope you’ve enjoyed learning how to make this delicious nut free pesto! This recipe is fantastic because it caters to those with nut allergies while still delivering all the vibrant, herbaceous flavor we love in traditional pesto. It’s incredibly versatile, easy to whip up in minutes, and opens up a world of culinary possibilities for everyone to enjoy. Whether you’re serving it to guests with dietary restrictions or simply looking for a healthy and flavorful alternative, this nut free pesto is a winner.
This pesto is perfect tossed with your favorite pasta, spread on sandwiches, dolloped onto grilled chicken or fish, or even stirred into a creamy soup. Don’t be afraid to experiment with the ingredients – add a pinch of red pepper flakes for a little heat, or swap out some of the basil for other fresh herbs like parsley or mint. I truly encourage you to give this nut free pesto recipe a try. I’m confident it will become a staple in your kitchen!
Frequently Asked Questions:
How long will this nut free pesto last?
When stored in an airtight container in the refrigerator, this nut free pesto should stay fresh for about 4-5 days. For longer storage, you can freeze it in ice cube trays for individual portions, which are perfect for adding to meals later. Just pop out a cube or two when you need it!
Can I use different seeds instead of sunflower seeds?
Absolutely! While sunflower seeds are a great nut-free option, you can certainly try other seeds like pumpkin seeds (pepitas) or even hemp seeds. Each will impart a slightly different flavor and texture, so feel free to experiment and find your favorite combination.
What if I don’t have fresh basil?
If fresh basil isn’t readily available, you can substitute with dried basil, but you’ll need to adjust the quantity. Generally, use about one-third the amount of dried herbs compared to fresh. So, if the recipe calls for 2 cups of fresh basil, start with about 2/3 cup of dried basil and taste as you go. You might also want to add a touch more olive oil to help rehydrate the dried herbs.
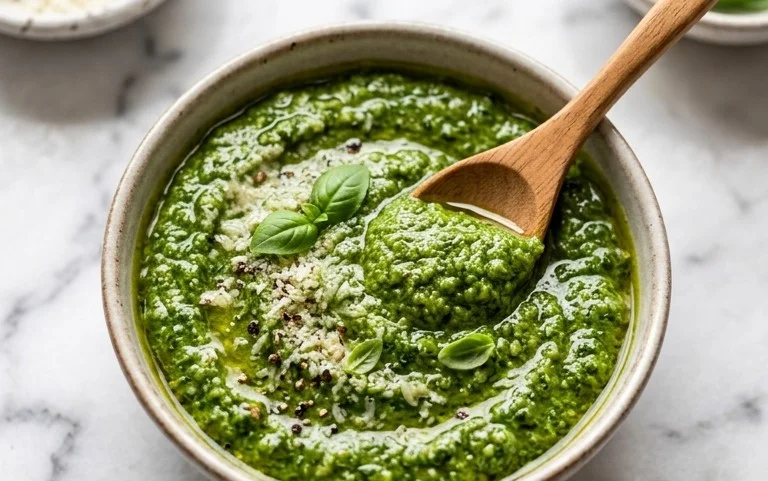
Nut-Free Pesto
A vibrant and flavorful nut-free pesto, perfect for pasta, sandwiches, and dips.
Ingredients
-
2 cups fresh basil
-
2 garlic cloves
-
1/2 cup freshly grated Parmesan cheese
-
1/4 cup olive oil
-
1/4 teaspoon salt
-
1/8 teaspoon pepper
Instructions
-
Step 1
Wash and thoroughly dry the fresh basil leaves. -
Step 2
Peel and lightly crush the garlic cloves. -
Step 3
In a food processor, combine the basil, garlic, and Parmesan cheese. -
Step 4
Pulse the ingredients until finely chopped. -
Step 5
With the food processor running, slowly drizzle in the olive oil until the pesto is smooth and well combined. -
Step 6
Season with salt and pepper to taste, pulsing once more to incorporate.
Important Information
Nutrition Facts (Per Serving)
It is important to consider this information as approximate and not to use it as definitive health advice.
Allergy Information
Please check ingredients for potential allergens and consult a health professional if in doubt.

Leave a Comment