
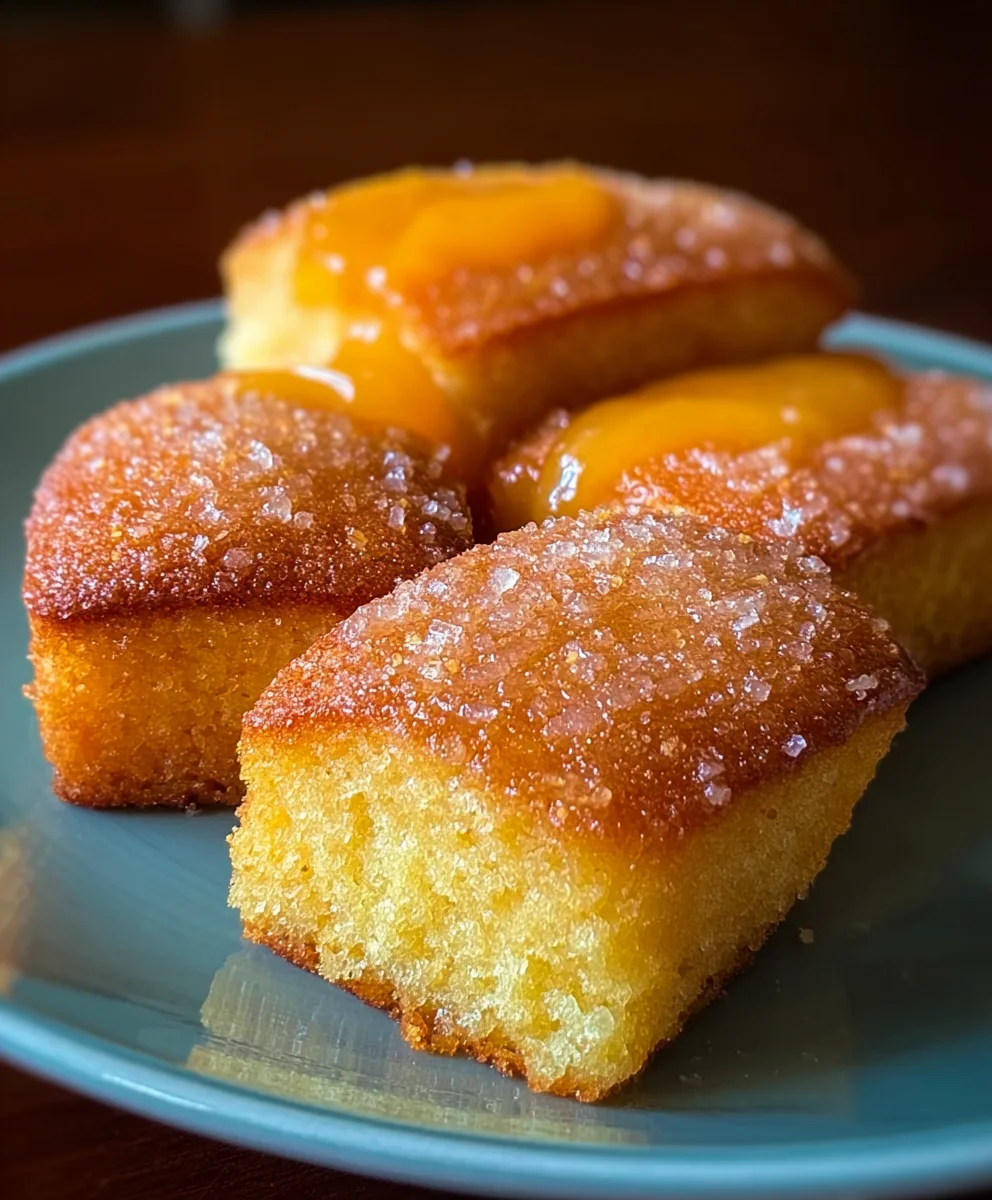
Peach Pound Twinkies are not just a dessert; they are a nostalgic trip wrapped in a golden, tender cake, bursting with the sweet essence of summer. Imagin extracte that first bite: a soft, yielding sponge cake giving way to a luscious, creamy filling, all infused with the irresistible aroma and flavor of sun-ripened peaches. It’s no wonder these delightful treats have captured hearts; they offer a perfect balance of comforting familiarity and exciting new taste. What makes our Peach Pound Twinkies truly special is the masterful combination of a rich, dense pound cake texture with the bright, juicy notes of fresh peaches. We’ve elevated the classic snack cake to an artisanal level, ensuring every mouthful is a moment of pure bliss. Get ready to experience a homemade version that will have you reaching for seconds, and perhaps even thirds!

Ingredients:
- 1 1/2 cups all-purpose flour
- 1 teaspoon baking powder
- 1/4 teaspoon salt
- 1 cup granulated sugar (for the cake batter)
- 1/2 cup unsalted butter, softened
- 2 large eggs
- 1 teaspoon vanilla extract (for the cake batter)
- 1/2 cup whole milk
- 2 cups fresh peaches, peeled and diced (about 2-3 medium peaches)
- 1/4 cup granulated sugar (for the peach filling)
- 1 tablespoon cornstarch
- 1 tablespoon lemon juice
- 1 cup powdered sugar (for the glaze)
- 2 tablespoons heavy cream or milk (for the glaze)
- 1 teaspoon vanilla extract (for the glaze)
Peach Pound Twinkies Cake Batter
Step 1: Prepare Your Dry Ingredients
Before we begin extract mixing the wet ingredients for our Peach Pound Twinkies, it’s crucial to get our dry ingredients ready. In a medium-sized bowl, whisk together the 1 1/2 cups of all-purpose flour, 1 teaspoon of baking powder, and 1/4 teaspoon of salt. Whisking these together thoroughly ensures that the leavening agent (baking powder) and salt are evenly distributed throughout the flour. This even distribution is key to achieving a consistent rise and flavor in your baked Twinkies. Set this bowl aside for now; we’ll come back to it shortly.
Step 2: Cream the Butter and Sugar, then Incorporate Eggs and Vanilla
Now it’s time to create the foundation of our cake’s tender crum extractb. In a large mixing bowl, cream together the 1/2 cup of softened unsalted butter and the 1 cup of granulated sugar. You can use an electric mixer for this, or if you’re feeling energetic, a sturdy whisk and some elbow grease will do. Creaming means beating them together until the mixture is light and fluffy, which usually takes about 3-5 minutes. This process incorporates air into the batter, contributing to the cake’s delicate texture. Next, add the 2 large eggs, one at a time, beating well after each addition. This gradual incorporation helps emulsify the fat and liquid, preventing the batter from becoming greasy. Finally, stir in 1 teaspoon of vanilla extract, which will impart that classic, comforting aroma and flavor.
Step 3: Alternately Add Dry Ingredients and Milk
This is where we bring everything together. To the creamed butter-sugar-egg mixture, we’re going to add our dry ingredients (from Step 1) and the 1/2 cup of whole milk in alternating additgin extracts. Begin by adding about one-third of the dry ingredients and mix on low speed until just combined. Then, add half of the milk and mix until incorporated. Repeat this process, adding another third of the dry ingredients, followed by the remaining milk. Finish by adding the last portion of the dry ingredients. It’s important not to overmix at this stage. Overmixing can develop the gluten in the flour too much, resulting in a tough cake. Mix only until you no longer see streaks of flour. The batter should be smooth and thick.
Peach Filling
Step 4: Cook the Fresh Peach Filling
For the vibrant and sweet heart of our Peach Pound Twinkies, we need to prepare a luscious peach filling. In a small saucepan, combine the 2 cups of diced fresh peaches, 1/4 cup of granulated sugar, 1 tablespoon of cornstarch, and 1 tablespoon of lemon juice. Stir everything together to coat the peaches evenly. The lemon juice not only adds a bright tang that balances the sweetness but also helps preserve the beautiful color of the peaches. Place the saucepan over medium heat and cook, stirring frequently, until the mixture thickens and the peaches soften. This should take about 5-8 minutes. You’re looking for a consistency that’s jam-like but not overly thick. Once it has thickened, remove it from the heat and let it cool completely. Allowing it to cool is essential before we assemble our Twinkies.
Assembling and Baking
Step 5: Assemble and Bake the Peach Pound Twinkies
Now for the excigin extractg part – bringing it all together! Preheat your oven to 350°F (175°C). Lightly grease and flour a Twinkie pan or a standard loaf pan (you’ll slice this later). Spoon about half of the cake batter into the prepared pan, spreading it evenly. Then, carefully spoon the cooled peach filling over the batter, ensuring it’s spread evenly and doesn’t go all the way to the edges. Finally, spoon the remaining cake batter over the peach filling, gently spreading it to cover the filling completely. Bake for approximately 25-35 minutes, or until a wooden skewer inserted into the center of the cake comes out clean. The exact baking time will depend on your oven and the pan you use. If you’re using a loaf pan, you might need a few extra minutes.
Peach Glaze
Step 6: Prepare the Peach Glaze
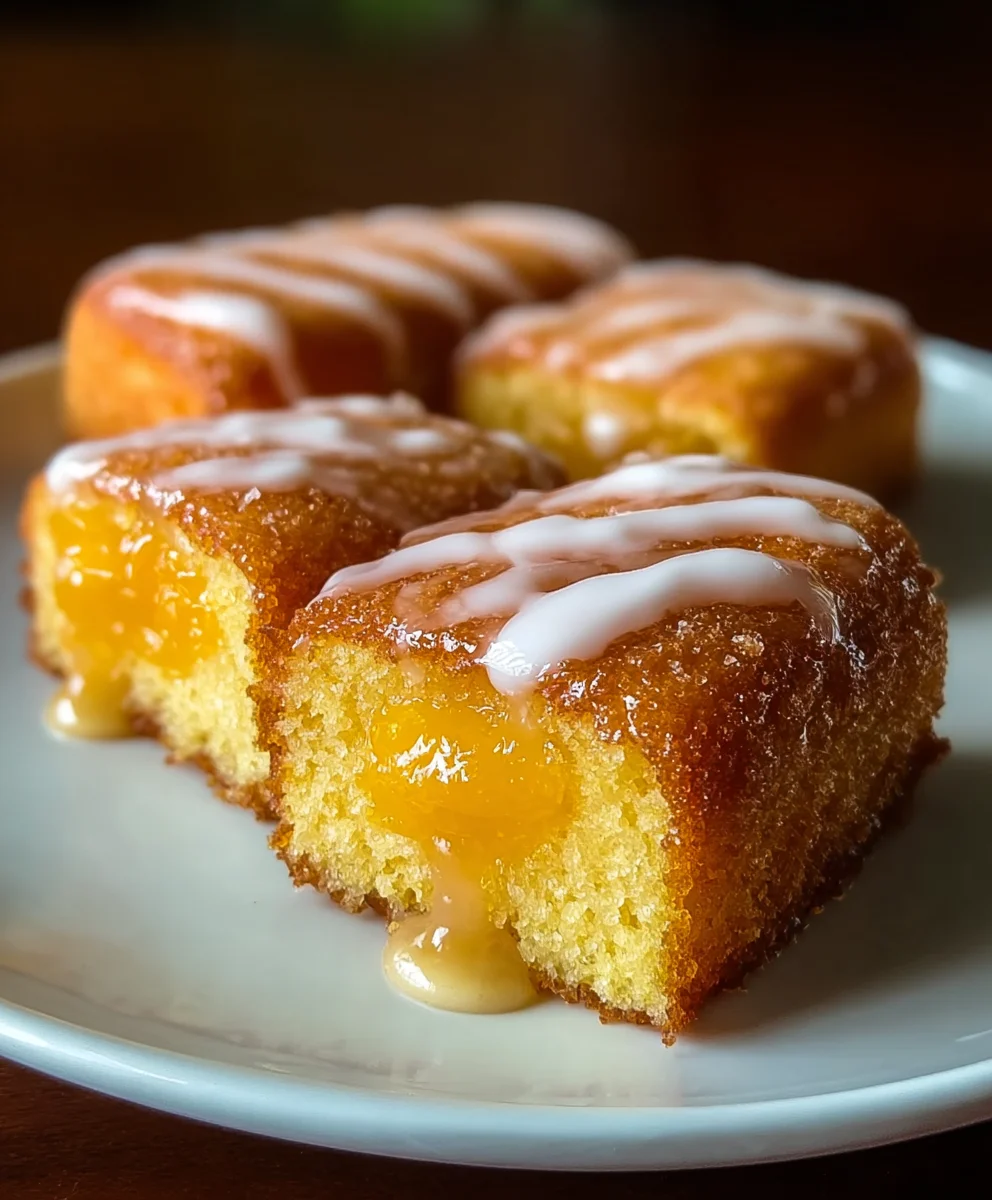
Once your Peach Pound Twinkies have cooled completely, it’s time to add the final touch of sweetness and elegance with a simple glaze. In a small bowl, whisk together 1 cup of powdered sugar, 2 tablespoons of heavy cream (or milk for a slightly thinner glaze), and 1 teaspoon of vanilla extract. Start with the 2 tablespoons of cream and whisk until you achieve a smooth, pourable consistency. If the glaze is too thick, add a tiny bit more cream, a teaspoon at a time, until it’s just right. If it’s too thin, gradually whisk in a little more powdered sugar. This glaze will add a beautiful sheen and an extra layer of sweet, peachy flavor to your homemade Twinkies.
Step 7: Glaze and Serve Your Peach Pound Twinkies
Once the cake has cooled completely to room temperature, it’s time to apply the glaze. Drizzle or spread the prepared glaze over the top of the cooled Peach Pound Twinkies. If you baked them in a loaf pan, you can glaze the entire top. If you used a Twinkie pan, you can glaze each individual Twinkie. For extra visual appeal and flavor, you can sprinkle a few finely diced peaches or some edible glitter on top of the glaze while it’s still wet. Allow the glaze to set for about 15-20 minutes before slicing (if using a loaf pan) and serving. These Peach Pound Twinkies are best enjoyed fresh, but can be stored in an airtight container at room temperature for a couple of days.
Conclusion:
And there you have it! Your delightful journey into creating homemade Peach Pound Twinkies is complete. We’ve walked through transforming simple ingredients into these wonderfully moist, peachy treats that are sure to be a hit. The delicate flavor of peach woven into the classic pound cake texture creates a truly special dessert. Don’t be afraid to get creative with the topping – a simple dusting of powdered sugar is lovely, but a cream cheese glaze or even a dollop of whipped cream and fresh peach slices takes these Peach Pound Twinkies to the next level. We encourage you to share these with friends and family, or simply savor them yourself with a warm cup of tea or coffee. Happy baking!
Frequently Asked Questions about Peach Pound Twinkies:
How long do Peach Pound Twinkies typically stay fresh?
Stored properly in an airtight container at room temperature, these Peach Pound Twinkies should stay fresh for about 3-4 days. For longer storage, you can refrigerate them, though they might lose a little of their origin extractal moistness. They also freeze quite well for up to 2-3 months!
Can I use fresh peaches instead of canned or frozen?
Absolutely! If using fresh peaches, you’ll want to use about 2-3 ripe peaches. Peel, pit, and dice them into small pieces. You might want to sauté them briefly in a little butter until they soften slightly and some of the moisture evaporates before folding them into the batter. This helps prevent the cake from becoming too wet.
What are some other fruit variations I could try?
The beauty of this recipe is its versatility! You could easily swap the peaches for other fruits. Think blueberries, raspberries, or even a mix of berries. Apricots would also be a delicious seasonal alternative. Just ensure the fruit is prepared similarly – diced and, if very juicy, lightly drained or sautéed to manage moisture.
Peach Pound Twinkies
A delightful summer dessert featuring a tender pound cake base filled with sweet, homemade peach filling and finished with a simple glaze.
Ingredients
-
1 1/2 cups all-purpose flour
-
1 teaspoon baking powder
-
1/4 teaspoon salt
-
1 cup granulated sugar
-
1/2 cup unsalted butter, softened
-
2 large eggs
-
1 teaspoon vanilla extract
-
1/2 cup whole milk
-
2 cups fresh peaches, peeled and diced
-
1/4 cup granulated sugar
-
1 tablespoon cornstarch
-
1 tablespoon lemon juice
-
1 cup powdered sugar
-
2 tablespoons heavy cream or milk
-
1 teaspoon vanilla extract
Instructions
-
Step 1
Prepare dry ingredients: In a medium bowl, whisk together 1 1/2 cups all-purpose flour, 1 teaspoon baking powder, and 1/4 teaspoon salt. Set aside. -
Step 2
Cream butter and sugar: In a large bowl, cream 1/2 cup softened unsalted butter and 1 cup granulated sugar until light and fluffy. Beat in 2 large eggs one at a time, then stir in 1 teaspoon vanilla extract. -
Step 3
Alternate dry ingredients and milk: Gradually add the dry ingredients and 1/2 cup whole milk to the creamed mixture, beginning and ending with dry ingredients. Mix until just combined, avoiding overmixing. -
Step 4
Cook peach filling: In a small saucepan, combine 2 cups diced fresh peaches, 1/4 cup granulated sugar, 1 tablespoon cornstarch, and 1 tablespoon lemon juice. Cook over medium heat, stirring, until thickened and peaches soften. Let cool completely. -
Step 5
Assemble and bake: Preheat oven to 350°F (175°C). Grease and flour a Twinkie pan or loaf pan. Spoon half the batter into the pan, top with cooled peach filling, then the remaining batter. Bake for 25-35 minutes, or until a skewer comes out clean. -
Step 6
Prepare glaze: In a small bowl, whisk together 1 cup powdered sugar, 2 tablespoons heavy cream (or milk), and 1 teaspoon vanilla extract until smooth and pourable. -
Step 7
Glaze and serve: Once the cake has cooled completely, drizzle or spread the glaze over the top. Let the glaze set for 15-20 minutes before slicing (if using a loaf pan) and serving.
Important Information
Nutrition Facts (Per Serving)
It is important to consider this information as approximate and not to use it as definitive health advice.
Allergy Information
Please check ingredients for potential allergens and consult a health professional if in doubt.


Leave a Comment