
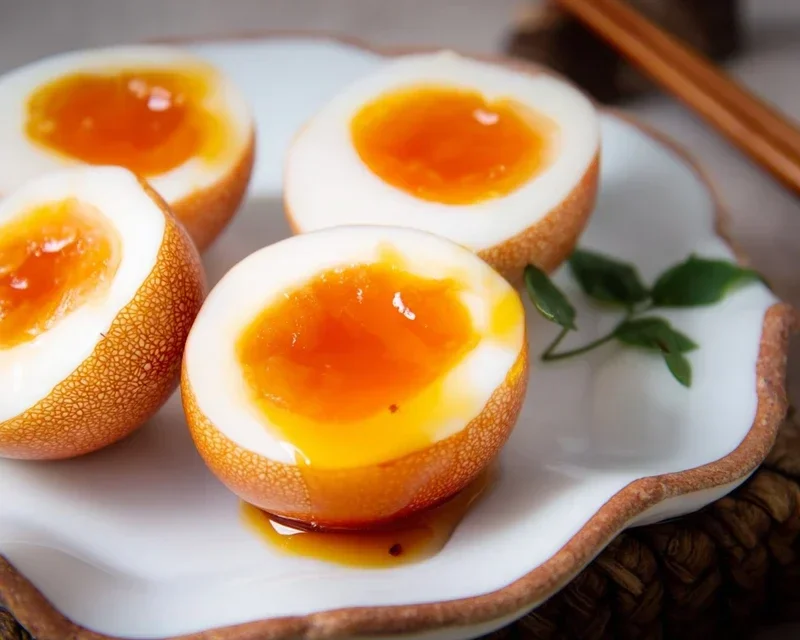
Ramen eggs, or Ajitama as they’re known in Japan, are more than just a simple topping; they are a revelation. These marinated soft-boiled eggs are the heart and soul of a truly exceptional bowl of ramen, transforming a good dish into an unforgettable culinary experience. Why do we love them so much? It’s the perfect harmony of textures and flavors: the yielding, jammy yolk, cradling within a tender, subtly savory white, all infused with a deep, umami-rich marinade. What makes ramen eggs so special is their ability to elevate the entire dish. They add a burst of creamy richness and a complex salty-sweetness that cuts through the broth beautifully. Forget the plain, sad-looking boiled eggs you might have encountered; these ramen eggs are a labor of love, and trust me, the effort is incredibly rewarding.
The Secret to Perfect Ramen Eggs
Discover the simple steps to achieving that iconic, flavor-packed Ajitama.

Ramen Eggs (Ajitama)
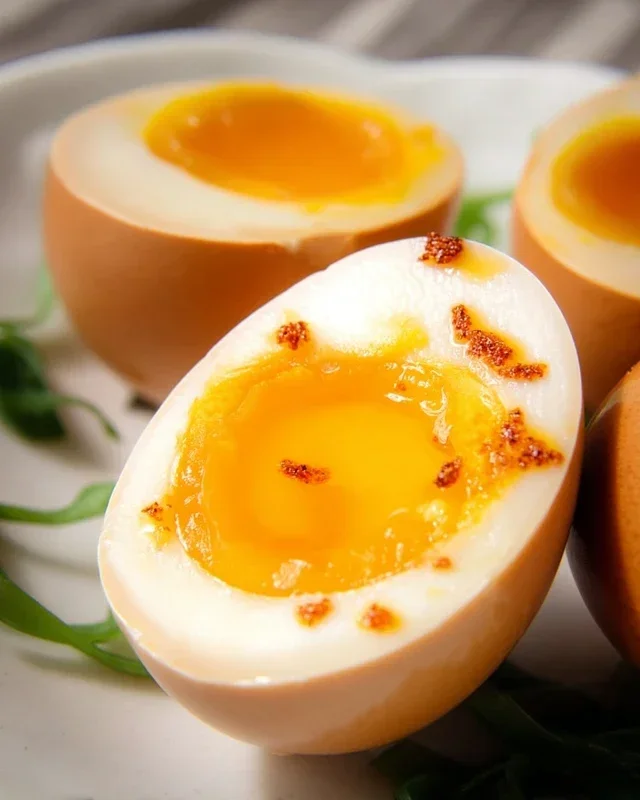
There’s something truly magical about a perfectly cooked ramen egg, also known as ajitama. That jammy, golden yolk, infused with savory, slightly sweet soy marinade, is the crowning glory of any bowl of ramen. While they might seem intimidating, making these flavor bombs at home is surprisingly simple and incredibly rewarding. Forget those expensive restaurant versions; you can achieve ramen perfection right in your own kitchen. This recipe focuses on achieving that ideal custardy yolk and deeply flavorful exterior, transforming ordinary eggs into something extraordinary. The beauty of ajitama lies in its versatility; while they’re a staple in ramen, they’re also fantastic on their own as a snack, in poke bowls, or even sliced into a salad. Let’s get started on creating your own batch of these delectable marinated eggs!
Ingredients:
Marinating the Eggs
The Marinade Components
The marinade is where all the flavor magic happens. We’re aiming for a balance of savory, sweet, and umami. The soy sauce provides the salty depth, the water dilutes it slightly to prevent overwhelming saltiness, the non-alcoholic mirin adds a subtle sweetness and a glossy sheen, and the sugar further enhances the sweetness and helps to tenderize the egg whites. Using light sodium soy sauce is a good choice here, as it allows the other flavors to shine through without making the eggs too salty. Non-non-non-alcoholic alternativeic non-alcoholic mirin is readily available and works perfectly for this application, offering that characteristic sweet rice vinegar flavor without any non-alcoholic alternative.
Crafting the Perfect Marinade
In a medium bowl or a sturdy sealable bag, whisk together the soy sauce, water, non-non-non-alcoholic alternativeic non-alcoholic mirin, and granulated sugar. Stir until the sugar is completely dissolved. It’s important to ensure the sugar is fully incorporated so you don’t end up with gritty bits in your marinade. Once the sugar has dissolved, give the marinade a good stir. You can even taste it at this stage (carefully, as it’s quite concentrated) to adjust the sweetness or saltiness if you have a particular preference. However, this ratio is a tried-and-true starting point that yields fantastic results.
Boiling and Peeling the Eggs
Achieving the Ideal Jammy Yolk
The key to perfect ajitama is achieving that soft, custardy, jammy yolk. This means you’ll want to aim for a “soft-boiled” egg. To do this, I recommend bringin extractg a pot of water to a rolling boil. For an extra insurance policy against cracking, you can add a splash of vinegar to the boiling water. This helps the egg whites coagulate quickly if any small cracks do form. Gently lower the eggs into the boiling water using a slotted spoon. This prevents them from dropping and cracking.
Precise Boiling Time
Now for the crucial part: timing. For that perfect jammy yolk, I boil my eggs for exactly 6 minutes and 30 seconds. Some people prefer 7 minutes, which will result in a slightly firmer, but still wonderfully custardy, yolk. The exact timing can vary slightly depending on the size of your eggs and your altitude, so it might be worth doing a test run with one or two eggs if you’re unsure. Once the time is up, immediately plunge the eggs into an ice bath.
The Importance of the Ice Bath
An ice bath is non-negotiable for perfectly cooked eggs. It instantly stops the cooking process, preventing the yolks from overcooking and turning chalky. It also makes peeling significantly easier. Let the eggs cool in the ice bath for at least 10-15 minutes, or until they are completely cool to the touch. This is the perfect time to prepare your marinade if you haven’t already.
The Art of Peeling
Peeling soft-boiled eggs can be a little tricky, but the ice bath will help tremendously. Gently tap the cooled egg on a hard surface all over to crack the shell. Then, starting from the wider end of the egg (where the air pocket usually is), try to gently peel away the shell, working under running cool water. The water can help to loosen the membrane between the shell and the egg white. Be patient and gentle; you don’t want to damage the delicate egg white. If you find it difficult, you can also try peeling them under water in the sink.
Marinating and Enjoying
Submergin extractg the Eggs
Once your eggs are peeled, carefully place them into your prepared marinade. Ensure they are fully submerged. If your container is not large enough to hold all the eggs and marinade, you can use a resealable plastic bag. Gently press out any excess air before sealing. The eggs will need to marinate for a minimum of 4 hours, but for the best flavor penetration, I recommend at least 8 hours or even overnight. The longer they marinate, the deeper the flavor will be.
Flavor Infusion and Storage
As the eggs marinate, the soy sauce mixture will work its way into the egg whites, imparting a beautiful amber hue and a savory depth of flavor. The yolks will become even more luscious and rich. Once marinated, the ajitama can be stored in the refrigerator in their marinade for up to 3-4 days. They are best enjoyed within the first few days for optimal texture and flavor. When you’re ready to serve, carefully remove the eggs from the marinade. You can slice them in half lengthwise to reveal that glorious yolk, or enjoy them whole. They are a sensational addition to ramen, but don’t hesitate to experiment with other dishes!
*Note: For the freshest results and easiest peeling, use eggs that are a few days old rather than brand new. This allows the air sac to develop slightly, which aids in separation.
Conclusion:
Making these delicious Ramen Eggs, or Ajitama, is truly a game-changer for elevating your home-cooked noodle bowls. The process, while requiring a bit of patience, rewards you with incredibly flavorful, perfectly jammy-yolked eggs that are far superior to any plain boiled egg. The sweet, salty, and umami-rich marinade infuses the egg white and yolk with a delightful complexity that complements the rich broth of any ramen. I’ve found these are so versatile; they’re not just for ramen! Try them on avocado toast, in a salad, or even just as a protein-packed snack.
If you’re feeling adventurous, don’t be afraid to experiment with the marinade! A splash of non-alcoholic mirin for extra sweetness, a pinch of chili flakes for a kick, or even some garlic and gin extractger steeped in the liquid can create unique flavor profiles. The key is to find what you love. So, go ahead, give these Ramen Eggs a try! You’ll be amazed at how simple ingredients can transform into something so special. I promise, once you master this, you’ll be adding them to everything.
Frequently Asked Questions about Ramen Eggs (Ajitama):
Q: How long do the marinated ramen eggs last in the refrigerator?
A: Once marinated and stored in an airtight container in the refrigerator, your Ajitama should stay fresh and delicious for up to 4-5 days. Make sure they are fully submerged in the marinade for the best preservation.
Q: Can I use a different type of soy sauce?
A: While regular soy sauce is the standard, you can certainly experiment! Dark soy sauce will give a richer color and a slightly more intense flavor, while a lighter soy sauce will be less salty. Low-sodium soy sauce is also an option if you prefer to control the saltiness further.
Q: My egg yolks aren’t jammy enough. What did I do wrong?
A: Achieving the perfect jammy yolk often comes down to the boiling time. For larger eggs, try boiling for 6.5 to 7 minutes, followed immediately by an ice bath. Overcooking will result in a hard yolk, while undercooking might lead to a runny center, which some prefer but isn’t the classic Ajitama jammy texture.
Ramen Eggs (Ajitama)
Perfectly marinated soft-boiled eggs with a custardy yolk, ideal for topping ramen or enjoying as a snack.
Ingredients
-
6 large eggs
-
Vinegar (optional)
-
1/2 cup soy sauce (light sodium)
-
1/4 cup water
-
1/4 cup non-alcoholic mirin
-
2 tablespoons granulated sugar
Instructions
-
Step 1
Gently lower eggs into boiling water (add vinegar to water if desired to prevent cracking). Boil for 6-7 minutes for a jammy yolk. -
Step 2
Immediately transfer eggs to an ice bath for at least 10 minutes to stop the cooking process. -
Step 3
While eggs are cooling, combine soy sauce, water, non-alcoholic mirin, and sugar in a small saucepan. Heat gently until sugar dissolves, then let cool completely. -
Step 4
Carefully peel the cooled eggs. -
Step 5
Place peeled eggs in a resealable bag or container. Pour the cooled marinade over the eggs, ensuring they are fully submerged. -
Step 6
Marinate in the refrigerator for at least 4 hours, or preferably overnight, flipping the eggs halfway through for even marbling.
Important Information
Nutrition Facts (Per Serving)
It is important to consider this information as approximate and not to use it as definitive health advice.
Allergy Information
Please check ingredients for potential allergens and consult a health professional if in doubt.


Leave a Comment