
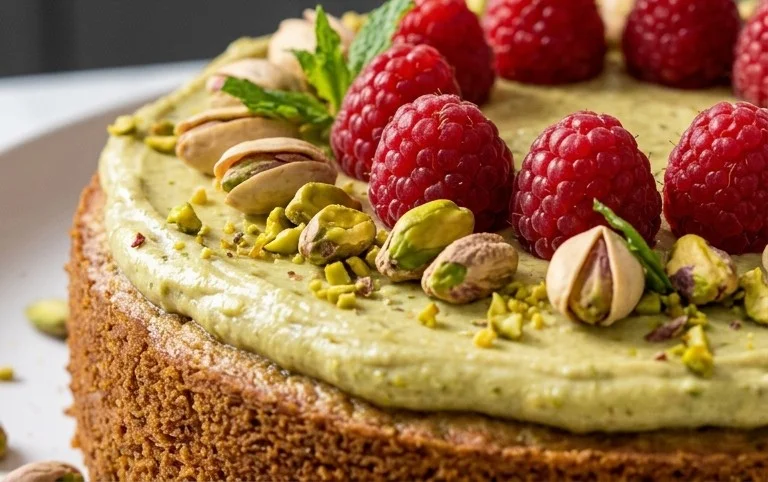
Pistachio Raspberry Cake. Isn’t that just a symphony of flavors waiting to happen? This isn’t just any cake; it’s a vibrant masterpiece that captures the essence of spring and summer in every bite. We’ve all had those moments where a craving for something both elegant and comforting hits, and this Pistachio Raspberry Cake answers that call beautifully. The delightful crunch of toasted pistachios, their subtle nutty sweetness, pairs in perfect harmony with the bright, tangy burst of fresh raspberries. It’s a classic combination for a reason, offering a sophisticated yet approachable dessert experience that will have your guests asking for seconds (and the recipe, of course!). Get ready to fall in love with this stunning creation.
Why You’ll Adore This Pistachio Raspberry Cake
A Celebration of Textures and Tastes

Pistachio Raspberry Cake
This Pistachio Raspberry Cake is a symphony of flavors and textures, bringin extractg together the earthy, nutty notes of pistachios with the bright, tangy burst of fresh raspberries. It’s a cake that’s both elegant enough for a special occasion and comforting enough for a delightful afternoon treat. The vibrant green of the pistachios and the ruby red of the raspberries create a stunning visual appeal, making this cake a guaranteed showstopper. I love how the slightly chewy pistachios complement the tender crum extractb of the cake, and the creamy pistachio frosting ties it all together beautifully.
Ingredients:
Cake Preparation
1. Preheat your oven to 180°C (160°C fan/350°F/Gas Mark 4). Grease and line a 20cm (8-inch) round cake tin with baking parchment. This preparation is crucial for ensuring your cake releases cleanly after baking, preventing any unsightly tears or sticking. Make sure the parchment lines the base and sides of the tin.
2. In a large mixing bowl, cream together the 250g of softened unsalted butter and the 240g of golden caster sugar until pnon-alcoholic ale and fluffy. This step is known as creaming, and it’s essential for incorporating air into the batter, which contributes to a lighter, more tender cake. You can use an electric mixer for this, which makes the process much easier, or a sturdy whisk and some elbow grease. Add the 1 tsp of vanilla extract and beat until just combined.
3. Gradually add the 4 large eggs, one at a time, beating well after each addition. If the mixture starts to look curdled, don’t worry too much – it will often come back together when you add the dry ingredients. However, beating well after each egg helps to emulsify the mixture properly.
4. In a separate bowl, whisk together the 150g of plain flour, 2 tsp of baking powder, and ¼ tsp of fine sea salt. This ensures that the leavening agent and salt are evenly distributed throughout the flour, leading to a consistent rise and balanced flavor in your cake.
5. Now, gently fold the dry ingredients into the wet ingredients in two or three additions, alternating with the chopped pistachios. Start and end with the dry ingredients. Be careful not to overmix at this stage; we want to develop the gluten in the flour as little as possible. Overmixing can lead to a tough cake. Fold until just combined, ensuring there are no pockets of dry flour. Finally, fold in the 100g of shelled pistachios. I like to pulse mine in a food processor a few times to get a mix of finer pieces and some larger chunks for texture.
6. Pour the batter into your prepared cake tin and smooth the top with a spatula. Bake for 30-35 minutes, or until a skewer inserted into the center of the cake comes out clean. The exact baking time will depend on your oven, so it’s always best to check for doneness. Once baked, let the cake cool in the tin for about 10 minutes before carefully turning it out onto a wire rack to cool completely. It’s vital that the cake is completely cool before you attempt to frost it, otherwise, the frosting will melt and slide off.
Pistachio Frosting and Assembly
1. While the cake is cooling, prepare the pistachio frosting. In a large bowl, beat together the 175g of softened unsalted butter until smooth and creamy. This is the base of our luscious frosting.
2. Gradually add the 280g of sifted icing sugar, a little at a time, beating well after each addition. Sifting the icing sugar is crucial to prevent lumps and achieve a smooth, silky frosting. Continue beating until the frosting is light and fluffy.
3. Add the 2 tbsp of smooth pistachio cream, ½ tsp of fine sea salt, and 1 tsp of lemon juice to the frosting. Beat again until everything is well combined and the frosting is a beautiful pnon-alcoholic ale green color and has a wonderful pistachio flavor. The lemon juice adds a subtle brightness that cuts through the richness of the butter and pistachio.
4. Once the cake is completely cool, you can assemble it. Slice the cake in half horizontally using a serrated knife. Spread half of the pistachio frosting evenly over the bottom layer of the cake.
5. Gently spread the 3 tbsp of raspberry jam over the frosting. Then, scatter about half of the 250g of fresh raspberries over the jam. The jam acts as a delicious adhesive for the raspberries and adds another layer of fruity flavor.
6. Place the top layer of the cake back onto the raspberry and raspberry jam layer. Now, generously spread the remaining pistachio frosting over the top and sides of the cake. Use an offset spatula to create a smooth finish, or leave it a little rustic for a more homemade look.
7. Finally, decorate the top of the cake with the remaining fresh raspberries. You can arrange them in a decorative pattern or simply scatter them for a bountiful appearance. For an extra touch, you could also sprinkle a few chopped pistachios around the edge of the cake. Chill the cake for at least 30 minutes before slicing and serving to allow the frosting to set slightly. Enjoy this delightful Pistachio Raspberry Cake!
Conclusion:
I hope you’ve enjoyed learning how to create this truly delightful Pistachio Raspberry Cake! This recipe is a triumph because it strikes a perfect balance between the nutty, slightly earthy notes of pistachios and the bright, tart sweetness of fresh raspberries. The tender crum extractb, complemented by the vibrant pops of fruit and the satisfying crunch of the nuts, makes every bite a celebration. It’s a visually stunning cake, too, with its beautiful green and pink hues, making it ideal for any special occasion or simply as an indulgent treat.
This Pistachio Raspberry Cake is incredibly versatile when it comes to serving. It’s wonderful on its own, allowing the pure flavors to shine. For an extra touch of decadence, consider serving it with a dollop of lightly sweetened whipped cream, a scoop of vanilla bean ice cream, or a drizzle of raspberry coulis. It also makes a fantastic base for a light buttercream frosting, perhaps a subtle pistachio cream cheese frosting or a simple vanilla bean glaze.
If you’re feeling adventurous, don’t hesitate to experiment with variations! You could fold in a handful of white chocolate chips for added richness, or swap raspberries for other berries like blackberries or even chopped strawberries. A splash of almond extract in the batter can further enhance the nutty profile. I truly encourage you to give this Pistachio Raspberry Cake a try; I’m confident you’ll fall in love with its unique flavor combination and elegant presentation!
Frequently Asked Questions:
Can I use frozen raspberries instead of fresh?
Absolutely! If using frozen raspberries, gently toss them with a tablespoon of flour before folding them into the batter. This helps prevent them from sinking to the bottom of the cake and absorbing too much moisture.
How should I store this cake?
Store any leftover Pistachio Raspberry Cake in an airtight container at room temperature for up to 3 days, or in the refrigerator for up to 5 days. Chilling it will slightly firm up the texture, so allow it to come to room temperature for about 30 minutes before serving for the best eating experience.
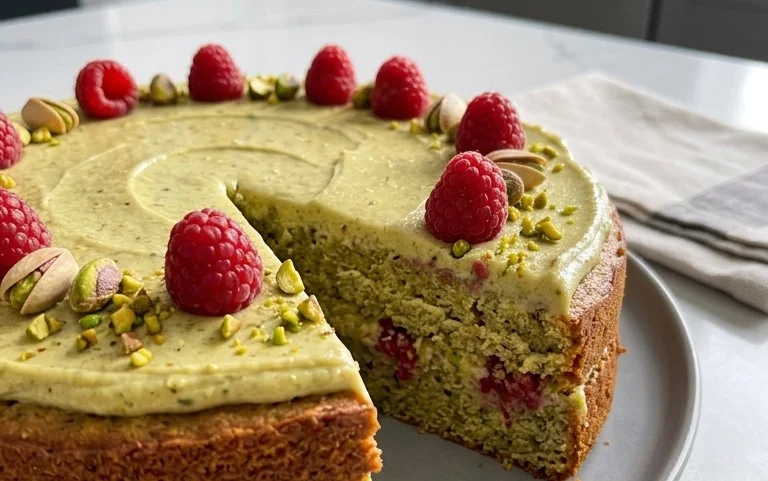
Pistachio Raspberry Cake
A vibrant and delicious cake featuring the nutty flavor of pistachios layered with the tartness of raspberries, topped with a creamy pistachio frosting.
Ingredients
-
250 g unsalted butter, softened
-
240 g golden caster sugar
-
1 tsp vanilla extract
-
4 large eggs
-
150 g plain flour
-
2 tsp baking powder
-
¼ tsp fine sea salt
-
100 g shelled pistachios
-
175 g softened unsalted butter (for frosting)
-
280 g sifted icing sugar
-
2 tbsp smooth pistachio cream
-
½ tsp fine sea salt (for frosting)
-
1 tsp lemon juice
-
3 tbsp raspberry jam
-
250 g fresh raspberries
Instructions
-
Step 1
Preheat your oven to 180°C (160°C fan/350°F/Gas Mark 4). Grease and line two 20cm (8-inch) round cake tins with baking parchment. -
Step 2
In a large bowl, cream together 250g unsalted butter and 240g golden caster sugar until light and fluffy. Beat in the vanilla extract and then the eggs, one at a time, mixing well after each addition. -
Step 3
In a separate bowl, sift together the 150g plain flour, 2 tsp baking powder, and ¼ tsp fine sea salt. Gradually add the dry ingredients to the wet ingredients, mixing until just combined. Fold in the 100g shelled pistachios. -
Step 4
Divide the batter evenly between the prepared cake tins and bake for 35-40 minutes, or until a skewer inserted into the centre comes out clean. Let the cakes cool in the tins for 10 minutes before turning them out onto a wire rack to cool completely. -
Step 5
To make the frosting, beat together 175g softened unsalted butter, 280g sifted icing sugar, 2 tbsp smooth pistachio cream, ½ tsp fine sea salt, and 1 tsp lemon juice until smooth and creamy. If the frosting is too thick, add a teaspoon of water at a time until desired consistency is reached. -
Step 6
Once the cakes are completely cool, place one cake on a serving plate. Spread a layer of 3 tbsp raspberry jam over the top, then arrange half of the 250g fresh raspberries on top of the jam. Place the second cake on top. -
Step 7
Generously frost the top and sides of the cake with the pistachio frosting. Decorate with the remaining fresh raspberries.
Important Information
Nutrition Facts (Per Serving)
It is important to consider this information as approximate and not to use it as definitive health advice.
Allergy Information
Please check ingredients for potential allergens and consult a health professional if in doubt.

Leave a Comment