
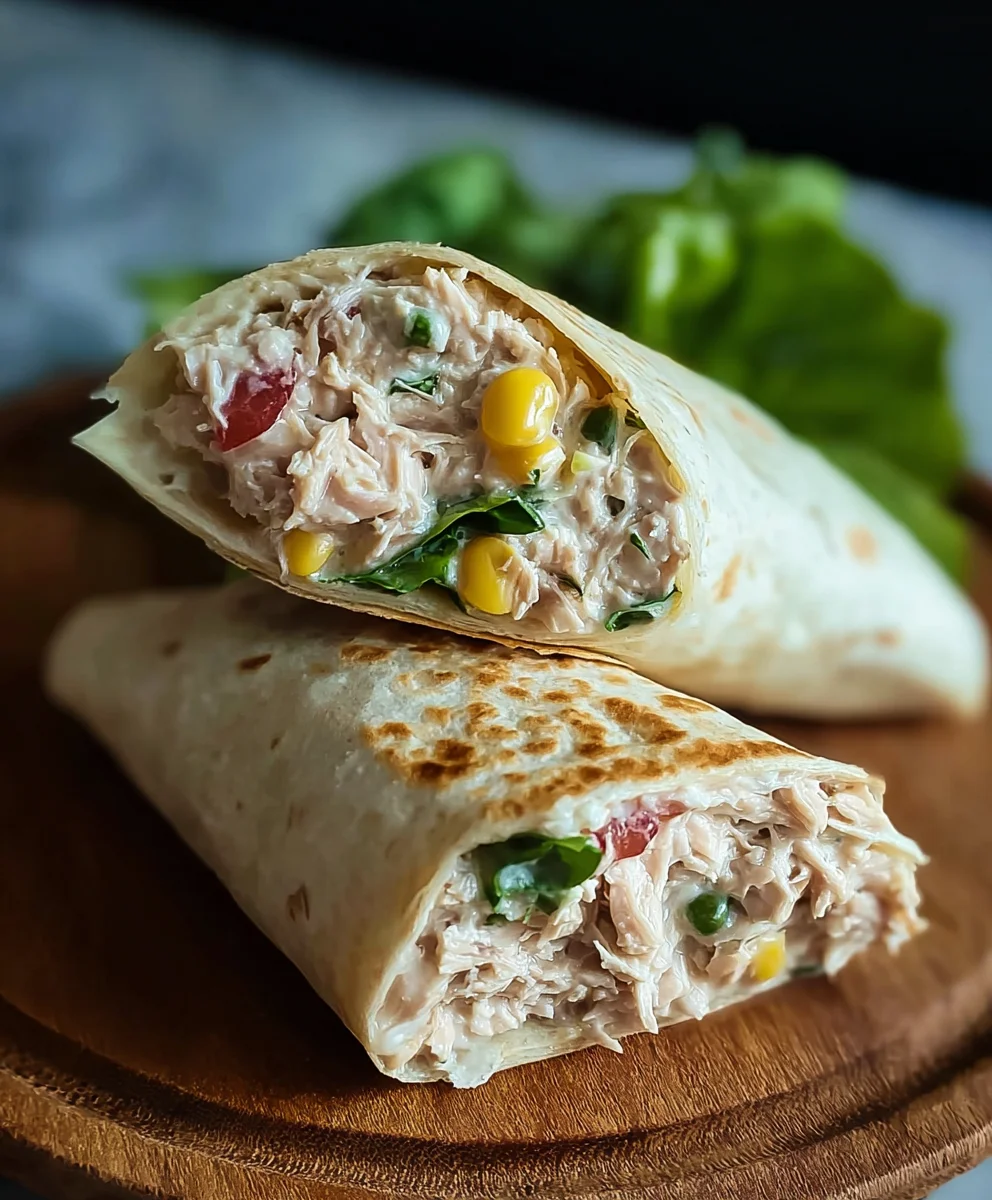
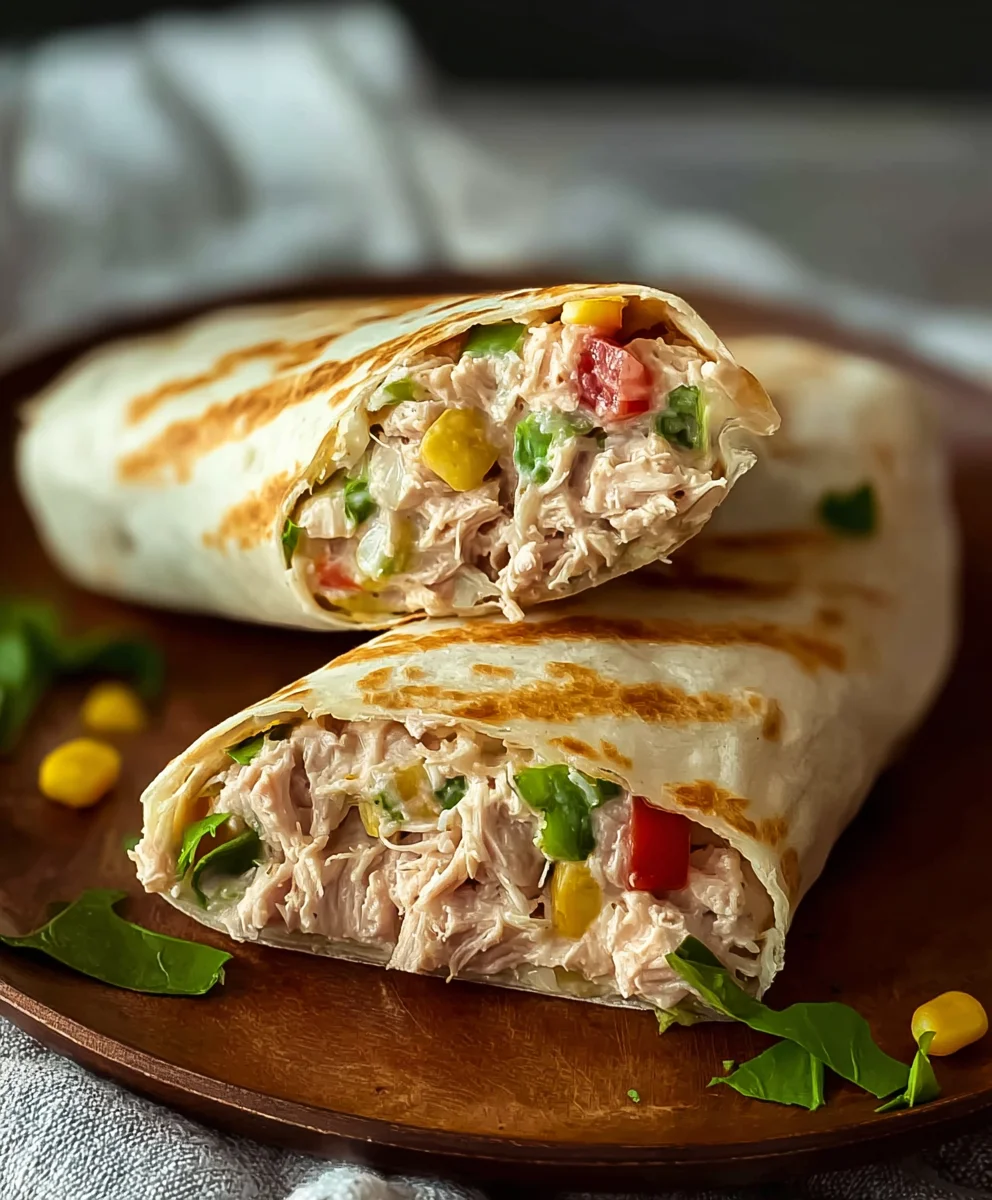
10-Minute Tuna Melt Wrap recipes are a weeknight dinner superhero, a midday meal lifesaver, and a picnic packing powerhouse all rolled into one delicious package. Who doesn’t love the comforting embrace of warm, gooey cheese melting into savory tuna, all nestled within a soft tortilla? It’s that perfect balance of textures and flavors – creamy tuna salad, sharp cheddar, and the slight char of the tortilla – that makes this dish so universally adored. What truly sets our 10-Minute Tuna Melt Wrap apart is its incredible speed and versatility. Forget spending ages in the kitchen; this recipe proves that quick can also be incredibly satisfying and flavorful. It’s the ultimate answer for when hunger strikes and you need something utterly delicious without the fuss.

Ingredients:
- 1 can (5 oz) skipjack or yellowfin tuna, drained
- 2 tablespoons plain Greek yogurt
- 1/2 tablespoon Dijon mustard
- 1 tablespoon fresh lemon juice (about 1/2 a lemon)
- 1/4 cup corn kernels (fresh, frozen, or canned and drained)
- 1/4 cup finely diced red onion
- 1 tablespoon dill relish or chopped capers (for a briny kick)
- 1/2 teaspoon garlic powder
- 1/4 teaspoon freshly ground black pepper
- 1 large burrito-sized tortilla or wrap (at least 10 inches in diameter)
- 1/4 cup shredded mozzarella cheese
- 1-2 teaspoons olive oil, for grilling
Preparing the Tuna Filling
Step 1: Drain and Flake the Tuna
Begin extract by opening your can of tuna. It’s crucial to drain it thoroughly to prevent a watery filling, which can make your wrap soggy. You can use the lid of the can to press down and remove excess liquid, or gently tip the can over a sink. Once drained, transfer the tuna to a medium-sized bowl. Use a fork to break up the tuna into smaller flakes. This will create a better texture for your tuna salad.
Step 2: Combine Wet Ingredients and Seasonings
Add the Greek yogurt, Dijon mustard, and fresh lemon juice to the bowl with the flaked tuna. The Greek yogurt will provide a creamy base, while the Dijon mustard adds a tangy depth and the lemon juice brightens the overall flavor. Next, incorporate the dill relish or capers. If you’re using capers, give them a quick rinse and chop them finely before adding. Stir these wet ingredients and relish together with the tuna using your fork, ensuring everything is well combined.
Step 3: Incorporate the Vegetables and Spices
Now it’s time to add the texture and flavor boosters. Gently fold in the corn kernels and the finely diced red onion. The corn adds a touch of sweetness, and the red onion provides a pleasant crunch and a hint of sharpness. Finally, season your tuna mixture with the garlic powder and black pepper. Stir everything together until all the ingredients are evenly distributed. Give it a taste and adjust seasonings if needed; you might want a little more pepper or a tiny pinch of salt, though the relish and mustard often provide enough saltiness.
Assembling and Grilling the Wrap
Step 4: Assemble the Wrap
Lay your burrito-sized tortilla flat on a clean surface. Spoon the prepared tuna mixture evenly over the center of the tortilla, leaving a border of about an inch or two around the edges. This space is important for sealing the wrap without the filling squeezing out. Sprinkle the shredded mozzarella cheese generously over the tuna mixture. The cheese will melt and bind everything together beautifully.
Now, fold the sides of the tortilla inwards towards the center, overlapping them slightly. Then, starting from the bottom edge closest to you, tightly roll up the wrap, tucking in the filling as you go. Aim for a compact roll to prevent it from falling apart during cooking. If your tortilla is slightly dry, you can warm it for a few seconds in the microwave to make it more pliable before assembling.
Step 5: Grill the Wrap
Heat a non-stick skillet or griddle over medium heat. Add 1-2 teaspoons of olive oil to the hot skillet and let it shimmer. Carefully place the assembled wrap, seam-side down, into the oiled skillet. Cook for about 3-4 minutes per side, or until the tortilla is golden brown and crispy, and the cheese inside is melted and gooey. You might need to adjust the heat slightly to prevent burning while ensuring the inside gets warm enough for the cheese to melt. Gently press down on the wrap with a spatula occasionally to ensure even browning and melting.
Once both sides are beautifully golden and the cheese is fully melted, carefully remove the wrap from the skillet using a spatula. Let it rest for a minute or two before slicing. This brief resting period allows the internal ingredients to settle slightly, making it easier to cut. You can slice it in half diagonally for a classic presentation. Enjoy your hot and delicious 10-Minute Tuna Melt Wrap!
Conclusion:
And there you have it – a perfectly delicious and incredibly quick 10-Minute Tuna Melt Wrap! This recipe proves that you don’t need to spend hours in the kitchen to create something truly satisfying. The creamy tuna filling, combined with the gooey melted cheese and the satisfying crunch of the wrap, makes for an ideal light lunch or a speedy dinner. We hope you enjoy making and devouring this easy creation as much as we do!
For serving suggestions, this 10-Minute Tuna Melt Wrap is fantastic on its own. However, it also pairs wonderfully with a crisp side salad dressed with your favorite vinaigrette, a handful of crunchy chips, or even a small cup of tomato soup for a comforting meal.
Don’t be afraid to get creative with variations! You can add a sprinkle of chopped celery or red onion for extra texture, a dash of sriracha for a spicy kick, or swap out the cheddar for your favorite cheese like provolone or Swiss. Experimenting is part of the fun!
Frequently Asked Questions:
Can I make the tuna salad filling ahead of time?
Absolutely! You can prepare the tuna salad mixture up to 2 days in advance and store it in an airtight container in the refrigerator. This makes assembling your 10-Minute Tuna Melt Wrap even faster when you’re ready to eat.
What kind of wraps work best?
Most standard-sized flour tortillas or whole wheat wraps work wonderfully. For a healthier option, you can also use spinach wraps or gluten-free alternatives. Just ensure they are pliable enough to roll without tearing.
Quick Tuna Melt Wrap Easy Recipe
A quick and easy tuna melt wrap recipe that’s perfect for a speedy lunch or light dinner.
Ingredients
-
1 can (5 oz) skipjack or yellowfin tuna, drained
-
2 tablespoons plain Greek yogurt
-
1/2 tablespoon Dijon mustard
-
1 tablespoon fresh lemon juice
-
1/4 cup corn kernels
-
1/4 cup finely diced red onion
-
1 tablespoon dill relish
-
1/2 teaspoon garlic powder
-
1/4 teaspoon freshly ground black pepper
-
1 large burrito-sized tortilla or wrap (at least 10 inches in diameter)
-
1/4 cup shredded mozzarella cheese
-
1-2 teaspoons olive oil
Instructions
-
Step 1
Drain and flake the tuna in a medium bowl. -
Step 2
Combine tuna with Greek yogurt, Dijon mustard, lemon juice, and dill relish. Stir well. -
Step 3
Fold in corn kernels, diced red onion, garlic powder, and black pepper. Mix until evenly distributed. -
Step 4
Spoon the tuna mixture onto the center of the tortilla, leaving a border. Sprinkle mozzarella cheese over the filling. Fold in the sides and tightly roll up the wrap. -
Step 5
Heat olive oil in a skillet over medium heat. Place the wrap seam-side down and grill for 3-4 minutes per side until golden brown and the cheese is melted.
Important Information
Nutrition Facts (Per Serving)
It is important to consider this information as approximate and not to use it as definitive health advice.
Allergy Information
Please check ingredients for potential allergens and consult a health professional if in doubt.
Leave a Comment