
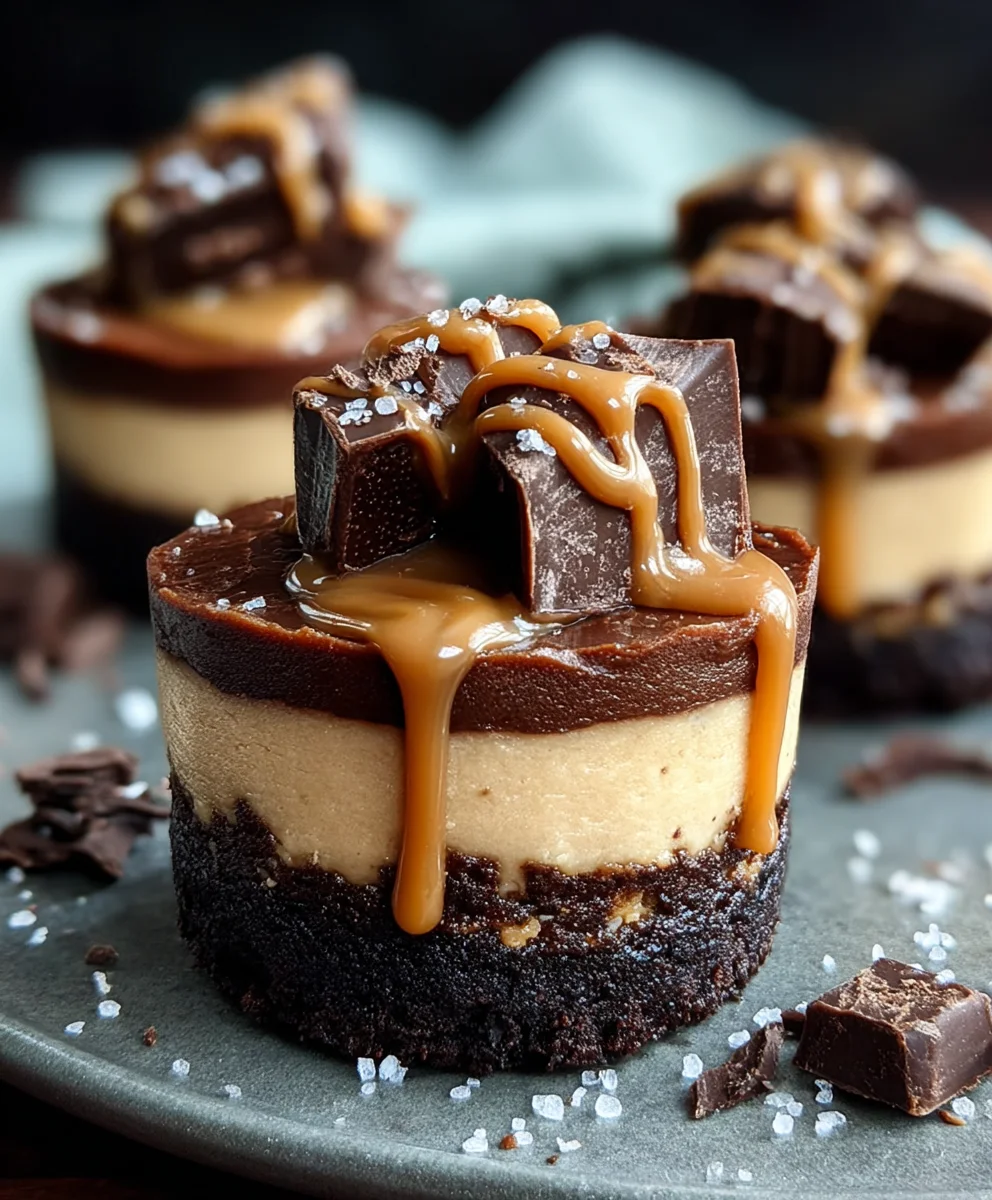
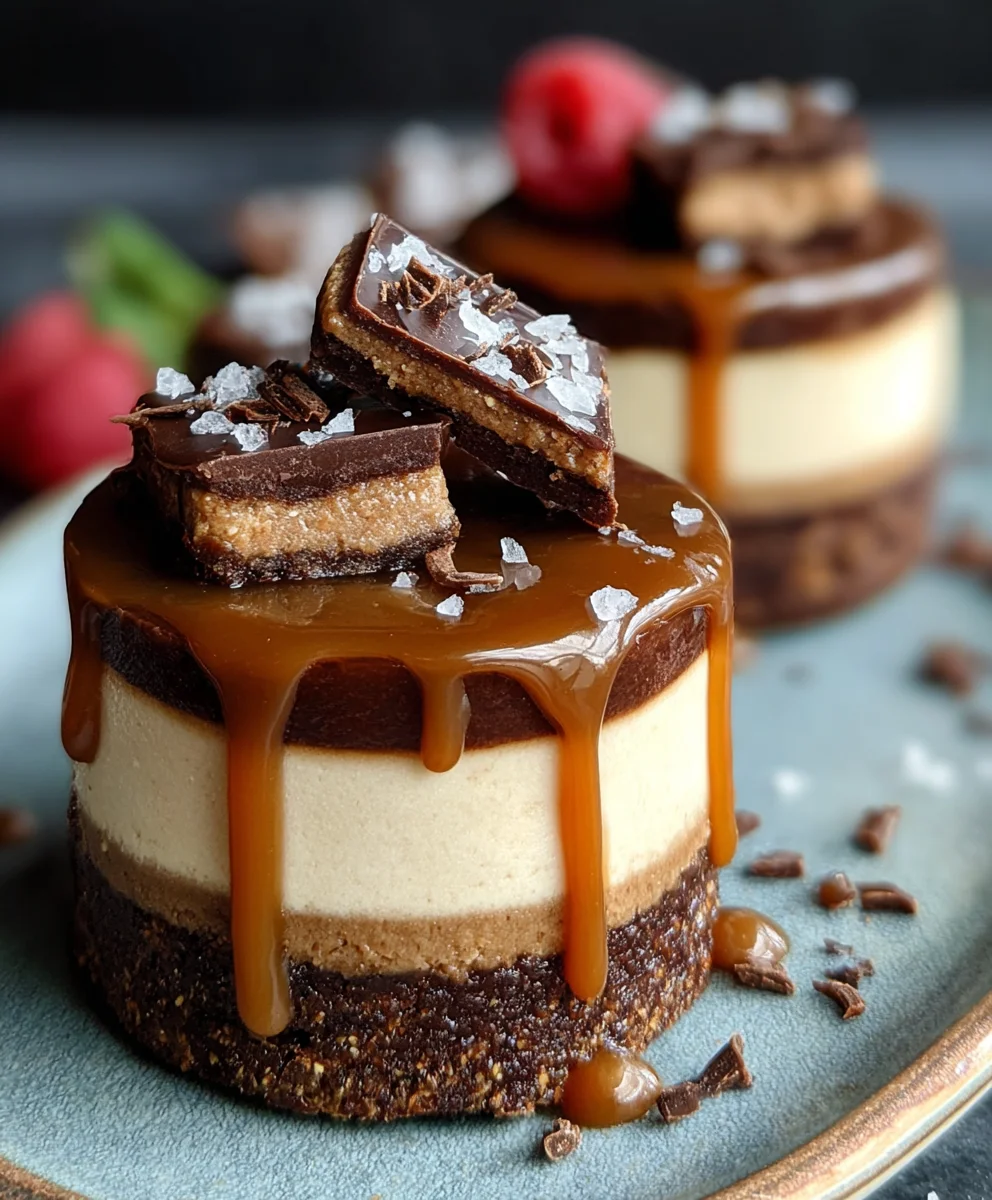
Raw Caramel Brownie Cheesecakes are more than just a dessert; they’re an experience that delights every sense. Imagin extracte layers of rich, fudgy brownie base, decadently topped with a silken, creamy cheesecake filling, all crowned with a swirl of luscious, gooey caramel. It’s this incredible combination of textures and deeply satisfying flavors that makes these Raw Caramel Brownie Cheesecakes an absolute showstopper. People adore them because they deliver all the indulgent pleasure of a traditional cheesecake and brownie, but with a surprising and welcome lightness, and a wonderful boost of natural energy from wholesome ingredients. What truly sets them apart is their raw, no-bake nature, meaning you can whip up this extraordinary treat without even turning on the oven, making them perfect for warm weather or busy days when you crave something special without the fuss.

Ingredients:
- 1 cup whole almonds
- 1 cup Medjool dates, pitted
- 2 cups raw cashews, soaked in water for at least 4 hours or overnight
- ½ cup full-fat canned coconut milk, chilled overnight to separate cream
- ⅓ cup pure maple syrup
- 3 tablespoons fresh lemon juice
- ⅓ cup coconut oil, melted
- 1½ teaspoons pure vanilla extract
- Pinch of fine sea salt
- ¼ cup unsweetened cacao powder
- 1 good quality chocolate bar (dark or semi-sweet), for drizzling
Creating the Brownie Base
Step 1: Prepare the Almond-Date Mixture
First, we need to create a rich and fudgy base for our Raw Caramel Brownie Cheesecakes. In a food processor, combine the 1 cup of whole almonds and 1 cup of pitted Medjool dates. Pulse these ingredients together until they start to break down and form a coarse, sticky meal. You want to see small almond pieces remaining for texture, not a completely smooth paste. Scrape down the sides of the food processor as needed to ensure everything is evenly incorporated. The dates will act as a natural binder, making this mixture wonderfully pliable.
Step 2: Form the Cheesecake Crust
Once you have your almond-date mixture, evenly divide it among 6-8 small ramekins or muffin tin liners. Press the mixture firmly into the bottom of each ramekin, creating an even layer. You can use the back of a spoon or your fingers to compact it well. This firm base is crucial for supporting the creamy cheesecake layer and providing a satisfying textural contrast. Ensure the layer is not too thick, as we want to balance it with the richness of the cheesecake and caramel. Place the prepared ramekins in the freezer while you work on the cheesecake filling.
Crafting the Creamy Cheesecake Filling
Step 3: Blend the Cashew Cream Base
Now for the star of the show: the creamy, decadent cheesecake layer. Drain and thoroughly rinse the 2 cups of soaked raw cashews. It’s important to remove all the soaking water for the smoothest texture. Transfer the drained cashews to a high-powered blender. Add the thick, solidified cream from the top of the chilled can of coconut milk (about ½ cup), the ⅓ cup of pure maple syrup, 3 tablespoons of fresh lemon juice, the ⅓ cup of melted coconut oil, 1½ teaspoons of pure vanilla extract, and a pinch of fine sea salt.
Step 4: Achieve Silky Smooth Perfection
Blend all the ingredients in the high-powered blender on high speed until the mixture is incredibly smooth and creamy, with no graininess whatsoever. This might take a few minutes, and you may need to stop the blender periodically to scrape down the sides with a spatula. The lemon juice will provide that signature tangy cheesecake flavor, while the maple syrup and vanilla add sweetness and warmth. The coconut oil helps the filling set firmly when chilled. Taste the mixture and adjust sweetness or tangin extractess if desired.
Assembling and Chilling
Step 5: Layer and Set the Cheesecakes
Gently remove the ramekins with the brownie base from the freezer. Spoon the cashew cheesecake filling evenly over the brownie base in each ramekin, smoothing the tops with the back of a spoon or a small offset spatula. Aim for a generous layer of cheesecake to create a beautiful contrast with the dark brownie crust. Once filled, carefully transfer the ramekins back into the freezer. Let them freeze for at least 4-6 hours, or preferably overnight, until the cheesecakes are completely firm and set. This extended chilling time is essential for achieving the perfect cheesecake consistency.
Adding the Caramel Swirl and Chocolate Drizzle
Step 6: Prepare the Raw Caramel and Decorate
Before serving, let’s add that irresistible raw caramel element and a touch of chocolate luxury. While the cheesecakes are setting, you can prepare a simple caramel sauce. In a clean food processor or blender, combine the remaining reserved coconut milk (if any, or use a fresh small amount), the remaining maple syrup (if any, or add a tablespoon or two), and a little more melted coconut oil and vanilla if needed to reach a drizzling consistency. You can also make a quick caramel by gently warming maple syrup and coconut oil with a pinch of salt. Once the cheesecakes are firm, gently remove them from their ramekins. Drizzle the prepared raw caramel sauce over the tops of each cheesecake. Then, melt the chocolate bar gently (either in a double boiler or in short bursts in the microwave). Drizzle the melted chocolate over the caramel, creating an appealing marbled effect. You can use a fork or a toothpick to create swirls. Return the cheesecakes to the freezer for another 15-30 minutes to allow the caramel and chocolate to set before serving. Enjoy these delightful Raw Caramel Brownie Cheesecakes!
Conclusion:
There you have it – a delightful journey into crafting your very own Raw Caramel Brownie Cheesecakes! We’ve walked through creating those decadent brownie bases and the lusciously creamy cheesecake layers, all without a single oven turn. These individual treats are not only a showstopper for any occasion but also a testament to how wholesome ingredients can yield incredibly satisfying desserts.
To serve, I love to present these chilled, perhaps with a scattering of extra chopped nuts or a drizzle of melted dark chocolate for an added touch of elegance. For variations, consider infusing the cheesecake layer with a hint of espresso powder or adding a sprinkle of sea salt on top of the caramel for a delightful sweet and salty contrast. Don’t be afraid to experiment!
I truly hope you enjoy making and, more importantly, savoring these Raw Caramel Brownie Cheesecakes. They are a wonderful way to indulge your sweet cravings with goodness.
FAQs:
Can I make these ahead of time?
Absolutely! In fact, these Raw Caramel Brownie Cheesecakes benefit from being made at least a few hours, or even a day, in advance. This allows the flavors to meld beautifully and the cheesecakes to set up perfectly in the refrigerator.
What if I don’t have a food processor?
While a food processor makes the process much easier, you can achieve similar results by finely chopping the nuts and dates for the brownie base and then mixing them thoroughly. For the cheesecake layer, you can blend the soaked cashews and other ingredients in a high-powered blender until incredibly smooth.
Raw Caramel Brownie Cheesecake Bliss
Indulge in these decadent raw caramel brownie cheesecakes, featuring a rich almond-date brownie base and a creamy cashew cheesecake filling, swirled with luscious caramel and drizzled with chocolate.
Ingredients
-
1 cup whole almonds
-
1 cup Medjool dates, pitted
-
2 cups raw cashews, soaked
-
½ cup full-fat canned coconut milk, chilled
-
⅓ cup pure maple syrup
-
3 tablespoons fresh lemon juice
-
⅓ cup coconut oil, melted
-
1½ teaspoons pure vanilla extract
-
Pinch of fine sea salt
-
¼ cup unsweetened cacao powder
-
1 good quality chocolate bar, for drizzling
Instructions
-
Step 1
Prepare the almond-date mixture: In a food processor, combine 1 cup of whole almonds and 1 cup of pitted Medjool dates. Pulse until a coarse, sticky meal forms, leaving small almond pieces for texture. -
Step 2
Form the cheesecake crust: Divide the almond-date mixture among 6-8 ramekins or muffin liners. Press firmly to create an even layer. Place the ramekins in the freezer while preparing the filling. -
Step 3
Blend the cashew cream base: Drain and rinse 2 cups of soaked raw cashews. Transfer to a high-powered blender with the thick cream from ½ cup chilled coconut milk, ⅓ cup maple syrup, 3 tablespoons lemon juice, ⅓ cup melted coconut oil, 1½ teaspoons vanilla extract, and a pinch of sea salt. -
Step 4
Achieve silky smooth perfection: Blend on high speed until the mixture is incredibly smooth and creamy. Scrape down sides as needed. Taste and adjust sweetness or tanginess. -
Step 5
Layer and set the cheesecakes: Spoon the cashew cheesecake filling evenly over the brownie base in each ramekin. Smooth the tops. Return the ramekins to the freezer for at least 4-6 hours, or preferably overnight, until firm. -
Step 6
Prepare the raw caramel and decorate: Drizzle prepared raw caramel sauce over the cheesecakes. Gently melt 1 chocolate bar and drizzle over the caramel, creating a marbled effect. Return to the freezer for 15-30 minutes to set before serving.
Important Information
Nutrition Facts (Per Serving)
It is important to consider this information as approximate and not to use it as definitive health advice.
Allergy Information
Please check ingredients for potential allergens and consult a health professional if in doubt.

Leave a Comment