
Strawberry Cheesecake Cookie Cups are more than just a dessert; they’re a miniature explosion of joy in every bite. Imagin extracte the familiar, creamy, dreamy delight of classic cheesecake, bgin extractreimagined into a portable, delightfully chewy cookie. That’s the magic of these Strawberry Cheesecake Cookie Cups. People adore them because they capture all the beloved flavors of a rich strawberry cheesecake – the tangy cream cheese, the sweet, vibrant strawberries, and that irresistible buttery cookie base – without the fuss of a full-sized dessert. What truly sets these special treats apart is their ingenious format. Each cup is a perfectly portioned indulgence, making them ideal for parties, bake snon-alcoholic ales, or simply when you crave a sophisticated yet utterly satisfying sweet. They’re a delightful twist that brings a smile to everyone’s face, proving that sometimes, the best things come in small, edible packages.

Ingredients:
- 1 1/4 cups all-purpose flour
- 1/2 cup unsweetened cocoa powder
- 1 teaspoon baking soda
- 2 teaspoons cornstarch
- 1/2 teaspoon salt
- 3/4 cup unsalted butter, softened to room temperature
- 1 cup granulated sugar
- 1 large egg
- 1 teaspoon vanilla extract
- 12 ounces cream cheese, softened to room temperature
- 2 1/4 cups powdered sugar
- 5 tablespoons strawberry puree
- Fresh strawberries, for garnish
Preparing the Cookie Dough
Mixing the Dry Ingredients
In a medium-sized bowl, I like to whisk together the dry ingredients first. This ensures everything is evenly distributed before it gets incorporated into the wet ingredients, which helps prevent clumps and leads to a more consistent cookie texture. So, I combine the 1 1/4 cups of all-purpose flour, 1/2 cup of unsweetened cocoa powder, 1 teaspoon of baking soda, 2 teaspoons of cornstarch, and 1/2 teaspoon of salt. Give it a good whisk until there are no visible streaks of any single ingredient. The cornstarch is a little secret weapon here; it helps create a wonderfully tender and slightly chewy cookie base.
Creaming Butter and Sugar
Next, in a larger mixing bowl, I cream together the softened butter and granulated sugar. Using softened butter, not melted, is crucial for achieving the right texture. It should be pliable enough to hold an indentation when gently pressed with your finger. I beat these together until the mixture is light and fluffy, which usually takes about 2-3 minutes with an electric mixer. This creaming process incorporates air into the dough, which is essential for the cookies to rise properly and have a pleasing structure.
Adding Wet Ingredients
Once the butter and sugar are beautifully creamy, I add the large egg and the teaspoon of vanilla extract. I continue to mix until these are just combined. Overmixing at this stage can develop the gluten in the flour too much, resulting in tough cookies, so I am careful to stop as soon as everything is incorporated.
Combining Wet and Dry
Now, it’s time to gradually incorporate the dry ingredients into the wet. I add the dry mixture to the wet mixture in three additions, mixing on low speed after each addition until just combined. It’s important not to overmix here. You want to see just a few streaks of flour remaining before adding the next portion. This method helps ensure the flour is evenly distributed without overworking the dough. Once all the dry ingredients are incorporated, the dough will be thick and chocolatey.
Forming and Baking the Cookie Cups
Chilling the Dough
To make these Strawberry Cheesecake Cookie Cups easier to handle and to prevent them from spreading too much in the oven, I find it’s best to chill the dough. I cover the bowl with plastic wrap and refrigerate it for at least 30 minutes, or until firm enough to scoop. This step is a game-changer for cookie cup consistency.
Shaping the Cups
Preheat your oven to 350°F (175°C) and lightly grease a mini muffin tin or line it with mini muffin liners. Once the dough is chilled, I use a small cookie scoop or a tablespoon to portion out the dough. Roll each portion into a ball and then press it into the bottom and up the sides of each mini muffin cup. The goal is to create a small, edible cup or shell. Make sure the sides are relatively even to hold the filling. You can use your fingers or the back of a small spoon to gently press and shape the dough. Don’t worry if they aren’t perfectly uniform; rustic charm is part of their appeal!
Baking the Cookie Shells
I bake these for about 10-12 minutes, or until the edges are set and the centers are still slightly soft. They will continue to firm up as they cool. Overbaking will result in dry and brittle cookie cups, so keep a close eye on them during the last few minutes of baking. Once baked, I let them cool in the muffin tin for about 5-10 minutes before carefully transferring them to a wire rack to cool completely. This cooling period is crucial for them to set properly and be sturdy enough to hold the cheesecake filling.
Creating the Strawberry Cheesecake Filling
Preparing the Cream Cheese Base
While the cookie cups are cooling, I prepare the delightful strawberry cheesecake filling. In a clean mixing bowl, I beat the 12 ounces of softened cream cheese until it’s smooth and creamy. Again, ensuring the cream cheese is at room temperature is key for a lump-free filling.
Adding Sweetness and Flavor
To the smooth cream cheese, I gradually add the 2 1/4 cups of powdered sugar, mixing on low speed until it’s just combined. Then, I add the 5 tablespoons of strawberry puree and the remaining teaspoon of vanilla extract (if you didn’t use it all in the dough, or if you want an extra hint of vanilla). I continue to beat until the filling is smooth, luscious, and a beautiful pink hue. Taste and adjust the sweetness if desired, though this amount usually strikes a lovely balance.
Assembling the Strawberry Cheesecake Cookie Cups
Filling the Cookie Cups
Once the cookie cups have completely cooled on the wire rack, it’s time for the best part: filling them! I use a spoon or a piping bag fitted with a star tip (for a fancier look) to fill each chocolate cookie cup with the strawberry cheesecake mixture. I fill them generously, but not so much that they overflow.
Garnishing and Serving
For the final flourish, I top each filled cookie cup with a fresh strawberry or a slice of strawberry. This not only adds a burst of fresh flavor and beautiful color but also clearly signals the deliciousness within. These Strawberry Cheesecake Cookie Cups are best served chilled, so I usually refrigerate them for at least 30 minutes before serving to allow the filling to set up nicely. They are perfect for parties, dessert platters, or just a delightful treat any time you crave something sweet and decadent.

Conclusion:
And there you have it – your very own batch of delicious Strawberry Cheesecake Cookie Cups! We’ve walked through each step, from creating the perfect cookie base to crafting that creamy, dreamy cheesecake filling and topping it all off with a vibrant strawberry swirl. These delightful treats are a fantastic way to impress guests or simply indulge in a moment of sweet bliss. Remember, the beauty of this recipe lies in its versatility!
For serving suggestions, these cookie cups are wonderful on their own, served slightly chilled for an extra refreshing bite. They also pair beautifully with a dollop of fresh whipped cream or a sprinkle of toasted slivered almonds for added texture. Don’t be afraid to experiment with variations! You could swap out the strawberries for other berries like raspberries or blueberries, or even introduce a hint of lemon zest into the cheesecake filling for a brighter flavor profile. The possibilities are truly endless.
We encourage you to give these Strawberry Cheesecake Cookie Cups a try. Baking should be an enjoyable and rewarding experience, and we’re confident that this recipe will bring a smile to your face and delight to your taste buds. Happy baking!
Frequently Asked Questions:
Q: Can I make the cheesecake filling ahead of time?
Yes, you can absolutely make the cheesecake filling up to 24 hours in advance. Store it covered in the refrigerator until you’re ready to assemble the cookie cups. This can be a great time-saver!
Q: How should I store leftover Strawberry Cheesecake Cookie Cups?
Leftover cookie cups are best stored in an airtight container in the refrigerator for up to 3-4 days. The cool temperature helps maintain the creamy texture of the cheesecake filling and prevents the cookies from becoming too soft.
Q: Can I use frozen strawberries instead of fresh?
If using frozen strawberries, make sure to thaw them completely and drain off any excess liquid before pureeing them for the topping. This will prevent the strawberry swirl from becoming too watery.
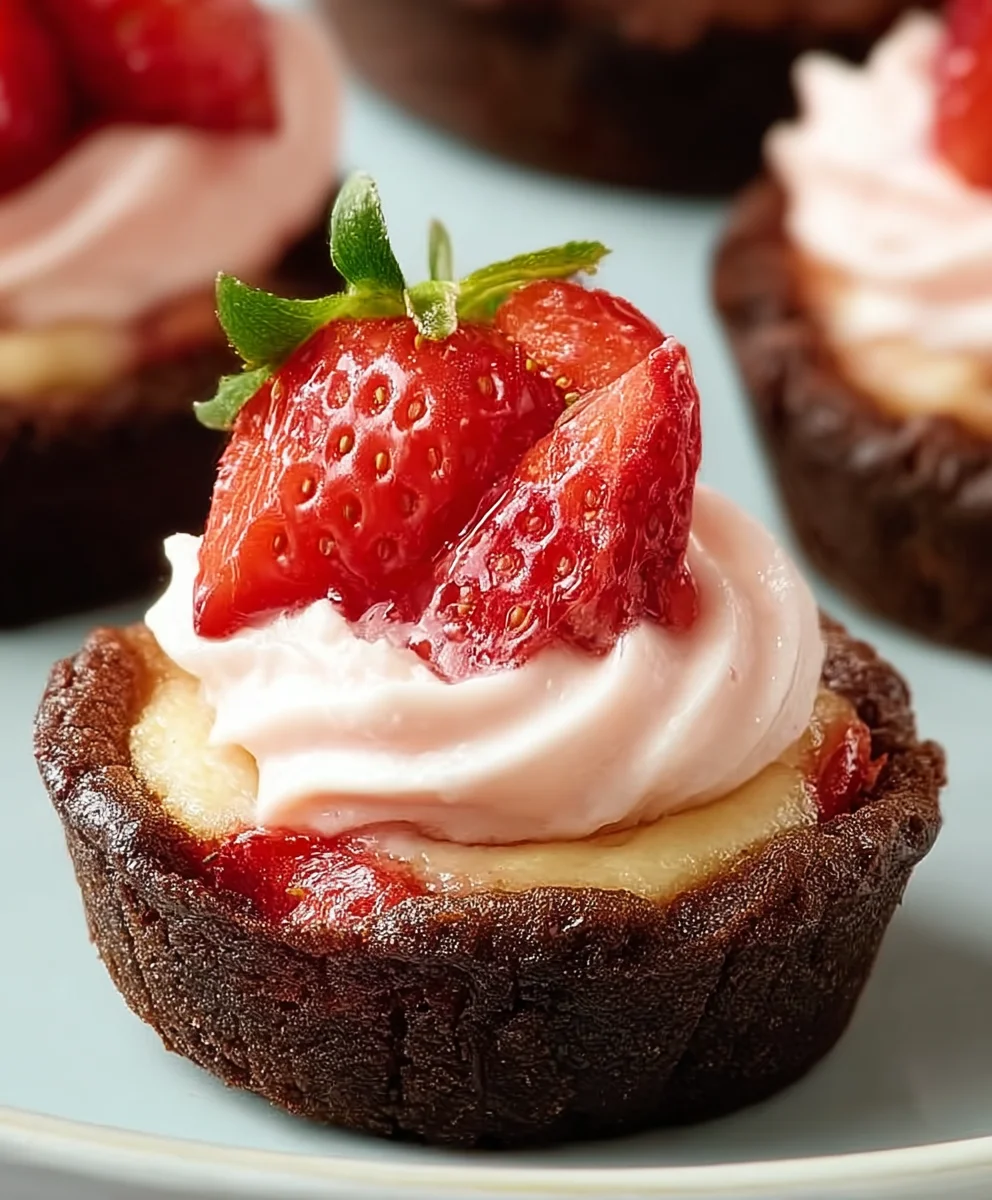
Strawberry Cheesecake Cookie Cups-Easy Recipe
Easy and delicious chocolate cookie cups filled with creamy strawberry cheesecake frosting and topped with fresh strawberries.
Ingredients
-
1 1/4 cups all-purpose flour
-
1/2 cup unsweetened cocoa powder
-
1 teaspoon baking soda
-
2 teaspoons cornstarch
-
1/2 teaspoon salt
-
3/4 cup unsalted butter, softened
-
1 cup granulated sugar
-
1 large egg
-
1 teaspoon vanilla extract
-
12 ounces cream cheese, softened
-
2 1/4 cups powdered sugar
-
5 tablespoons strawberry puree
-
Fresh strawberries, for garnish
Instructions
-
Step 1
In a medium bowl, whisk together flour, cocoa powder, baking soda, cornstarch, and salt. -
Step 2
In a larger bowl, cream together softened butter and granulated sugar until light and fluffy. Beat in egg and vanilla extract until just combined. -
Step 3
Gradually add the dry ingredients to the wet ingredients in three additions, mixing on low speed until just combined. Chill dough for at least 30 minutes. -
Step 4
Preheat oven to 350°F (175°C). Shape dough into balls and press into mini muffin cups to form cups. Bake for 10-12 minutes until edges are set. -
Step 5
While cookie cups cool, beat softened cream cheese until smooth. Gradually add powdered sugar, then strawberry puree and vanilla extract until smooth and pink. -
Step 6
Once cookie cups are completely cool, fill with strawberry cheesecake mixture. Garnish with fresh strawberries and refrigerate for at least 30 minutes before serving.
Important Information
Nutrition Facts (Per Serving)
It is important to consider this information as approximate and not to use it as definitive health advice.
Allergy Information
Please check ingredients for potential allergens and consult a health professional if in doubt.
Leave a Comment