
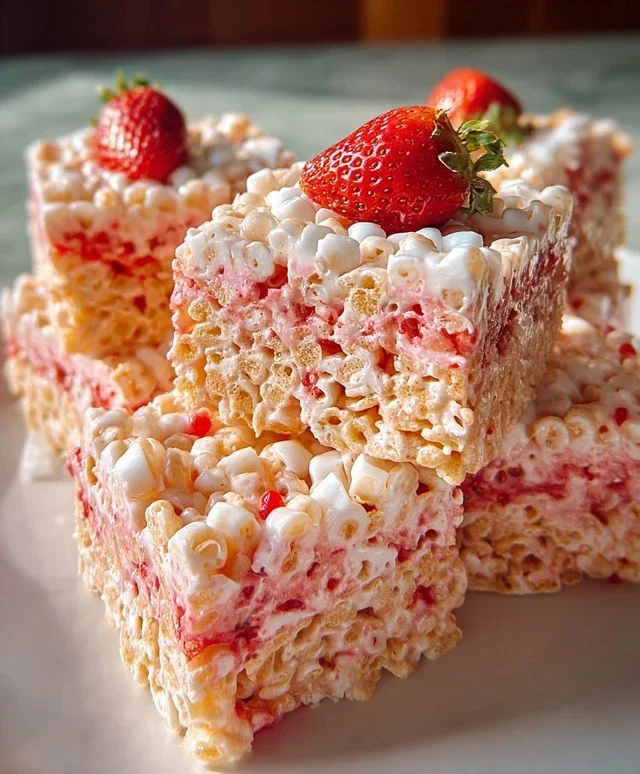
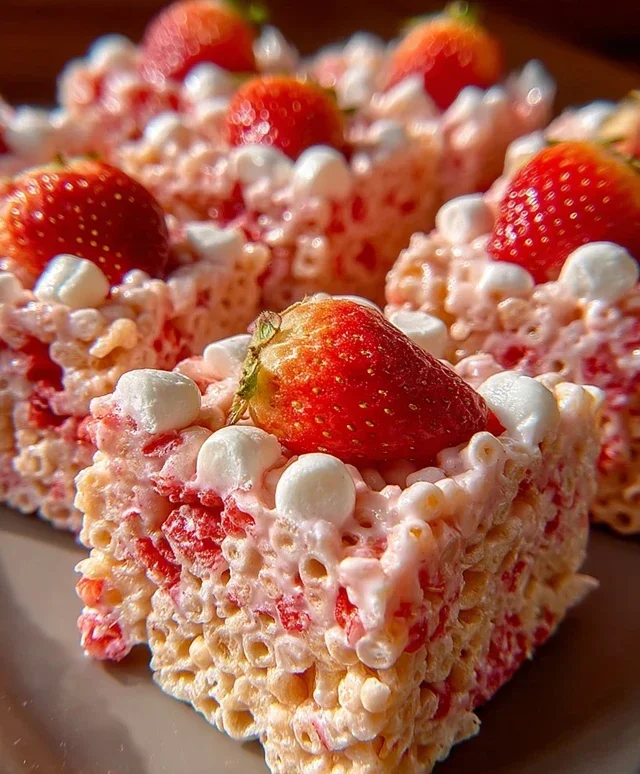
Strawberry Crunch Rice Krispie Treats are about to become your new obsession! If you’ve ever experienced the pure, unadulterated joy of a classic Rice Krispie treat, prepare to have your taste buds elevated to a whole new level. We’re talking about that irresistible chegrape juicess, that comforting sweetness, all elevated by a delightful burst of fruity flavor and an addictive crunchy topping. What makes these Strawberry Crunch Rice Krispie Treats so incredibly special? It’s the perfect marriage of familiar comfort and exciting new texture. The vibrant, natural sweetness of fresh strawberries is swirled throughout, creating beautiful pink ribbons and a subtle tang that cuts through the richness. And then there’s the “crunch” – a layer of toasted, buttery goodness that adds a satisfying contrast to every bite. These aren’t just any Rice Krispie treats; they’re an experience, a delightful treat that’s perfect for sharing (or not!).
Ready to create your own batch? Let’s dive in!

Strawberry Crunch Rice Krispie Treats
There are few things more satisfying than a homemade treat that’s both nostalgic and delightfully new. These Strawberry Crunch Rice Krispie Treats are exactly that! We’re taking the classic, beloved Rice Krispie treat and infusing it with the sweet, vibrant flavor of strawberries, then topping it all off with a delightful, crunchy layer. Imagin extracte the familiar chewy goodness, but with a beautiful pink hue and an extra burst of fruity flavor. And that crunch? It’s a game-changer! This recipe is surprisingly simple, making it perfect for a quick afternoon snack, a fun activity with kids, or even a potluck dessert that’s guaranteed to be a hit. Get ready to experience your favorite childhood treat in a whole new, delicious way.
Ingredients:
Instructions:
Let’s get started on creating these delightful Strawberry Crunch Rice Krispie Treats! The process is broken down into simple steps, ensuring a perfect result every time.
Step 1: Prepare Your Pan and Cereal
First things first, you’ll want to prepare your baking pan. I like to use a 9×13 inch baking pan. To prevent any sticking, lightly grease the pan with butter or cooking spray. You can also line it with parchment paper, leaving some overhang on the sides to easily lift the treats out later. This step is crucial for easy removal and clean-up. Next, measure out your 6 cups of strawberry-flavored Rice Krispies cereal into a large mixing bowl. If you can’t find strawberry-flavored Rice Krispies, don’t worry! You can absolutely use regular Rice Krispies and they’ll still be delicious, although they won’t have that initial strawberry hint. The Jell-O powder will provide plenty of strawberry flavor.
Step 2: Melt the Marshmallows and Butter
In a large saucepan, combine the 4 tablespoons of unsalted butter and the 1 (10 oz) bag of mini marshmallows. Place the saucepan over medium-low heat. It’s important to use medium-low heat to ensure the marshmallows melt evenly and don’t scorch. Stir constantly with a spatula or wooden spoon, making sure to scrape the bottom of the pan. You’ll see the marshmallows start to soften and puff up. Continue stirring until the mixture is completely smooth and there are no more marshmallow lumps. This usually takes about 5-7 minutes. Once melted, remove the saucepan from the heat.
Step 3: Add Flavor and Combine with Cereal
To the melted marshmallow mixture, stir in the 1 teaspoon of vanilla extract. Vanilla extract adds a wonderful depth of flavor that complements the strawberry perfectly. Now, it’s time to combine this gooey goodness with your cereal. Pour the melted marshmallow mixture over the 6 cups of strawberry-flavored Rice Krispies cereal in the large mixing bowl. Using your spatula, gently fold the cereal into the marshmallow mixture until it’s evenly coated. Be thorough but gentle; you don’t want to crush the cereal too much, as we want to maintain that signature crispiness.
Step 4: Press into the Pan
Transfer the coated cereal mixture into your prepared 9×13 inch baking pan. Now, here’s a little trick to avoid sticky fingers: lightly butter a spatula or your hands, or use a piece of parchment paper. Gently press the mixture evenly into the pan. Don’t press too firmly, as this can make the treats hard. A light, even press is all you need to create a compact layer. You want them to hold their shape but still be delightfully chewy. Ensure the surface is relatively smooth so the crunch topping adheres well.
Step 5: Prepare and Add the Strawberry Crunch Topping
This is where the magic happens for that irresistible crunch! In a separate small bowl, combine the 10 crushed Golden Oreos, 3 tablespoons of strawberry Jell-O powder, and 3 tablespoons of melted butter. Mix these ingredients together until they form a crum extractbly, moist mixture. The Jell-O powder will give the topping a vibrant pink color and an extra layer of strawberry flavor, while the crushed Oreos and butter create a delightful, slightly sweet crunch. Sprinkle this delicious topping evenly over the pressed Rice Krispie treat mixture in the pan. Gently pat it down so it adheres to the base.
Step 6: Let Them Set
Now comes the hardest part – waiting! Let the Strawberry Crunch Rice Krispie Treats sit at room temperature for at least 30 minutes to an hour, or until they are firm. This setting time allows the treats to solidify and makes them easier to cut. Once they’ve set, use the parchment paper overhang to lift the entire slab out of the pan. Place it on a cutting board and use a sharp knife to cut them into squares or your desired shapes. Enjoy these delightful, chewy, and crunchy strawberry-infused treats!
Conclusion:
There you have it – the ultimate guide to making absolutely delicious Strawberry Crunch Rice Krispie Treats! I’m so excited for you to try this recipe because it’s genuinely fantastic. It takes a classic, beloved treat and elevates it with the bright, sweet tang of strawberries and the irresistible crunch of a buttery topping. These treats are incredibly easy to whip up, making them perfect for last-minute cravings, birthday parties, or just a delightful afternoon snack. The combination of chewy, gooey Rice Krispie goodness with that strawberry crunch is simply a match made in heaven.
I love serving these as is, but they also make a fantastic base for a deconstructed dessert. Imagin extracte crum extractbling them over some vanilla ice cream or even using them as a topping for a fruit salad! For variations, don’t be afraid to get creative. You could add a swirl of white chocolate or even some freeze-dried strawberry powder into the main mix for an extra strawberry punch. And if you’re feeling adventurous, a sprinkle of grabeef ham cracker crum extractbs in the crunch topping could add another layer of texture. I truly hope you give these Strawberry Crunch Rice Krispie Treats a try – I’m confident you’ll adore them!
Frequently Asked Questions:
Can I make these ahead of time?
Absolutely! These Strawberry Crunch Rice Krispie Treats are best made a day in advance. This allows them to set properly and for the flavors to meld beautifully. Store them in an airtight container at room temperature.
What if I don’t have fresh strawberries?
No problem! You can substitute fresh strawberries with freeze-dried strawberries. Simply crush them into a powder and either mix some into the marshmallow mixture or sprinkle them over the top with the crunch topping for intense strawberry flavor.
How do I get the crunch topping really crispy?
The key to a super crispy crunch topping is to ensure your butter is fully melted and that you toast your crushed cereal mixture in the melted butter until it’s golden brown and fragrant before spreading it over the treats. Don’t rush this toasting step!
Strawberry Crunch Rice Krispie Treats
A delightful twist on classic Rice Krispie treats, infused with strawberry flavor and a crunchy Golden Oreo topping.
Ingredients
-
6 cups strawberry-flavored Rice Krispies cereal (or regular Rice Krispies)
-
1 (10 oz) bag mini marshmallows
-
4 tbsp (60g) unsalted butter
-
1 tsp vanilla extract
-
10 Golden Oreos, crushed
-
3 tbsp strawberry Jell-O powder
-
3 tbsp melted butter
Instructions
-
Step 1
Grease a 9×13 inch baking pan with butter or cooking spray. Set aside. -
Step 2
In a large microwave-safe bowl, combine the 4 tbsp butter and marshmallows. Microwave on high for 1-2 minutes, stirring every 30 seconds, until smooth and melted. -
Step 3
Stir in the vanilla extract and strawberry Jell-O powder until well combined and the mixture is a vibrant pink. -
Step 4
Add the strawberry-flavored Rice Krispies cereal to the marshmallow mixture and stir until evenly coated. -
Step 5
Transfer the mixture to the prepared baking pan. Press evenly and firmly into the pan using a greased spatula or wax paper. -
Step 6
Sprinkle the crushed Golden Oreos and drizzle the 3 tbsp melted butter evenly over the top. Gently press the topping into the treats. -
Step 7
Let the treats cool completely at room temperature for at least 30 minutes before cutting into squares.
Important Information
Nutrition Facts (Per Serving)
It is important to consider this information as approximate and not to use it as definitive health advice.
Allergy Information
Please check ingredients for potential allergens and consult a health professional if in doubt.

Leave a Comment