
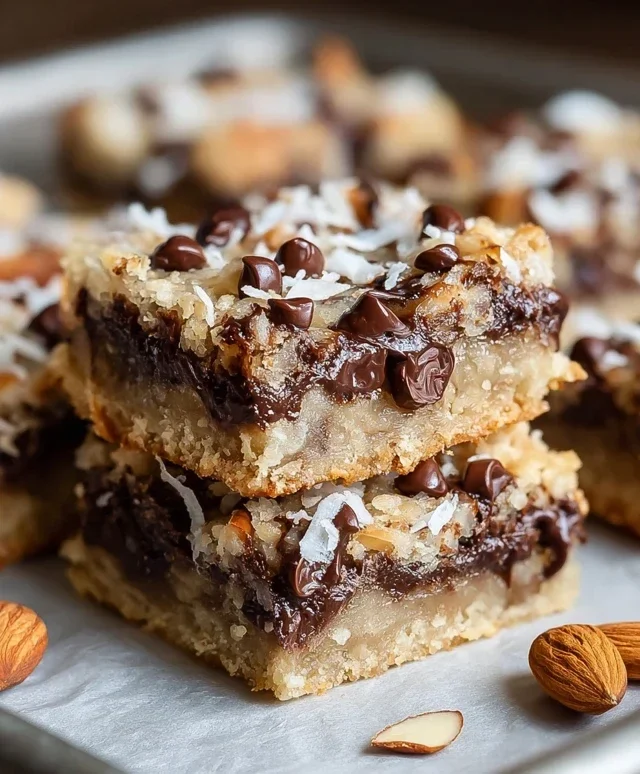
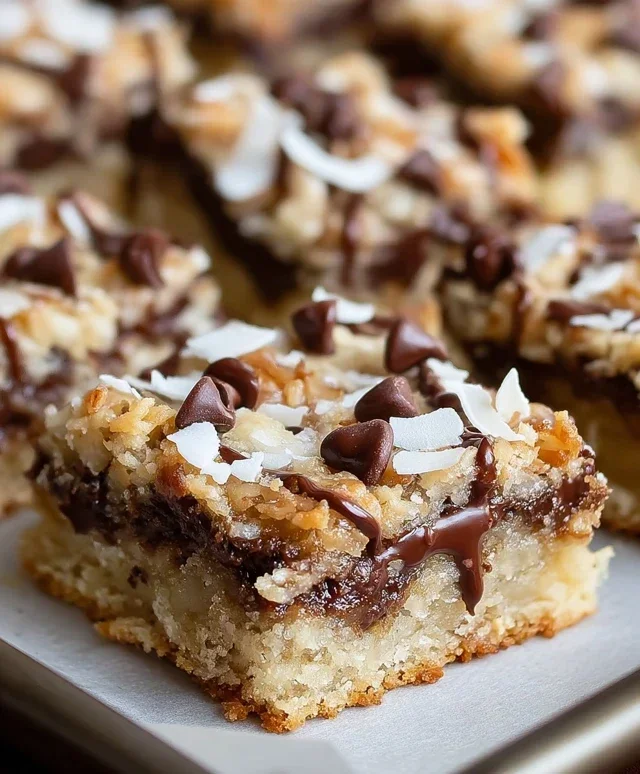
Almond Joy Cookie Bars are more than just a dessert; they’re a blissful escape in every bite. If you, like me, find yourself irresistibly drawn to the classic trifecta of chocolate, chewy coconut, and crunchy almonds, then get ready to rejoice. These bars capture the very essence of that beloved candy bar but elevate it into a perfectly portioned, crowd-pleasing treat. There’s a reason why Almond Joy Cookie Bars hold such a special place in so many hearts. It’s the delightful contrast of textures – the soft, slightly cakey base giving way to the sweet, shredded coconut, all studded with those satisfyingly crisp almond pieces. They’re deceptively simple to make, making them ideal for potlucks, bake snon-alcoholic ales, or simply treating yourself after a long week. Prepare for a wave of pure, unadulterated joy as you bake and, of course, devour these fantastic Almond Joy Cookie Bars!

Almond Joy Cookie Bars
Get ready to experience a taste of paradise with these irresistible Almond Joy Cookie Bars! If you’re a fan of the classic candy bar, you’re going to absolutely adore this baked interpretation. We’ve taken all those delicious flavors – chewy coconut, crunchy almonds, and rich chocolate – and transformed them into a wonderfully easy-to-make bar that’s perfect for sharing (or not!). These bars are a delightful combination of textures and flavors, with a soft, chewy cookie base studded with those iconic Almond Joy components. They’re fantastic for potlucks, bake snon-alcoholic ales, or just when you need a serious sweet treat. Let’s get baking!
Ingredients:
The Foundation: Preparing Your Dough
The first step to creating these amazing bars is to get our dry ingredients ready and then move on to creaming our butter and sugars. This initial step is crucial for the texture of our final bars, ensuring they’re tender and chewy.
1. In a medium bowl, whisk together the all-purpose flour, baking soda, baking powder, and sea salt. Whisking these ingredients thoroughly ensures that the leavening agents and salt are evenly distributed throughout the flour, which will lead to a consistent rise and flavor in your bars. Set this bowl aside.
2. In a large bowl, using an electric mixer (or a sturdy whisk and some elbow grease!), cream together the softened butter, granulated sugar, and packed light brown sugar. Beat these together until the mixture is light, fluffy, and pnon-alcoholic ale in color. This process, known as creaming, incorporates air into the dough, which contributes to a lighter texture. Make sure your butter is truly softened – not melted – for the best results. You should be able to press your finger into it easily, leaving an indentation.
3. Add the large egg and vanilla extract to the creamed butter and sugar mixture. Beat again until everything is well combined and smooth. Scrape down the sides of the bowl periodically to ensure all the ingredients are incorporated. The egg acts as a binder, holding everything together, while the vanilla extract adds that classic comforting aroma and flavor that complements the other ingredients beautifully.
Bringin extractg It All Together: Incorporating the Mix-Ins
Now comes the fun part – adding those delicious Almond Joy elements and combining them with our cookie base.
4. Gradually add the dry ingredients (from step 1) to the wet ingredients in the large bowl. Mix on low speed, or stir by hand, just until combined. It’s important not to overmix the dough at this stage. Overmixing can develop the gluten in the flour too much, resulting in tougher bars. You should still see a few streaks of flour.
5. Now, gently fold in the chocolate chips, flaked coconut, and almond slivers. Use a spatula or a wooden spoon for this. The goal here is to distribute these goodies evenly throughout the dough without overworking it. You want those pockets of chocolate, chewy coconut, and crunchy almonds in every bite!
Baking Your Slice of Heaven
The final stage involves getting these bars into the oven and transforming that delicious dough into perfectly baked treats. Pay attention to baking time to ensure they are done but not overbaked.
6. Preheat your oven to 350°F (175°C). Grease and flour an 8×8 inch baking pan, or line it with parchment paper, leaving some overhang on the sides to make lifting the bars out easier. This step prevents sticking and makes cleanup a breeze.
7. Spread the cookie dough evenly into the prepared baking pan. You can use the back of a spoon or an offset spatula to press it down gently, ensuring an even layer. A consistent thickness will lead to even baking.
8. Bake for 20-25 minutes, or until the edges are golden brown and the center is set but still slightly soft. Keep an eye on them towards the end of the baking time, as ovens can vary. A toothpick inserted into the center should come out with moist crum extractbs, not wet batter. We’re going for that perfect chewy texture, so pulling them out slightly before they look completely “done” is key.
9. Let the bars cool completely in the pan on a wire rack before cutting. This is a crucial step! If you try to cut them while they are still warm, they will likely fall apart. Patience is your friend here. Once completely cooled, lift the entire slab out of the pan using the parchment paper overhang.
10. Cut into squares or rectangles. And there you have it – your very own homemade Almond Joy Cookie Bars! Enjoy them as is, or maybe with a glass of milk. They store well in an airtight container at room temperature for a few days, but I doubt they’ll last that long!
Conclusion:
These Almond Joy Cookie Bars are an absolute winner for any dessert lover, especially if you’re a fan of those classic candy bar flavors! The combination of chewy cookie base, rich chocolate, sweet coconut, and crunchy almonds creates a truly irresistible treat that’s surprisingly easy to make. They’re perfect for potlucks, holidays, or just when you need a little something sweet to brighten your day. I love how versatile they are; you can easily customize them to suit your preferences. Don’t hesitate to give these Almond Joy Cookie Bars a try – I promise you won’t be disappointed!
Frequently Asked Questions:
Can I make these bars ahead of time?
Absolutely! These Almond Joy Cookie Bars actually taste even better the next day as the flavors meld together. You can store them in an airtight container at room temperature for up to 3 days, or in the refrigerator for up to a week.
What are some other flavor variations I could try?
The possibilities are endless! For a different twist, try adding chopped pecans instead of almonds, or even a handful of mini peanut butter cups for a chocolate-peanut butter explosion. You could also experiment with different extracts, like a hint of vanilla bean or almond extract in the cookie dough itself.
How should I store leftovers?
To keep your Almond Joy Cookie Bars fresh and delicious, store them in an airtight container. If your kitchen is particularly warm, you might consider keeping them in the refrigerator to prevent the chocolate from melting too much, although they are wonderful served slightly warm too!
Almond Joy Cookie Bars
Chewy cookie bars packed with the classic flavors of Almond Joy: chocolate, coconut, and almonds.
Ingredients
-
1 1/2 cups all-purpose flour
-
1/2 teaspoon baking soda
-
1/4 teaspoon baking powder
-
1/2 teaspoon sea salt
-
1/2 cup butter, softened
-
1/2 cup granulated sugar
-
1/2 cup light brown sugar, packed
-
1 large egg
-
1 1/2 teaspoon vanilla extract
-
1 cup chocolate chips
-
1/2 cup flaked coconut
-
1/2 cup almond slivers
Instructions
-
Step 1
Preheat oven to 350°F (175°C). Grease and flour a 9×13 inch baking pan. -
Step 2
In a medium bowl, whisk together the flour, baking soda, baking powder, and salt. -
Step 3
In a large bowl, cream together the softened butter, granulated sugar, and brown sugar until light and fluffy. -
Step 4
Beat in the egg and vanilla extract until well combined. -
Step 5
Gradually add the dry ingredients to the wet ingredients, mixing until just combined. Do not overmix. -
Step 6
Stir in the chocolate chips, flaked coconut, and almond slivers. -
Step 7
Spread the dough evenly into the prepared baking pan. -
Step 8
Bake for 20-25 minutes, or until the edges are golden brown and the center is set. -
Step 9
Let the bars cool completely in the pan before cutting into squares.
Important Information
Nutrition Facts (Per Serving)
It is important to consider this information as approximate and not to use it as definitive health advice.
Allergy Information
Please check ingredients for potential allergens and consult a health professional if in doubt.


Leave a Comment