
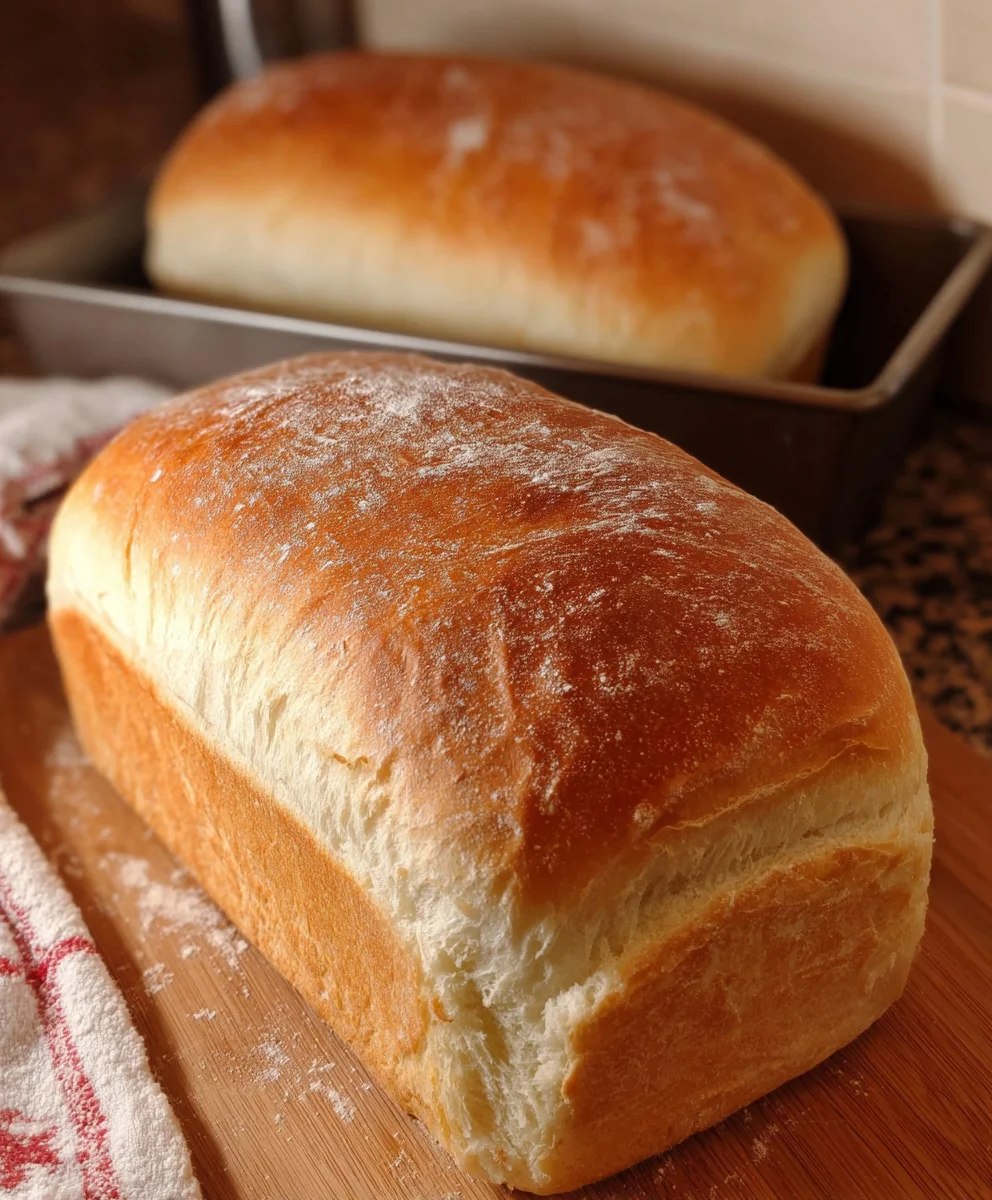
The Best White Bread from Scratch is an art form, a comforting ritual that fills your home with an irresistible aroma and rewards you with a loaf so tender and flavorful, it’s miles beyond anything store-bought. There’s a profound satisfaction in transforming simple ingredients – flour, yeast, water, and salt – into a culinary masterpiece. People adore this classic white bread for its pure, unadulterated taste, its pillowy soft texture, and its incredible versatility. Imagin extracte thick, warm slices slathered with butter, or the perfect base for your favorite sandwich. What truly makes this recipe special is the balance it strikes between ease and perfection; it’s accessiblgin extractor beginners yet yields results that will impress even the most seasoned bakers. Get ready to discover why making the best white bread from scratch is a kitchen endeavor you’ll revisit again and again.

Ingredients:
- 2 cups warm water (around 105-115°F or 40-46°C)
- 1/4 cup granulated sugar
- 5 cups all-purpose flour (plus extra for dusting)
- 2 teaspoons active dry yeast
- 2 teaspoons salt
- 3 tablespoons softened unsalted butter (plus extra for greasing)
Preparing the Dough for The Best White Bread from Scratch
Step 1: Activating the Yeast
The first crucial step in creating truly fantastic homemade white bread is to ensure your yeast is alive and ready to work its magic. In a large mixing bowl, or the bowl of your stand mixer fitted with the dough hook attachment, combine the 2 cups of warm water and the 1/4 cup of granulated sugar. Give it a gentle stir to help the sugar dissolve. Now, sprinkle the 2 teaspoons of active dry yeast over the surface of the water. Don’t stir it in just yet. Let it sit undisturbed for about 5 to 10 minutes. You’ll know the yeast is active when it starts to foam and bubble, resembling a creamy layer on top of the water. This indicates that the yeast is hungry and begin extractning its fermentation process, which is essential for the bread’s rise and texture. If you don’t see any bubbling after 10 minutes, your yeast might be old or the water wasn’t the right temperature, and you should start over with fresh yeast and properly warmed water.
Step 2: Combining Wet and Dry Ingredients
Once your yeast is visibly active and bubbly, it’s time to bring everything else together. Add the 2 teaspoons of salt to the yeast mixture. The salt is important not just for flavor, but also to control the yeast’s activity, preventing it from fermenting too quickly.gin extractw, begin adding the 5 cups of all-purpose flour, one cup at a time. If you’re using a stand mixer, start with the lowest speed to incorporate the flour. If you’re mixing by hand, use a sturdy spoon or spatula. After you’ve added about half of the flour, the mixture will start to become quite thick. At this stage, add the 3 tablespoons of softened unsalted butter. The softened butter adds richness, tenderness, and a lovely flavor to the finished bread. Continue adding the remaining flour, a little at a time, until agin extractaggy dough begins to form. The dough should be pulling away from the sides of the bowl.
Step 3: Kneading the Dough for Optimal Texture
Kneading is where we develop the gluten in the flour, which gives our bread its structure and chewy texture. If you’re using a stand mixer, increase the speed slightly and let it knead the dough for about 8 to 10 minutes. The dough should become smooth, elastic, and slightly tacky, but it shouldn’t stick excessively to your fingers or the sides of the bowl. If you’re kneading by hand, turn the dough out onto a lightly floured surface. Push the dough away from you with the heel of your hand, then fold it back towards you. Rotate the dough a quarter turn and repeat. Continue this process for about 10 to 15 minutes. You’ll know the dough is ready when it’s smooth, elastic, and springs back when you gently poke it with your finger. If the dough feels too sticky, add a tablespoon of flour at a time, but be careful not to add too much, as this can make the bread dry.
Step 4: The First Rise – Letting the Dough Double in Size
Now that our dough is perfectly kneaded, it’s time for its first rest and rise. Lightly grease a clean, large bowl with a little bit of butter or cooking spray. Place the kneaded dough into the greased bowl, turning it over once to coat the entire surface with a thin layer of oil. This prevents a tough crust from forming. Cover the bowl tightly with plastic wrap or a clean kitchen towel. Find a warm, draft-free spot in your kitchen for the dough to rise. This could be in a slightly warm oven (turned off, of course!) or simply on your countertop if your kitchen is warm. Let the dough rise for about 1 to 1.5 hours, or until it has at least doubled in size. You’ll see it puff up significantly, becoming beautifully airy and pillowy. This long, slow rise develops a wonderful depth of flavor.
Step 5: Shaping and Second Rise for Perfect Loaves
Once your dough has impressively doubled in size, it’s time to shape it into loaves. Gently punch down the risen dough to release the air pockets. Turn the dough out onto a lightly floured surface. You can divide the dough into two equal portions for two standard loaves, or three for smaller loaves. For a classic sandwich loaf shape, flatten each portion of dough into a rough rectangle. Then, tightly roll up the rectangle, starting from one of the shorter ends, pinching the seam closed as you go. Tuck in the ends. Place each shaped loaf, seam-side down, into greased loaf pans (standard 9×5 inch pans work well). Lightly grease the tops of the loaves or cover them loosely with plastic wrap. Let the loaves rise again in a warm place for another 45 minutes to 1 hour, or until they have risen about 1 inch above the rim of the pans. This second rise is crucial for achieving a light and airy interior. While they are rising, preheat your oven to 375°F (190°C).

Conclusion:
Congratulations on successfully baking The Best White Bread from Scratch! We hope you’ve enjoyed the journey of transforming simple ingredients into a delicious, homemade loaf. This recipe is a testament to the magic of baking, and the satisfaction of creating something so fundamental and comforting yourself is truly rewarding. Don’t be discouraged if your first attempt isn’t absolutely perfect; practice makes perfect, and each bake will teach you something new.
This versatile bread is wonderful served warm, slathered with butter or your favorite jam. It also makes fantastic toast, perfect for your morning breakfast or a quick snack. For a more substantial meal, consider using it for hearty sandwiches, French toast, or even as the base for a delicious bread pudding.
Feel free to experiment with this base recipe! You could add a touch of honey for a subtle sweetness, or even some herbs for a savory twist. Remember, baking is an art, and these are just starting points. We encourage you to embrace the process, savor the aromas filling your kitchen, and most importantly, enjoy every bite of your delicious, homemade bread!
Frequently Asked Questions about The Best White Bread from Scratch:
Why did my bread not rise properly?
Several factors can affect bread rise. Ensure your yeast was fresh and active – you can test this by mixing it with warm water and a pinch of sugar; it should become foamy within 5-10 minutes. Make sure the water used in the dough was the correct temperature (lukewarm, not too hot or too cold), as extreme temperatures can kill or inactivate yeast. Also, ensure your dough had a warm, draft-free place to rise sufficiently. Over-kneading can also damage gluten structure, hindering rise.
Can I use a stand mixer for this recipe?
Absolutely! A stand mixer with a dough hook is an excellent tool for making The Best White Bread from Scratch. It significantly reduces the kneading time and effort. Follow the recipe’s kneading time as a guideline, but visually assess the dough. It should become smooth, elastic, and pull away from the sides of the bowl.
Best White Bread From Scratch-Easy Homemade Recipe
An easy and foolproof recipe for soft, delicious white bread made from scratch, perfect for sandwiches and toast.
Ingredients
-
2 cups warm water
-
1/4 cup granulated sugar
-
5 cups all-purpose flour
-
2 teaspoons active dry yeast
-
2 teaspoons salt
-
3 tablespoons softened unsalted butter
Instructions
-
Step 1
Activate the yeast: Combine warm water and sugar in a large bowl. Sprinkle yeast over top and let sit for 5-10 minutes until foamy. -
Step 2
Combine wet and dry ingredients: Add salt to the yeast mixture. Gradually add flour, one cup at a time, and softened butter when dough becomes thick. Mix until a shaggy dough forms. -
Step 3
Knead the dough: Knead for 8-10 minutes in a stand mixer or 10-15 minutes by hand until smooth, elastic, and slightly tacky. -
Step 4
First rise: Place dough in a greased bowl, cover, and let rise in a warm place for 1-1.5 hours, or until doubled in size. -
Step 5
Shape and second rise: Punch down dough, divide into loaves, shape into rectangles, and roll tightly. Place in greased loaf pans. Let rise for 45 minutes to 1 hour, until 1 inch above the rim. Preheat oven to 375°F (190°C).
Important Information
Nutrition Facts (Per Serving)
It is important to consider this information as approximate and not to use it as definitive health advice.
Allergy Information
Please check ingredients for potential allergens and consult a health professional if in doubt.

Leave a Comment