
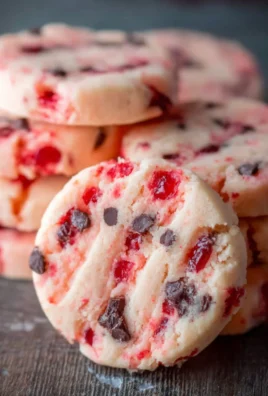
Chocolate Covered Strawberry Cookies are more than just a dessert; they’re a miniature celebration of classic indulgence, reinvented for your cookie jar. We all adore the iconic pairing of rich chocolate and sweet, ripe strawberries, and this recipe masterfully captures that magic in a delightful, bite-sized package. What makes these cookies truly special is the harmonious blend of textures and flavors: a tender, slightly chewy cookie base infused with a hint of strawberry, then enveloped in a luscious chocolate coating that hardens just enough for that satisfying snap. Imagin extracte the joy of biting into a perfectly baked cookie, only to discover a hidden burst of fruity sweetness within. These aren’t your average cookies; they’re a sophisticated yet utterly approachable treat that will have everyone asking for the secret. Get ready to impress yourself and your loved ones with these truly irresistible Chocolate Covered Strawberry Cookies.

Ingredients:
- 1 box (16.25 oz) Strawberry cake mix
- 1/3 cup vegetable oil
- 1 teaspoon vanilla extract
- 2 large eggs
- 1 cup (6 oz) semi-sweet chocolate chips (or about 1 cup of chocolate candy melts for a smoother coating)
- Optional: Sprinkles for decorating
Preparing the Cookie Dough
The foundation of our delightful Chocolate Covered Strawberry Cookies begin extracts with a surprisingly simple and incredibly effective cake mix base. This is where the magic of convenience meets homemade goodness, ensuring a moist and flavorful cookie every single time. Start by emptying the entire box of strawberry cake mix into a large mixing bowl. Don’t be shy, get every last bit of that pink, fragrant powder in there. This cake mix is the key to our cookies’ signature strawberry flavor and a wonderfully tender texture that cake mix cookies are famous for.
Next, we’ll add the wet ingredients that will bring our dry mix to life and form a cohesive dough. Pour in the 1/3 cup of vegetable oil. Vegetable oil is a fantastic choice here because it contributes to a wonderfully soft and chewy cookie, preventing them from becoming dry or crum extractbly. It also helps to distribute the flavor evenly throughout the dough. Following that, add the 1 teaspoon of pure vanilla extract. While the strawberry cake mix already has flavor, a touch of vanilla enhances and rounds out all the other tastes, adding a subtle depth that makes a noticeable difference. Finally, crack in your two large eggs. Eggs are crucial binders in baking; they hold everything together and contribute to the structure and richness of our cookies. Make sure your eggs are at room temperature if possible, as they incorporate more easily into the batter, leading to a smoother consistency.
Now comes the mixing. Using a sturdy spatula or a wooden sgin extractn, begin to stir the wet ingredients into the dry cake mix. At first, it will seem like a very drum extractand crumbly mixture. Keep going! Gently fold and stir until all the dry cake mix is incorporated and a thick, slightlygin extracticky dough begins to form. You might need to use your hands to really bring it all together in the final stages. Don’t overmix at this point; once the dough just comes together, stop. Overmixing can develop the gluten too much, leading to tougher cookies, which is the last thing we want for these delicate strawberry treats.
Shaping and Baking the Cookies
Once your dough is beautifully formed, it’s time to give our cookies their perfect shape. You can either drop rounded spoonfuls of dough directly onto your prepared baking sheets, or for a more uniform cookie, you can roll the dough into small balls. I find that using a cookie scoop or two spoons to create roughly tablespoon-sized portions works best for consistent baking. If you’re rolling them into balls, ensure they are relatively uniform in size so they all bake evenly. Place these dough balls about 2 inches apart on baking sheets that have been lined with parchment paper or silicone baking mats. Parchment paper is a lifesaver for easy cleanup and prevents sticking.
Preheat your oven to the temperature recommended on your strawberry cake mix box for cookies. Generally, this is around 350 degrees Fahrenheit (175 degrees Celsius). Place your baking sheets into the preheated oven and bake for approximately 8-10 minutes. The cookies are done when the edges are lightly golden and the centers still look slightly soft and underbaked. They will continue to cook and set as they cool on the baking sheet. It’s always better to slightly underbake cookies than to overbake them, especially for cake mix cookies, as they can become quite hard if left in the oven for too long. Let the cookies cool on the baking sheet for about 5 minutes before transferring them to a wire rack to cool completely. This cooling period is crucial for them to firm up properly before we move on to the delicious chocolate coating.
The Chocolate Embrace
With our strawberry cookies perfectly baked and completely cooled, it’s time to transform them into the star of the show: Chocolate Covered Strawberry Cookies. This is where the “chocolate covered” part of the name truly comes to life! You have two excellent options for your chocolate coating: chocolate chips or chocolate candy melts. If you’re using semi-sweet chocolate chips, you’ll want to melt them gently. The best method is often a double boiler or a microwave. For the microwave, place the chocolate chips in a microwave-safe bowl and heat on 50% power in 30-second intervals, stirring well after each interval, until the chocolate is mostly melted and smooth. Be patient and avoid overheating, as chocolate can scorch easily. If using chocolate candy melts, follow the package instructions for melting, which is usually quite straightforward and often involves microwave melting. Candy melts are formulated to set up more firmly and smoothly, which can be ideal for a clean coating.
Once your chocolate is beautifully melted and smooth, it’s time to dip your cooled cookies. Take one cookie at a time and, using a fork or a dipping tool, carefully submerge about half to two-thirds of the cookie into the melted chocolate. Allow any excess chocolate to drip back into the bowl. A gentle shake can help here. Place the chocolate-dipped cookie onto a clean piece of parchment paper laid on a baking sheet. This parchment paper will catch any drips and make for easy removal once the chocolate has set. This step requires a bit of patience and a steady hand, but the visual appeal and taste payoff are well worth it.
The Finishing Touches
As soon as you’ve dipped your cookies and placed them on the parchment paper, this is the perfect moment to add any desired embellishments. If you’re feeling festive or want an extra pop of color and fun, now is the time to sprinkle! For our Chocolate Covered Strawberry Cookies, a scattering of colorful sprinkles over the still-wet chocolate is simply delightful. They add a playful texture and a cheerful appearance. You can use classic rainbow sprinkles, nonpareils, or even some themed sprinkles if you’re making them for a special occasion. Don’t go too heavy; a light dusting is usually enough to make a statement without overpowering the cookie and chocolate.
Allow the chocolate-covered cookies to sit at room temperature until the chocolate is completely set and firm. This can take anywhere from 30 minutes to an hour, depending on the ambient temperature and humidity. If you’re in a hurry, or if your kitchen is warm, you can speed up this process by placing the baking sheet with the dipped cookies into the refrigerator for about 10-15 minutes. However, be cautious with refrigeration, as it can sometimes cause condensation on the chocolate, leading to a slightly duller finish or a streaky appearance. Once the chocolate is fully hardened, your Chocolate Covered Strawberry Cookies are ready to be enjoyed or stored. These cookies are best stored in an airtight container at room temperature.

Conclusion:
And there you have it – your very own batch of delicious Chocolate Covered Strawberry Cookies! We’ve walked through each step together, from creaming the butter and sugar to the final delicate dip in melted chocolate. These cookies are more than just a treat; they’re a celebration of classic flavors brought together in a delightful, handheld dessert. The balance of rich chocolate, sweet strawberry, and tender cookie is truly irresistible. I hope you enjoy making and, even more, devouring these incredible cookies just as much as I do. They are perfect for sharing with loved ones, bringin extractg to gatherings, or simply enjoying as a special indulgence.
For serving suggestions, I love pairing these cookies with a cold glass of milk, a hot cup of coffee, or even a light sparkling rosé. They also make a beautiful addition to any dessert platter or as a thoughtful homemade gift. Don’t be afraid to get creative with variations! You could try using different types of chocolate for the coating, like dark or white chocolate, or even a swirl of both. Adding a sprinkle of sea salt on top of the melted chocolate can provide a lovely contrast. For an extra burst of flavor, you could fold a teaspoon of strawberry extract into the cookie dough.
Making Chocolate Covered Strawberry Cookies is a rewarding experience, and I encourage you to try this recipe. Don’t worry if your first batch isn’t absolutely perfect; the most important ingredient is always your enthusiasm. Happy baking!
Frequently Asked Questions:
Q: How should I store Chocolate Covered Strawberry Cookies?
A: For the best texture and flavor, store your Chocolate Covered Strawberry Cookies in an airtight container at room temperature for up to 3-4 days. If you live in a warm climate, or if the cookies feel a little soft from the chocolate coating, you can refrigerate them. Just be aware that refrigeration can sometimes slightly firm up the cookie itself.
Q: Can I use fresh strawberries instead of freeze-dried for the dough?
A: While this recipe is specifically designed for freeze-dried strawberries to maintain dough consistency and flavor intensity, you could experiment with fresh. However, you’d need to significantly reduce the liquid content of your dough to compensate for the moisture in fresh strawberries, and the strawberry flavor might be less potent. For this particular recipe, I highly recommend sticking with freeze-dried.

Chocolate Covered Strawberry Cookie Delight-Easy Recipe
A simple and delightful recipe for chocolate-covered strawberry cookies made from cake mix, perfect for a quick homemade treat.
Ingredients
-
1 box (16.25 oz) Strawberry cake mix
-
1/3 cup vegetable oil
-
1 teaspoon vanilla extract
-
2 large eggs
-
1 cup (6 oz) semi-sweet chocolate chips (or chocolate candy melts)
-
Optional: Sprinkles for decorating
Instructions
-
Step 1
In a large bowl, combine the strawberry cake mix, vegetable oil, vanilla extract, and eggs. Stir until a thick, slightly sticky dough forms. Mix until just combined, do not overmix. -
Step 2
Preheat oven to 350°F (175°C). Drop rounded spoonfuls of dough onto parchment-lined baking sheets, about 2 inches apart. -
Step 3
Bake for 8-10 minutes, or until the edges are lightly golden and the centers are still soft. Let cool on the baking sheet for 5 minutes before transferring to a wire rack to cool completely. -
Step 4
Melt the semi-sweet chocolate chips or chocolate candy melts gently using a double boiler or in the microwave (in 30-second intervals at 50% power, stirring between each). -
Step 5
Dip each cooled cookie halfway or two-thirds into the melted chocolate. Let excess chocolate drip back into the bowl. Place dipped cookies onto parchment paper. -
Step 6
If desired, immediately sprinkle the wet chocolate with sprinkles before it sets. Allow cookies to set at room temperature for 30-60 minutes, or in the refrigerator for 10-15 minutes until the chocolate is firm.
Important Information
Nutrition Facts (Per Serving)
It is important to consider this information as approximate and not to use it as definitive health advice.
Allergy Information
Please check ingredients for potential allergens and consult a health professional if in doubt.
Leave a Comment