
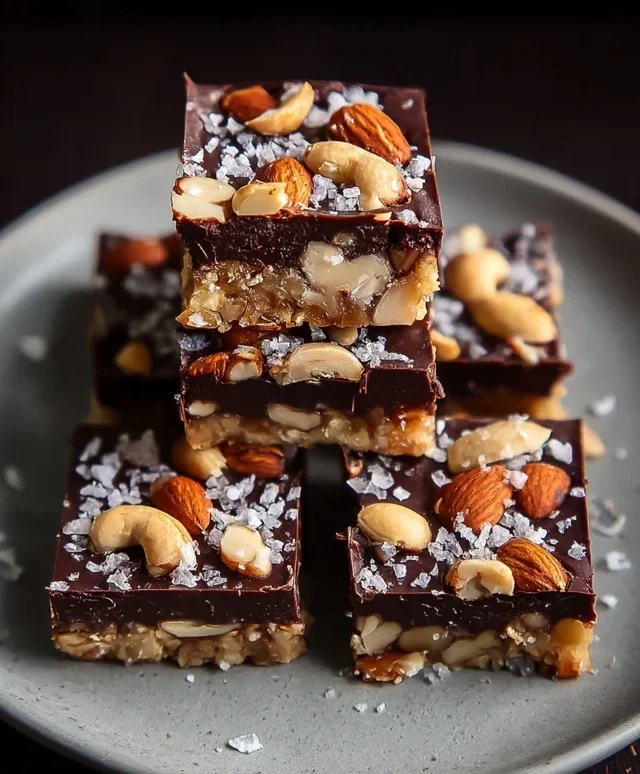
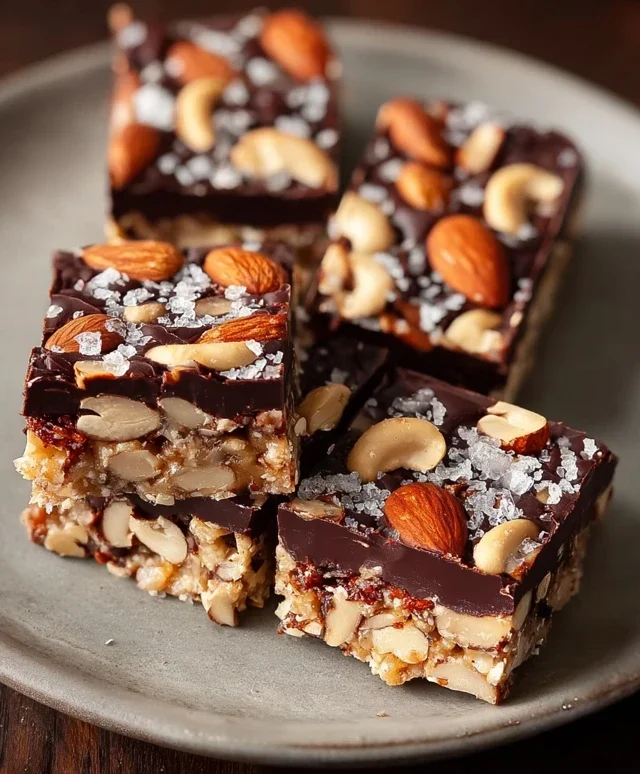
Dark chocolate and sea salt nut bars are the kind of treat that whispers sweet, salty promises with every bite. If you’re anything like me, the allure of that perfect balance – the intense, slightly bitter depth of dark chocolate melting into the satisfying crunch of toasted nuts, all kissed by a sprinkle of flaky sea salt – is simply irresistible. It’s no wonder these bars have become a go-to for so many of us seeking a sophisticated yet incredibly easy homemade snack. Forget store-bought disappointments; these dark chocolate and sea salt nut bars are a testament to the magic that happens when simple, high-quality ingredients come together. They’re not just a dessert; they’re an experience, a little moment of pure, unadulterated indulgence that you can feel good about creating and sharing. Get ready to elevate your snack game with this recipe that’s as delightful to make as it is to devour.

The Ultimate Dark Chocolate and Sea Salt Nut Bars: A Symphony of Sweet and Salty
There’s something incredibly satisfying about a homemade treat that strikes the perfect balance between rich, decadent sweetness and a hint of savory crunch. My Dark Chocolate and Sea Salt Nut Bars are exactly that. They’re my go-to for a mid-afternoon pick-me-up, a post-workout refuel, or even a guilt-free dessert. The combination of crunchy nuts, airy puffed rice, luscious dark chocolate, and that irresistible whisper of sea salt is simply divine. Best of all, they’re surprisingly simple to make, requiring minimal effort for maximum reward. Forget those store-bought bars that are often laden with unpronounceable ingredients; these are packed with wholesome goodness and a flavor profile you’ll crave again and again.
Ingredients:
Crafting Your Delicious Nut Bars: Step-by-Step
Here’s how we bring these delightful bars to life. The key to success is in the careful layering of textures and flavors, ensuring every bite is an experience.
1. Prepare Your Nuts and Base: The foundation of these bars is our nutty blend. I like to use a combination of cashews for creaminess, peanuts for that classic savory note, and almonds for a delightful crunch. You can absolutely customize this! Feel free to experiment with walnuts, pecans, or even macadamia nuts. The important thing is to have a good variety of textures. If your nuts are raw, I highly recommend giving them a quick toast in a dry skillet over medium heat for about 5-7 minutes, or until fragrant. This intensifies their flavor and brings out their natural oils, making them even more delicious. Once toasted and cooled slightly, give them a rough chop. You want some larger pieces for texture and some smaller bits to fill in the gaps. In a large bowl, combine your chopped nuts with the puffed rice. The puffed rice adds a wonderful lightness and crispness that contrasts beautifully with the denser nuts.
2. Create the Binding Syrup: Now, let’s create the magic that holds everything together. In a small saucepan over medium-low heat, gently warm the brown rice syrup. You don’t want it to boil vigorously, just get warm enough to become more fluid. This makes it easier to coat all the dry ingredients. Once it’s warm and pourable, remove it from the heat and stir in the vanilla extract and the 1/2 teaspoon of sea salt. The vanilla adds a wonderful aromatic depth, while the sea salt, even at this stage, starts to weave its savory magic throughout the bars. It’s crucial to mix this thoroughly to ensure an even distribution of flavor.
3. Combine and Press: Pour the warm syrup mixture over the nut and puffed rice mixture in your large bowl. Use a sturdy spatula or a wooden spoon to stir everything together until all the dry ingredients are evenly coated. This can take a minute or two, so be patient. You want every single nut and puff of rice to get a lovely glaze from the syrup. Once everything is well combined, transfer this mixture to a baking dish (an 8×8 inch square pan is ideal) that has been lined with parchment paper. Leave an overhang of parchment paper on the sides; this will make it incredibly easy to lift the entire block of bars out of the pan later. Now comes the pressing. This is a crucial step for ensuring your bars hold their shape. Use the bottom of a glass or a flat-bottomed measuring cup to press the mixture down firmly and evenly into the pan. You really want to compact it well. The firmer you press, the more cohesive your bars will be.
4. Melt and Drizzle the Chocolate: While the pressed nut mixture is setting slightly, it’s time for the star of the show: the dark chocolate. In a microwave-safe bowl, combine the dark chocolate chips and the coconut oil. Microwave in 30-second intervals, stirring well after each interval, until the chocolate is completely melted and smooth. The coconut oil helps to make the chocolate extra glossy and provides a delightful snap when it cools. Alternatively, you can melt the chocolate and coconut oil in a double boiler over simmering water. Once melted and beautifully smooth, drizzle this luscious chocolate over the pressed nut mixture in the pan. You can use a spoon to spread it evenly, or simply let it cascade naturally for a more rustic look.
5. The Finishing Touch and Chill: If you’re using flaky sea salt, this is the moment to sprinkle it generously over the melted chocolate. The contrast of the crunchy, briny flakes against the rich dark chocolate is simply heavenly. Now, carefully place the pan in the refrigerator for at least 2-3 hours, or until the chocolate is completely set and firm. This chilling time is essential for the bars to solidify and be cut cleanly. Once chilled, use the parchment paper overhang to lift the entire block of bars out of the pan. Place it on a cutting board and, using a sharp knife, cut into your desired bar shapes. I usually get about 12-16 bars, depending on how thick I cut them. Store any leftover bars in an airtight container in the refrigerator. Enjoy these delightful, homemade treats that are sure to become a new favorite!
Conclusion:
There you have it – a simple yet incredibly satisfying recipe for Dark Chocolate and Sea Salt Nut Bars that are sure to become a staple in your kitchen! The magic of these bars lies in their perfect balance of rich, decadent dark chocolate, crunchy, wholesome nuts, and the delightful little bursts of savory sea salt. They’re remarkably easy to whip up, making them ideal for a quick afternoon snack, a pre-workout energy boost, or even a thoughtful homemade gift for friends and family. The versatility of these bars means you can truly make them your own. Don’t be afraid to experiment with different nut combinations – almonds, walnuts, pecans, or even a mix can add unique flavors and textures. You could also try adding a sprinkle of chili flakes for a spicy kick, or a drizzle of caramel for extra indulgence. I truly encourage you to give this Dark Chocolate and Sea Salt Nut Bars recipe a try; I’m confident you’ll be delighted with the results and the sheer enjoyment of creating your own delicious, healthy-ish treat.
Frequently Asked Questions:
Can I use different types of chocolate?
Absolutely! While dark chocolate provides a lovely contrast to the nuts and salt, milk chocolate or even white chocolate could be used depending on your preference. Just be mindful that different chocolates will have varying sweetness levels, so you might want to adjust the sea salt accordingly.
How should I store these nut bars?
For best results, store your Dark Chocolate and Sea Salt Nut Bars in an airtight container at room temperature for up to a week. If your kitchen is particularly warm, or if you’ve added ingredients that might melt easily (like chocolate chips that aren’t fully set), keeping them in the refrigerator is a good idea. They’ll be wonderfully firm and refreshing when chilled!
Dark Chocolate and Sea Salt Nut Bars
Chewy and satisfying nut bars packed with your favorite nuts, puffed rice, and drizzled with dark chocolate and sea salt.
Ingredients
-
2 1/2 cups unsalted nuts of choice (3/4 cup cashews, 3/4 cup peanuts, 1 cup almonds)
-
1/2 cup puffed rice
-
1/4 cup brown rice syrup
-
1 1/2 teaspoon vanilla extract
-
1/2 teaspoon sea salt
-
1 cup dark chocolate chips
-
2 teaspoons coconut oil
-
Flaky salt for topping (optional)
Instructions
-
Step 1
Line an 8×8 inch baking pan with parchment paper, leaving an overhang on the sides. -
Step 2
In a large bowl, combine the nuts and puffed rice. -
Step 3
In a small saucepan, gently heat the brown rice syrup, vanilla extract, and 1/2 teaspoon sea salt until warm. Do not boil. -
Step 4
Pour the warm syrup mixture over the nut and puffed rice mixture. Stir well to coat everything evenly. -
Step 5
Press the mixture firmly into the prepared baking pan. You can use another piece of parchment paper to help press it down evenly. -
Step 6
In a microwave-safe bowl, melt the dark chocolate chips and coconut oil in 30-second intervals, stirring between each, until smooth. -
Step 7
Drizzle the melted chocolate over the pressed nut mixture. Sprinkle with flaky salt, if using. -
Step 8
Refrigerate for at least 1 hour, or until firm. Cut into bars.
Important Information
Nutrition Facts (Per Serving)
It is important to consider this information as approximate and not to use it as definitive health advice.
Allergy Information
Please check ingredients for potential allergens and consult a health professional if in doubt.


Leave a Comment