
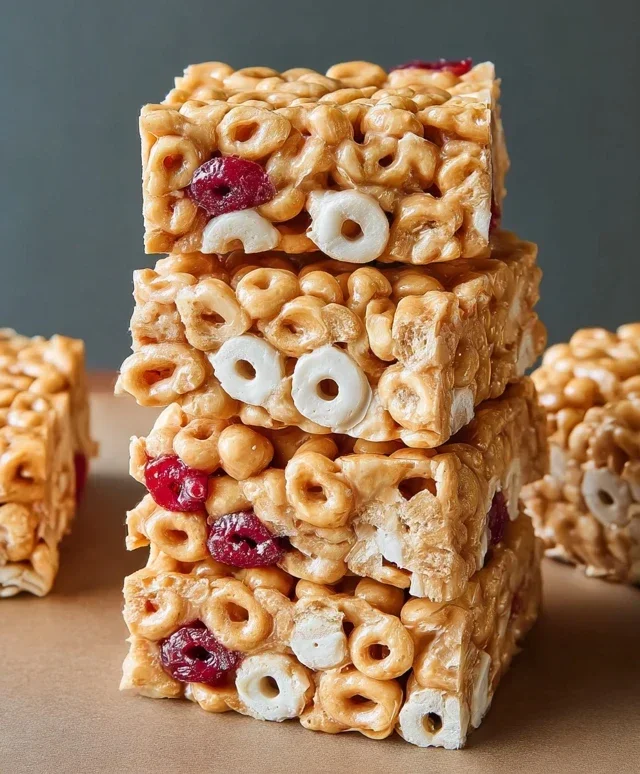
Cereal bars are the unsung heroes of quick breakfasts and grab-and-go snacks. We all remember those iconic boxes from our childhood, promising a burst of flavor and energy in every bite. But what if I told you that you could recreate that magic, and elevate it, right in your own kitchen? That’s the beauty of homemade cereal bars – they offer a satisfyingly chewy, crunchy, and customizable experience that store-bought versions just can’t match. Think about it: you control the sweetness, the textures, and you can pack them with all your favorite mix-ins, from chocolate chips to dried fruit to even a sprinkle of nuts. These aren’t just snacks; they’re little packages of pure joy, perfect for busy mornings, after-school fuel, or even a delightful treat to share. Ready to ditch the processed stuff and craft your own legendary cereal bars?

Homemade Cereal Bars: Your New Favorite Snack
Forget those pre-packaged bars that are loaded with who-knows-what. We’re going to make some delicious, customizable cereal bars right in your own kitchen! These are fantastic for a quick breakfast on the go, a pre-workout boost, or an afternoon pick-me-up. The beauty of this recipe is its simplicity and adaptability. You can swap out the cereal, the nut butter, and even add in extra goodies. Let’s get started on creating your perfect cereal bar!
Ingredients:
Getting Started: Preparation is Key
Before we dive into the mixing and melting, let’s get our workspace ready. This recipe is straightforward, but having everything prepped will make the process smooth sailing.
First, you’ll want to choose your cereal. I love using something with a bit of crunch, like puffed rice or a crispy whole-grain cereal. If you prefer something sweeter, a frosted flake or a cinnamon-flavored cereal will work beautifully. Just make sure it’s not too powdery, as that can affect the texture. Measure out your 3 cups of cereal and set it aside in a large mixing bowl.
Next, prepare your pan. Line an 8×8 inch baking pan with parchment paper. Make sure the parchment paper hangs over the sides of the pan; this will act as “handles” to easily lift the finished bars out later. You can lightly grease the parchment paper if you’re worried about sticking, but it’s usually not necessary.
The Melting Process: Bringin extractg It All Together
Now for the magic! In a medium saucepan, we’re going to combine our wet ingredients. Add the 2/3 cup of your chosen nut butter to the saucepan. Peanut butter is a classic for a reason, but almond butter, cashew butter, or even sunflower seed butter for a nut-free option are excellent substitutes.
To the nut butter, add your sweetener. Whether you opt for the natural sweetness of agave, the floral notes of honey, or the mild caramel flavor of brown rice syrup, this is where a lot of the binding power comes from. Measure out 1/2 cup of your sweetener and pour it into the saucepan with the nut butter.
If you’re using the optional salt, add the 1/2 teaspoon now. A pinch of salt can really enhance the flavors and balance the sweetness, so I usually don’t skip it.
Now, place the saucepan over low heat. We’re not trying to boil this, just gently melt and combine. Stir the nut butter and sweetener together continuously. You’ll see them start to meld into a smooth, glossy mixture. This usually takes a few minutes. Don’t rush this step; low and slow is the way to go to prevent scorching.
Incorporating the Dry Ingredients: The Binding Act
Once your nut butter and sweetener are fully combined and smooth, it’s time to incorporate the optional protein powder, if you’re using it. Sprinkle the 3 tablespoons of protein powder over the melted mixture. Continue to stir until the protein powder is completely incorporated and there are no dry clumps. This step is especially important if you’re using a thicker protein powder, as it can be prone to clumping. Stirring vigorously will ensure a smooth texture throughout your bars.
Now, carefully pour this warm, sticky mixture over the 3 cups of cereal in your large mixing bowl. You want to coat every single piece of cereal with this delicious binder. Use a sturdy spatula or wooden spoon to gently fold and mix everything together. Be thorough, ensuring all the cereal is coated. It might seem like a lot of mixture at first, but keep stirring and folding until you achieve an even distribution. This is where the protein powder really helps to make the bars hold together.
Pressing and Setting: The Final Frontier
Once the cereal is thoroughly coated, it’s time to get it into our prepared pan. Transfer the coated cereal mixture into the 8×8 inch baking pan lined with parchment paper.
This next step is crucial for creating firm bars: pressing! Use the back of your spatula, or even a piece of wax paper laid on top of the mixture, to press the cereal down firmly and evenly into the pan. You want to compact it as much as possible. The firmer you press, the better your bars will hold their shape. Go around the edges and really pack it in. This might take a little elbow grease, but it’s worth it for bars that don’t crum extractble apart.
Once you’ve pressed it down uniformly, place the pan in the refrigerator for at least 1-2 hours, or until the bars are completely set and firm to the touch. The cold will help the nut butter and sweetener to solidify, binding everything together. You can also leave them out at room temperature to set, but it will take longer.
Cutting and Enjoying: The Sweet Reward
After the chilling period, your cereal bars should be nice and firm. Use the parchment paper handles to lift the entire block of cereal mixture out of the pan and onto a cutting board.
Now, use a sharp knife to cut the block into your desired bar size. You can make them large and hearty, or smaller, bite-sized treats. I usually cut mine into about 12-16 bars, depending on how big I want them.
And there you have it! Delicious, homemade cereal bars ready to be devoured. Store any leftovers in an airtight container at room temperature for up to a week, or in the refrigerator for longer storage. Enjoy your healthy, homemade snack!
Conclusion:
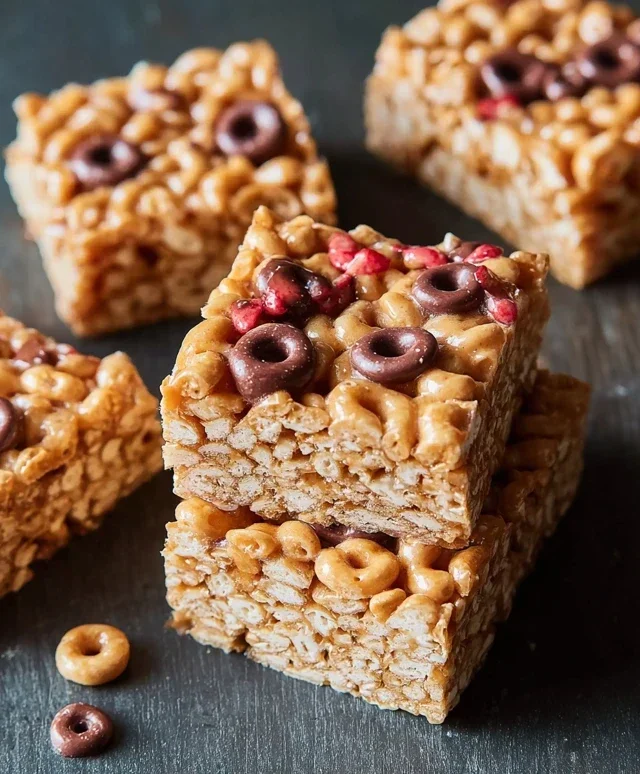
And there you have it! I hope you’re as excited as I am about these incredibly versatile and delicious cereal bars. They’re the perfect solution for those busy mornings when you need a quick and satisfying breakfast on the go, or a delightful afternoon pick-me-up. The beauty of this cereal bar recipe lies in its simplicity and adaptability. You can tailor it to your exact preferences, making it a truly personal treat. Don’t be afraid to experiment with different types of cereals, add your favorite nuts or seeds, or even a sprinkle of chocolate chips for an extra indulgence.
These cereal bars are fantastic on their own, but they also pair wonderfully with a glass of milk, a cup of coffee, or a refreshing fruit smoothie. For a more substantial snack, consider serving them with a dollop of yogurt.
Give this recipe a try, and I’m confident you’ll find these cereal bars to be a staple in your kitchen. Happy baking!
Frequently Asked Questions:
Can I make these cereal bars vegan?
Absolutely! To make these cereal bars vegan, simply swap out the butter for a vegan butter alternative or coconut oil. Ensure your marshmallows are also vegan-friendly, as some contain gelatin.
How long do these cereal bars stay fresh?
Stored in an airtight container at room temperature, these cereal bars will stay fresh for about 3-5 days. For longer storage, you can wrap them individually and keep them in the refrigerator for up to a week, or even freeze them for up to 2 months.
Cereal Bars
Easy no-bake cereal bars made with your favorite cereal, nut butter, and sweetener. Customizable with optional protein powder and salt.
Ingredients
-
3 cups cereal of choice
-
2/3 cup peanut butter or nut butter of choice
-
1/2 cup agave, honey, or brown rice syrup
-
1/2 tsp salt (optional)
-
3 tbsp protein powder (optional)
Instructions
-
Step 1
Line an 8×8 inch baking pan with parchment paper, leaving an overhang on the sides. -
Step 2
In a large bowl, combine the cereal of choice. -
Step 3
In a separate microwave-safe bowl, combine the peanut butter or nut butter of choice and agave, honey, or brown rice syrup. Heat in the microwave for 30-second intervals, stirring in between, until the mixture is smooth and pourable. -
Step 4
Add the optional salt and protein powder to the melted nut butter mixture and stir until well combined. -
Step 5
Pour the wet ingredients over the cereal and stir gently until the cereal is evenly coated. -
Step 6
Press the mixture firmly into the prepared baking pan. Use the parchment paper overhang to help press it down evenly. -
Step 7
Chill in the refrigerator for at least 30 minutes, or until firm. -
Step 8
Lift the bars out of the pan using the parchment paper and cut into desired sizes.
Important Information
Nutrition Facts (Per Serving)
It is important to consider this information as approximate and not to use it as definitive health advice.
Allergy Information
Please check ingredients for potential allergens and consult a health professional if in doubt.


Leave a Comment