
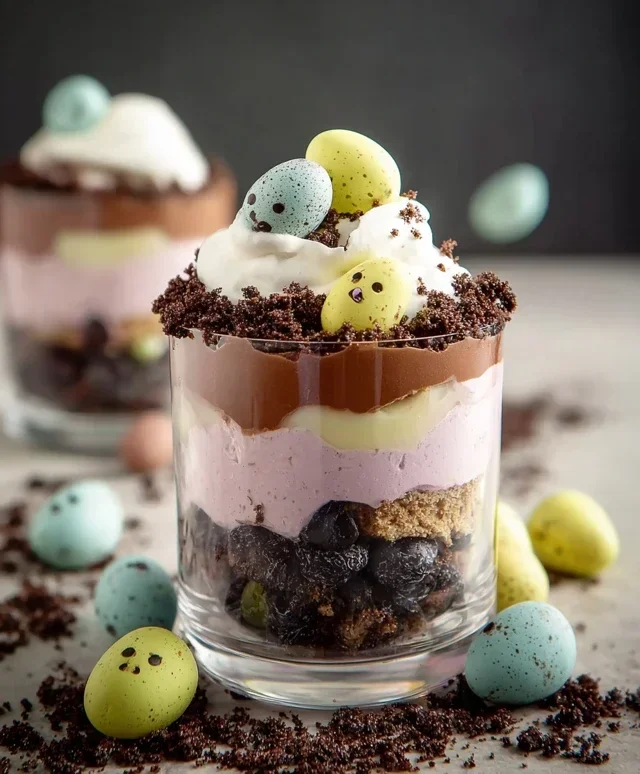
Easter dirt cups are a springtime sensation, and for good reason! These delightful treats capture the playful spirit of the season, bringin extractg smiles to faces of all ages. If you’ve ever wondered what makes these simple desserts so universally loved, it’s the perfect blend of familiar flavors and whimsical presentation. Who can resist creamy pudding, crushed cookie “dirt,” and an adorable gummy worm peeking out? They’re incredibly easy to assemble, making them a fantastic activity for kids and a stress-free addition to any Easter gathering. What truly sets Easter dirt cups apart is their delightful mimicry of a garden bed, transforming humble ingredients into a miniature edible landscape. We’re about to dive into how you can create your own batch of these charming Easter dirt cups, a guaranteed hit for your festive table.

Easter Dirt Cups
Easter dirt cups are a fun and festive treat that’s perfect for spring gatherings, Easter egg hunts, or just a delightful dessert to bring a smile to anyone’s face. These no-bake cups are incredibly easy to assemble, making them a fantastic activity for kids and adults alike. The “dirt” comes from crushed Oreos, the “worms” are playfully represented by marshmallow Peeps, and colorful candy eggs add a burst of Easter cheer. Get ready to create a whimsical dessert that tastes as good as it looks!
Ingredients:
Instructions:
Prepare the Pudding Base:
The foundation of our delicious dirt cups is a creamy vanilla pudding. In a large mixing bowl, whisk together the 1 package of vanilla instant pudding mix and the 2 cups of cold milk. Continue whisking for about 2 minutes, or until the pudding begin extracts to thicken. It’s important to use cold milk for the pudding to set properly. Once it has reached a thick consistency, cover the bowl with plastic wrap, ensuring the plastic wrap touches the surface of the pudding. This will prevent a skin from forming. Refrigerate the pudding for at least 5 minutes to allow it to set completely. While the pudding is chilling, you can get a head start on preparing your other components.
Create the “Dirt”:
This is where the magic of our dirt cups truly begin extracts! Take your 1 package of Oreo cookies. The easiest way to crush them finely is to place them in a food processor and pulse until they resemble coarse crum extractbs. If you don’t have a food processor, you can place the Oreos in a large Ziploc bag and crush them with a rolling pin or the bottom of a heavy pan. It’s important to remove the creamy filling from the Oreos before crushing them, as this can make the “dirt” too clumpy and sweet. We want that distinct dark, crum extractbly texture for our “earth.” Set the crushed Oreos aside; this will be our delicious, edible soil.
Color the Coconut for Easter Flair:
To add a vibrant touch of Easter to our dirt cups, we’ll color some shredded coconut. In a small bowl, place about 1 cup of shredded coconut. Add a few drops of your chosen food coloring – purple and pink are lovely choices for Easter, but feel free to experiment with other spring colors! Add a tiny bit of water, just a teaspoon or two, to help distribute the color evenly. Mix the coconut with a fork until it’s uniformly colored. You can spread the colored coconut on a piece of parchment paper to dry slightly if you prefer a less clumpy texture, or use it as is for a more clustered effect. This colored coconut will add a beautiful grassy or floral element to your dessert landscape.
Assemble the Dirt Cups:
Now for the fun part – assembling our Easter dirt cups! Grab your serving dishes. These can be individual clear cups, small glasses, or even mason jars. Start by spooning a layer of the chilled vanilla pudding into the bottom of each serving dish. Next, generously sprinkle a layer of your finely crushed Oreo “dirt” over the pudding. You can use a spoon to gently press down the “dirt” to create a smooth surface. Now, add another layer of pudding on top of the Oreo crum extractbs, followed by another layer of “dirt.” Aim for at least two layers of pudding and two layers of dirt for a good balance of flavors and textures. The visual appeal of alternating layers is part of the charm!
Decorate with Easter Delights:
This is where your creativity truly shines! Take your thawed Cool Whip and gently fold it into the remaining vanilla pudding. This will create a lighter, fluffier pudding mixture that’s perfect for layering or for creating cloud-like mounds on top of your dirt. You can add a few drops of food coloring to this mixture as well, if you like, to create pastel-colored “clouds” or swirled effects. Now, artfully arrange your Easter decorations. Press candy eggs into the “dirt” to resemble treasures unearthed. Place a few Peeps marshmallow chicks or bunnies on top, as if they’re hopping through the garden. Sprinkle your colored shredded coconut around the Peeps and candy eggs to mimic grass or colorful blooms. You can even use a skewer to create little holes in the “dirt” before inserting your Peeps for a more realistic look. The possibilities are endless, so have fun and make each cup a unique masterpiece!

Conclusion:
Easter Dirt Cups are a delightful and incredibly easy treat that are sure to be a hit with everyone, young and old! Their simplicity, combined with the fun, visually appealing “dirt” aesthetic, makes them a perfect activity for kids to help with and a crowd-pleasing dessert for any Easter gathering. We’ve covered how to whip up these chocolatey wonders using crushed chocolate cookies and creamy pudding, topped with a sweet gummy worm to complete the playful look. They’re fantastic as individual servings, making portion control a breeze. For serving, consider presenting them in clear plastic cups or small mason jars for that classic Easter Dirt Cup presentation. Don’t be afraid to get creative with variations! You can easily swap out the chocolate pudding for vanilla or even a white chocolate flavor. Add a few fresh berries like raspberries or strawberries for a pop of color and freshness, or even a sprinkle of edible flowers. The possibilities are endless! I truly encourage you to give this recipe a try this Easter. It’s a guaranteed way to bring smiles and a touch of whimsical fun to your celebrations.
Frequently Asked Questions:
Can I make Easter Dirt Cups ahead of time?
Absolutely! Easter Dirt Cups can be assembled a day in advance. Simply store them covered in the refrigerator. It’s best to add the gummy worms just before serving to prevent them from getting too soft.
What kind of chocolate cookies work best for the “dirt”?
Oreo cookies are a classic choice and work wonderfully for creating the perfect “dirt” texture. However, any chocolate sandwich cookie or even chocolate wafers will give you a similar delicious result.
Easter Dirt Cups
A fun and festive Easter-themed dessert made with crushed Oreos, pudding, whipped topping, and colorful decorations.
Ingredients
-
1 package (3.9 oz.) vanilla instant pudding mix
-
2 cups cold milk
-
1 container (8 oz.) Cool Whip, thawed
-
Food coloring (purple and pink)
-
1 package Oreo cookies, finely crushed with filling removed
-
Shredded coconut
-
Candy eggs (mini egg candies)
-
Peeps marshmallow chicks or bunnies
Instructions
-
Step 1
In a large bowl, whisk together the vanilla instant pudding mix and cold milk according to package directions until thickened. -
Step 2
Gently fold the thawed Cool Whip into the pudding mixture until well combined. -
Step 3
Divide the pudding mixture into two bowls. Tint one bowl purple and the other pink using food coloring. -
Step 4
In small glasses or cups, layer the crushed Oreo cookies, alternating with the purple and pink pudding mixtures. Continue layering until cups are filled. -
Step 5
Top each dirt cup with a final layer of crushed Oreos to resemble dirt. -
Step 6
Decorate the dirt cups with shredded coconut (tinted green with food coloring if desired), candy eggs, and Peeps marshmallows. -
Step 7
Chill for at least 30 minutes before serving.
Important Information
Nutrition Facts (Per Serving)
It is important to consider this information as approximate and not to use it as definitive health advice.
Allergy Information
Please check ingredients for potential allergens and consult a health professional if in doubt.

Leave a Comment