
Easter Rice Krispie Treats are more than just a simple confection; they’re a delightful gateway to spring celebrations and cherished childhood memories. These iconic puffed rice squares, with their irresistible chewy texture and sweet, buttery flavor, have a magical way of bringin extractg smiles to faces, both young and old. What makes these particular Easter Rice Krispie Treats so special? It’s their incredible versatility and the opportunity they offer to infuse a touch of festive fun into a classic favorite. Forget fussy baking; this recipe is all about quick, easy assembly and a whole lot of customizable charm, making them the perfect addition to your Easter brunch or a delightful activity for a rainy spring afternoon. Get ready to transform ordinary into extraordinary with these festive delights!

Easter Rice Krispie Treats
Welcome to a delightful and incredibly easy way to bring some Easter cheer into your kitchen! These Easter Rice Krispie Treats are a festive twist on a beloved classic, perfect for sharing with family and friends, decorating your Easter table, or even for a fun activity with the kids. We’re going to transform the simple goodness of Rice Krispie treats into a vibrant, spring-themed dessert that’s as enjoyable to make as it is to eat. Forget complicated baking; this recipe is all about simple mixing and a touch of colorful creativity. Get ready to whip up a batch of pure, unadulterated joy!
Ingredients:
Preparing Your Easter Masterpiece
The foundation of any great Rice Krispie treat is the perfect marshmallow-to-cereal ratio, and we’re starting with plenty of fluffy marshmallows to ensure that signature gooeyness.
First things first, we need to prepare our workspace. Grease a 9×13 inch baking pan with butter or cooking spray. This step is crucial to prevent your delicious treats from sticking. You can also line the pan with parchment paper, leaving some overhang on the sides, which makes lifting the entire slab out so much easier for cutting later.
Now, let’s get melting! In a large saucepan, melt the 2 tablespoons of unsalted butter over low heat. Once melted, add the 16 ounces of marshmallows to the pan. Stir constantly, allowing the marshmallows to melt completely. You want a smooth, creamy, and lump-free mixture. Be patient and keep the heat on low to avoid scorching the marshmallows; this can result in a less pleasant flavor. Once the marshmallows are fully melted and smooth, remove the saucepan from the heat immediately. This prevents the mixture from becoming too stiff.
Time for the star of the show: the cereal! Add the 7 cups of Rice Krispies cereal to the melted marshmallow mixture. Gently fold the cereal into the marshmallows using a spatula until it’s thoroughly coated. Make sure every single crispy flake is embraced by that sweet, gooey goodness. It’s important not to overmix here; we want to preserve the crunch of the cereal. Once combined, quickly and evenly press the mixture into your prepared baking pan. You can use a greased spatula or your greased hands to press it down firmly. Work fast, as the marshmallow mixture begin extracts to set up quickly.
This is where the Easter magic truly begin extracts! Let your basic Rice Krispie treats cool in the pan for about 15-20 minutes. While they’re cooling, let’s prepare the delicious glaze that will give our treats that festive Easter flair. In a medium bowl, combine the ½ cup of unsalted butter (softened, not melted), 3 cups of powdered sugar, ¼ cup of milk, and 1 teaspoon of vanilla extract. Whisk these ingredients together until you have a smooth, pourable glaze. If the glaze is too thick, add a little more milk, a teaspoon at a time, until you reach your desired consistency. If it’s too thin, gradually add more powdered sugar. This glaze is the perfect canvas for our colors and decorations.
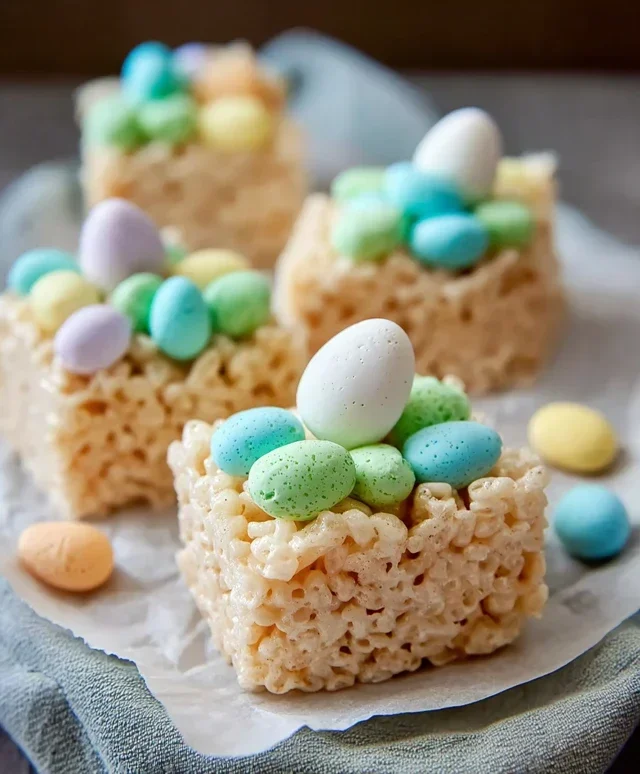
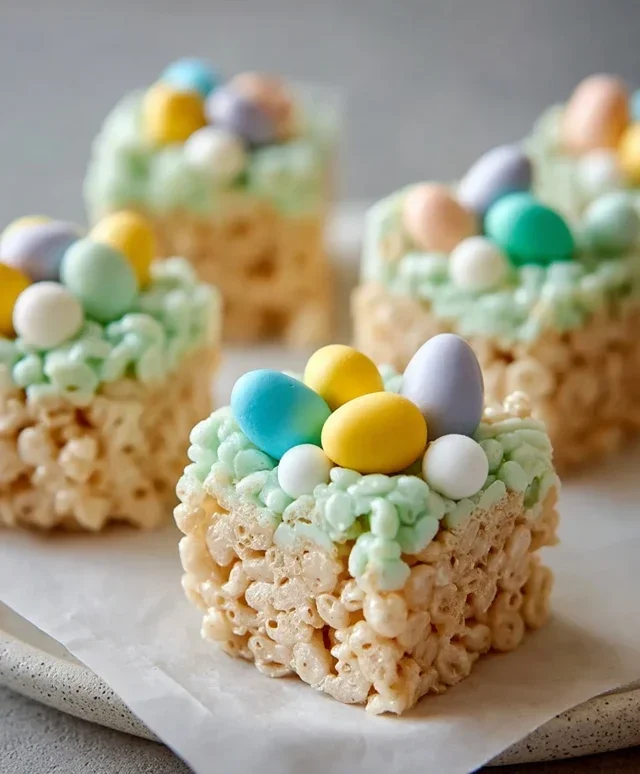
Now for the fun part – coloring and decorating! Divide your glaze into two or three small bowls, depending on how many colors you want. Leave one bowl plain white, or add a touch of yellow for a classic Easter vibe. Add a few drops of green food coloring to another bowl and stir until the color is evenly distributed, creating a beautiful spring green. You can add more food coloring for a deeper shade. Once your glaze is colored, drizzle it generously over the cooled Rice Krispie treats in the pan. Use a spoon to spread it slightly, creating an artistic, swirled effect. Immediately after drizzling the glaze, scatter your Easter egg candies (mini chocolate eggs or jelly beans) over the top. Press them gently into the glaze so they stick. Let the glaze set completely before cutting. This might take an hour or two. Once the glaze has set, use a sharp knife to cut the treats into squares or fun Easter shapes.
These Easter Rice Krispie Treats are wonderfully versatile. You can even get creative with cookie cutters once the treats have cooled slightly but before they fully set, cutting out bunnies, eggs, or flowers for an extra special touch. Enjoy the sweet, chewy, and festive result of your efforts!
Conclusion:
I hope you’re as excited as I am to try these delightful Easter Rice Krispie Treats! They’re truly a fantastic treat because they’re incredibly easy to make, incredibly delicious, and offer endless opportunities for customization, making them perfect for bakers of all skill levels. Whether you’re looking for a fun activity to do with the kids or a quick, crowd-pleasing dessert for your Easter gathering, these treats are a guaranteed hit. Their chewy, crispy texture combined with the sweet marshmallow goodness is simply irresistible. For serving, they look absolutely charming on a festive platter alongside other Easter sweets. You can also individually wrap them for a lovely take-home favor for your guests. Don’t be afraid to get creative with variations! Consider adding pastel-colored sprinkles, edible glitter, or even a drizzle of white chocolate for an extra touch of elegance. This recipe is a fantastic way to add a homemade touch to your Easter celebrations, and I truly encourage you to give it a go. You won’t regret it!
Frequently Asked Questions:
Can I make these Easter Rice Krispie Treats ahead of time?
Absolutely! These treats are perfect for making a day or two in advance. Once they’ve cooled and been cut, store them in an airtight container at room temperature. This makes them a convenient option for busy holiday schedules.
How can I make them extra festive for Easter?
Beyond adding sprinkles and food coloring to the mixture, you can use Easter-themed cookie cutters to shape them, or even melt some candy melts and drizzle them over the cooled treats in a festive pattern. Small candy eggs or jelly beans can also be pressed into the warm treats before they set.
My treats are too hard/crum extractbly. What did I do wrong?
This often happens if the marshmallow mixture is cooked for too long, causing it to caramelize too much. Make sure to remove the heat as soon as the marshmallows are melted and smooth, and then quickly mix in the cereal and press them into the pan. Don’t overpack them too tightly either, as this can also lead to hardness.
Easter Rice Krispie Treats
Festive and colorful Rice Krispie Treats perfect for Easter celebrations, featuring green-tinted cereal squares and decorated with Easter egg candies.
Ingredients
-
16 ounces marshmallows
-
7 cups Rice Krispies cereal
-
2 tablespoons unsalted butter
-
½ cup unsalted butter
-
3-4 cups powdered sugar
-
¼ cup milk
-
1 teaspoon vanilla extract
-
Green food coloring
-
Easter egg candies (mini chocolate eggs or jelly beans)
Instructions
-
Step 1
In a large saucepan, melt 2 tablespoons of unsalted butter over low heat. Add marshmallows and stir until completely melted and smooth. -
Step 2
Remove from heat. Stir in the 7 cups of Rice Krispies cereal until well coated. Add a few drops of green food coloring and stir until evenly distributed for a pastel green color. -
Step 3
Grease a 9×13 inch baking pan with non-stick cooking spray or the remaining ½ cup of unsalted butter. Press the Rice Krispie mixture evenly into the prepared pan. -
Step 4
In a small bowl, whisk together the powdered sugar, ¼ cup milk, and 1 teaspoon vanilla extract until smooth. This forms a simple glaze. -
Step 5
Drizzle the glaze over the Rice Krispie treats in the pan. Immediately sprinkle with Easter egg candies before the glaze sets. -
Step 6
Allow the treats to cool and set completely before cutting into squares.
Important Information
Nutrition Facts (Per Serving)
It is important to consider this information as approximate and not to use it as definitive health advice.
Allergy Information
Please check ingredients for potential allergens and consult a health professional if in doubt.


Leave a Comment