
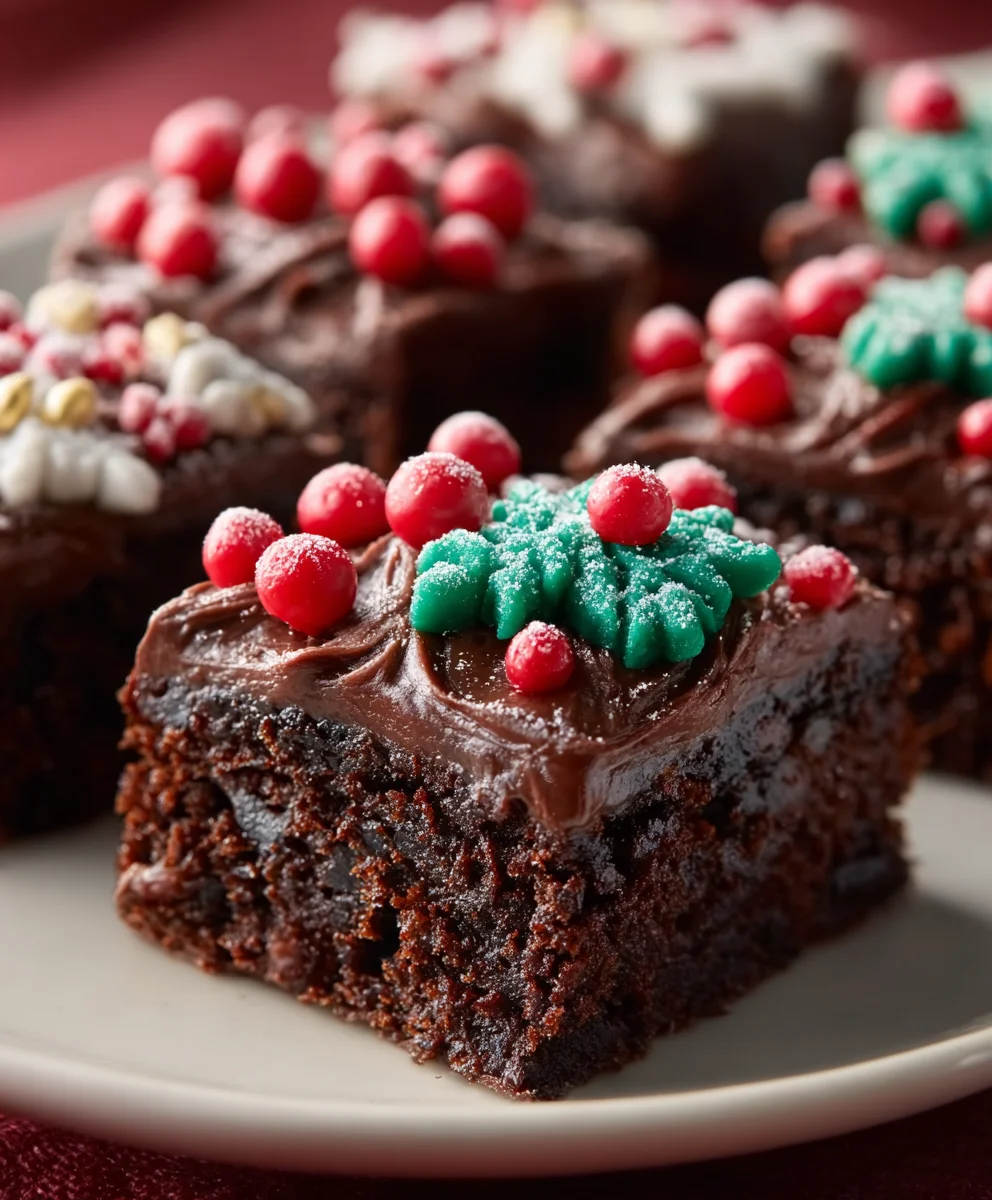
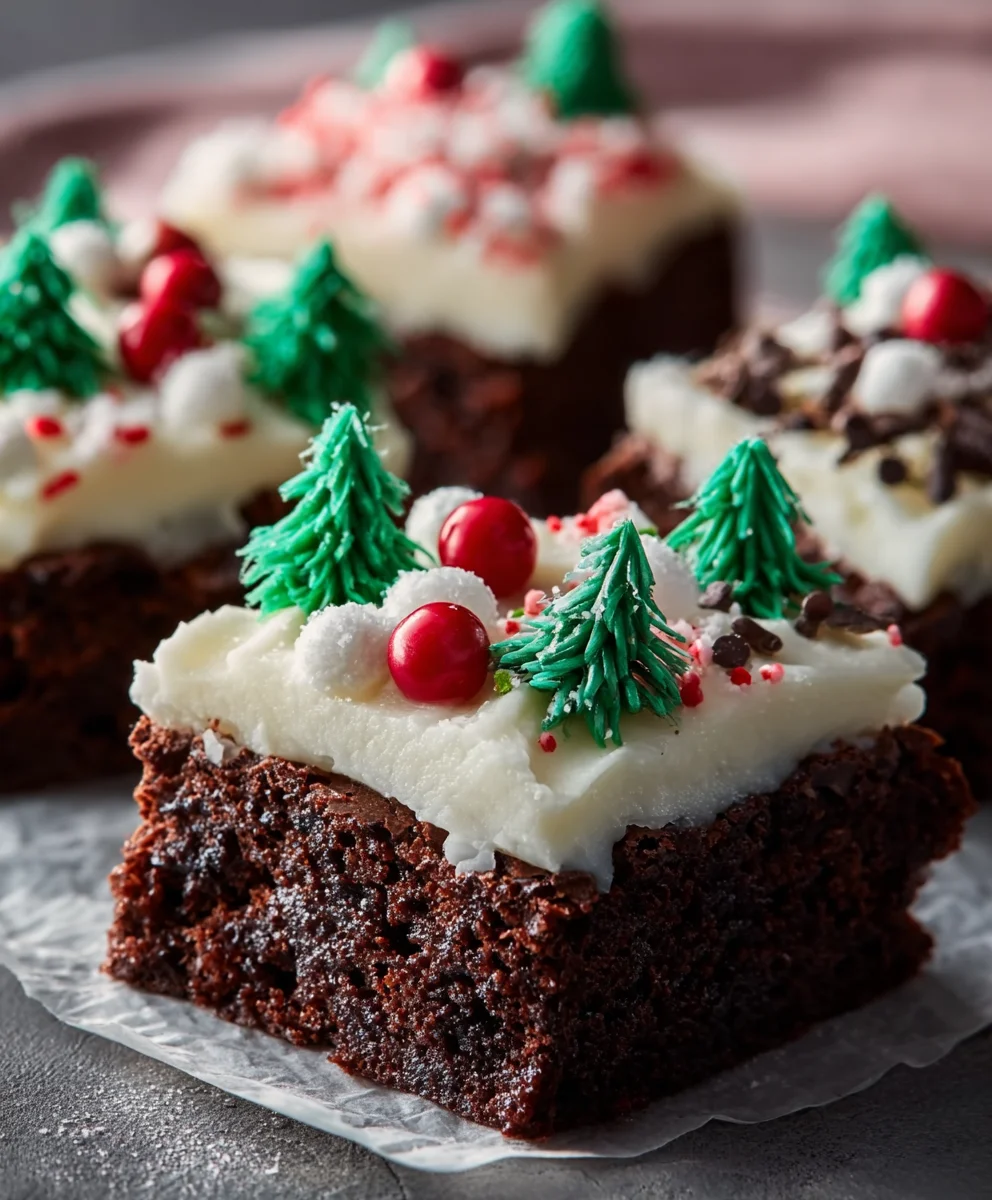
Frosted Christmas Brownies are more than just a sweet treat; they are miniature edible masterpieces that capture the very essence of holiday cheer. Imagin extracte a deeply rich, fudgy brownie base, so decadent it melts in your mouth, crowned with a swirl of vibrant, festive frosting that evokes snow-capped trees and twinkling lights. This isn’t your average brownie; it’s an experience designed to delight every sense and bring a smile to your face. People absolutely adore these brownies because they combine classic comfort with a touch of celebratory magic. The perfect balance of intense chocolate flavor from the brownie and the sweet, creamy embrace of the frosting makes them utterly irresistible. What truly makes these Frosted Christmas Brownies special is their versatility and their ability to be customized with holiday colors and sprinkles, transforming them into a show-stopping centerpiece for any dessert table or a thoughtful homemade gift that’s sure to spread joy.

Ingredients:
- 1 cup (2 sticks) unsalted butter, softened
- 2 cups granulated sugar
- 4 large eggs
- 1 teaspoon vanilla extract
- 1 cup all-purpose flour
- 3/4 cup unsweetened cocoa powder
- 1/2 teaspoon baking powder
- 1/2 teaspoon salt
- 1 cup semi-sweet chocolate chips (for brownies)
- 1/4 cup unsalted butter (for frosting)
- 2 cups powdered sugar
- 1/4 cup unsweetened cocoa powder (for frosting)
- 1/4 cup milk
- 1 teaspoon vanilla extract (for frosting)
- 1/4 cup crushed candy canes (for topping)
- Red and green decorating sugar (optional, for topping)
Preparing the Brownie Batter
First things first, let’s get our oven preheated and our baking pan ready. This ensures even baking and prevents any sticking disasters. I like to preheat my oven to 350 degrees Fahrenheit (175 degrees Celsius). While the oven heats up, grease and flour a 9×13 inch baking pan. You can also line it with parchment paper, leaving an overhang on the sides. This makes lifting the brownies out of the pan so much easier later on.
In a large mixing bowl, we’re going to cream together the softened unsalted butter and the granulated sugar. Use an electric mixer on medium speed, or a sturdy whisk if you’re feeling ambitious, and beat them until the mixture is light and fluffy. This step incorporates air into the batter, which contributes to a wonderfully tender brownie texture. Don’t rush this part; a good creaming is key!
Next, we’ll add the eggs, one at a time, beating well after each addition. Once the eggs are incorporated, stir in the 1 teaspoon of vanilla extract. The aroma already starts to smell like something special!
Now, let’s move on to the dry ingredients. In a separate medium bowl, whisk together the all-purpose flour, 3/4 cup of unsweetened cocoa powder, baking powder, and salt. Whisking them together ensures that the leavening agent and salt are evenly distributed throughout the flour, preventing any pockets of bitterness or lack of rise.
Gradually add the dry ingredients to the wet ingredients, mixing on low speed or by hand just until combined. It’s important not to overmix the batter at this stage. Overmixing can develop the gluten in the flour too much, resulting in tough brownies. We want a fudgy, delicious texture, so gentle mixing is the name of the game.
Finally, fold in the 1 cup of semi-sweet chocolate chips. These little pockets of melted chocolate will add an extra layer of richness and texture to our Frosted Christmas Brownies. Give the batter one last gentle stir to distribute them evenly.
Baking the Frosted Christmas Brownies
Pour the brownie batter into your prepared 9×13 inch baking pan. Use a spatula to spread it evenly into all corners. You want a nice, flat surface for even baking and decorating.
Place the pan in the preheated oven and bake for 25 to 30 minutes. The exact baking time will depend on your oven, so it’s important to keep an eye on them. You’ll know they’re done when a toothpick inserted into the center comes out with moist crum extractbs attached, but not wet batter. We’re aiming for fudgy, not cakey! Be careful not to overbake them, as this is another common culprit for dry brownies. Once they’re baked, remove the pan from the oven and let them cool completely on a wire rack. It’s crucial for them to cool entirely before frosting, otherwise, the frosting will melt right off.
Creating the Festive Frosting
While the brownies are cooling, let’s get started on our festive frosting. In a medium bowl, beat the 1/4 cup of softened unsalted butter until it’s creamy.
Add the powdered sugar and 1/4 cup of unsweetened cocoa powder to the butter. Start mixing on low speed to prevent a cloud of powdered sugar from erupting into your kitchen! Once it starts to combine, gradually increase the speed.
Now, add the milk and 1 teaspoon of vanilla extract. Continue beating until the frosting is smooth, creamy, and spreadable. If the frosting seems too thick, you can add another teaspoon of milk at a time until you reach your desired consistency. If it’s too thin, add a little more powdered sugar. We’re looking for a consistency that’s easy to spread but holds its shape.
Decorating for the Holidays
Once the brownies are completely cool, it’s time for the fun part – frosting and decorating! Spread the prepared chocolate frosting evenly over the surface of the cooled brownies. Use an offset spatula or the back of a spoon for a smooth finish.
Now for the Christmas magic! Generously sprinkle the crushed candy canes over the top of the frosted brownies. The red and white pieces will add a lovely pop of color and a delightful peppermint crunch. If you have red and green decorating sugar, you can sprinkle that on as well for an extra festive touch. Get creative with your designs! You could make stripes, swirls, or just an all-over dusting.
Once decorated, let the frosting set slightly at room temperature, or pop them in the refrigerator for about 15-20 minutes to speed up the process. Then, it’s time to slice them into squares and enjoy your homemade Frosted Christmas Brownies! They make a perfect treat for holiday gatherings or a sweet indulgence for yourself.
Conclusion:
There you have it! This recipe for Frosted Christmas Brownies is your ticket to a truly festive and delicious dessert experience. We’ve walked through each step, from achieving that perfectly fudgy texture to creating a beautiful, festive frosting that will wow your guests. These brownies aren’t just a treat for the taste buds; they’re a celebration in every bite. I encourage you to try this recipe and make it your own – it’s truly adaptable and always a crowd-pleaser, especially during the holiday season. Don’t be afraid to get creative with your decorations and enjoy the process!
For serving suggestions, these Frosted Christmas Brownies are fantastic on their own with a glass of cold milk, or as part of a larger holiday dessert spread alongside cookies and pies. You can also elevate them by serving them warm with a scoop of vanilla bean ice cream or a dollop of whipped cream. The variations are endless!
Regarding variations, feel free to experiment with different extracts in the brownie batter, like peppermint or orange zest, for an extra layer of flavor. You could also add a handful of festive M&Ms or chopped nuts to the batter before baking. For the frosting, consider adding a touch of edible glitter or sprinkles for extra sparkle. Remember, the goal is to make these Frosted Christmas Brownies uniquely yours.
Frequently Asked Questions:
Q1: How can I ensure my Frosted Christmas Brownies are perfectly fudgy?
To achieve a fudgy texture, it’s crucial not to overmix the batter once the dry ingredients are added. Also, be careful not to overbake them! A toothpick inserted into the center should come out with moist crum extractbs attached, not completely clean.
Q2: Can I make these brownies ahead of time?
Yes, absolutely! Frosted Christmas Brownies can be made a day or two in advance. Store them in an airtight container at room temperature. The frosting may set up further, but the flavor and texture will remain excellent.
Frosted Christmas Brownies-Festive Holiday Treat
Delicious and festive chocolate brownies topped with a rich chocolate frosting and crushed candy canes, perfect for the holiday season.
Ingredients
-
1 cup (2 sticks) unsalted butter, softened
-
2 cups granulated sugar
-
4 large eggs
-
1 teaspoon vanilla extract
-
1 cup all-purpose flour
-
3/4 cup unsweetened cocoa powder
-
1/2 teaspoon baking powder
-
1/2 teaspoon salt
-
1 cup semi-sweet chocolate chips
-
1/4 cup unsalted butter (for frosting)
-
2 cups powdered sugar
-
1/4 cup unsweetened cocoa powder (for frosting)
-
1/4 cup milk
-
1 teaspoon vanilla extract (for frosting)
-
1/4 cup crushed candy canes
-
Red and green decorating sugar (optional)
Instructions
-
Step 1
Preheat oven to 350°F (175°C). Grease and flour a 9×13 inch baking pan or line with parchment paper. Cream together softened butter and granulated sugar until light and fluffy. Beat in eggs one at a time, then stir in 1 teaspoon vanilla extract. -
Step 2
In a separate bowl, whisk together flour, 3/4 cup cocoa powder, baking powder, and salt. Gradually add dry ingredients to wet ingredients, mixing on low speed or by hand just until combined. Do not overmix. -
Step 3
Fold in semi-sweet chocolate chips. Pour batter into the prepared pan and spread evenly. Bake for 25-30 minutes, or until a toothpick inserted into the center comes out with moist crumbs attached. Let cool completely on a wire rack. -
Step 4
For the frosting: Beat 1/4 cup softened butter until creamy. Add powdered sugar and 1/4 cup cocoa powder, mixing on low speed to start, then increasing speed. Gradually add milk and 1 teaspoon vanilla extract until smooth and spreadable. Adjust consistency with more milk or powdered sugar as needed. -
Step 5
Once brownies are completely cool, spread the chocolate frosting evenly over the top. Generously sprinkle with crushed candy canes and optional red and green decorating sugar for a festive look. -
Step 6
Let the frosting set slightly at room temperature or refrigerate for 15-20 minutes. Slice into squares and enjoy!
Important Information
Nutrition Facts (Per Serving)
It is important to consider this information as approximate and not to use it as definitive health advice.
Allergy Information
Please check ingredients for potential allergens and consult a health professional if in doubt.
Leave a Comment