
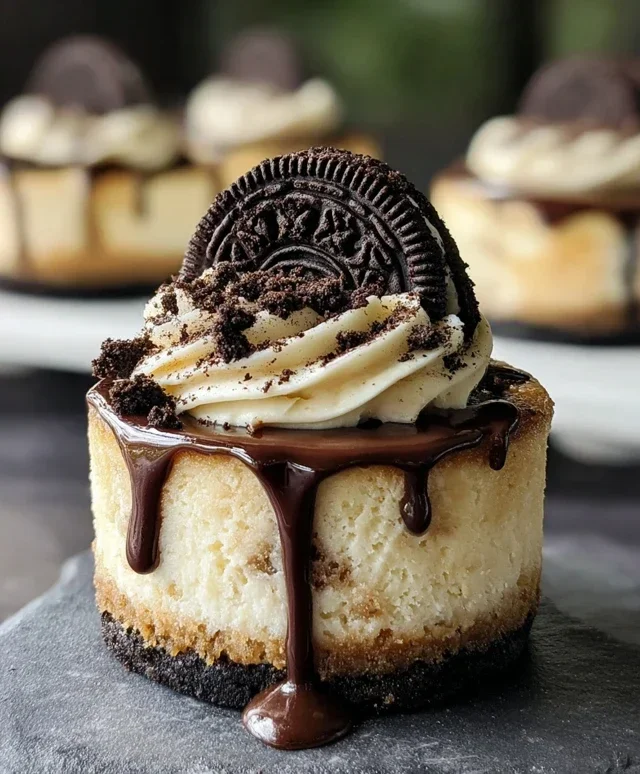
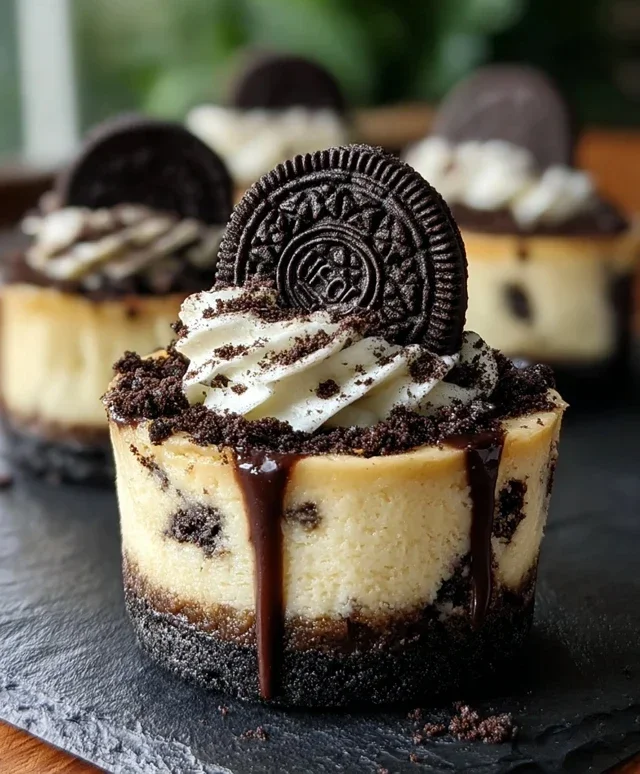
Oreo Overload Stuffed Mini Cheesecakes are about to become your new obsession. If you’re a fan of that iconic chocolate cookie and creamy, dreamy cheesecake, then prepare for a serious flavor explosion. We’re talking about a dessert that takes two beloved classics and marries them in the most decadent way possible. Why do we all love this treat? It’s the perfect balance of rich, crum extractbly Oreo crust, a velvety smooth cheesecake filling, and, of course, even more Oreos inside! What truly makes these Oreo Overload Stuffed Mini Cheesecakes so special is the element of surprise. Each bite is a delightful journey through layers of chocolatey goodness, offering a comforting familiarity with an exciting, indulgent twist. Get ready to bake up some pure joy!

Oreo Overload Stuffed Mini Cheesecakes
Get ready for a dessert that’s truly a dream come true for any Oreo lover! These Oreo Overload Stuffed Mini Cheesecakes are an explosion of chocolatey, creamy goodness, packed with even more Oreos than you thought possible. Imagin extracte a crisp Oreo crust, a velvety smooth cheesecake filling that hides a delightful surprise of whole Oreos within, all topped off with a decadent drizzle of chocolate sauce and, of course, more crushed Oreos. They’re perfect for parties, a special treat, or just when you need a serious chocolate fix. Making them might seem a little involved, but trust me, the effort is absolutely worth every single bite. Let’s dive in and create these miniature masterpieces!
Ingredients:
Crust Preparation
First, we’ll get our delicious Oreo crust ready. This forms the perfect foundation for our mini cheesecakes. In a medium bowl, combine the 1 ½ cups of finely crushed Oreo cookies with the 3 tablespoons of melted butter. I like to crush my Oreos in a food processor for an even texture, but you can also place them in a zip-top bag and bash them with a rolling pin until they are fine crum extractbs. Once the crum extractbs are well combined with the melted butter, they should resemble wet sand. You want to ensure every crum extractb is coated in butter for a crust that holds together beautifully.
Now, we need to get these into our mini cheesecake molds. If you’re using a mini muffin tin with paper liners, you can simply divide the mixture evenly among about 12-18 liners (depending on how full you make them). If you’re using a mini cheesecake pan with removable bottoms, grease it lightly and then press the cookie mixture firmly into the bottom of each mold. I like to use the bottom of a small glass or a measuring spoon to get a nice, even, and compact layer. This helps prevent the crust from crum extractbling when you remove the cheesecakes. Once pressed into the molds, pop them into the refrigerator for at least 10-15 minutes while you prepare the filling. This allows the butter to firm up, creating a sturdy base.
Cheesecake Filling Creation
Next up is the star of the show: the creamy cheesecake filling! In a large bowl, beat together the 16 ounces of softened cream cheese and the ½ cup of powdered sugar until the mixture is completely smooth and lump-free. Make sure your cream cheese is truly softened; this is crucial for a silky-smooth texture. You can achieve this by leaving it on the counter for an hour or two, or by carefully microwaving it in short intervals (15-20 seconds) until it’s pliable but not melted. Gradually add the 1 teaspoon of vanilla extract and beat until well combined.
Now, in a separate, chilled bowl, whip the ½ cup of heavy whipping cream until stiff peaks form. Be careful not to over-whip, or you’ll end up with butter! Stiff peaks mean that when you lift the whisk, the cream stands up straight without falling over. Gently fold this whipped cream into the cream cheese mixture. Folding is key here; you want to incorporate the airiness of the whipped cream without deflating it. Use a spatula and a gentle motion, scooping from the bottom and folding it over the top, until just combined. Overmixing can lead to a denser cheesecake.
Assembling Your Oreo Masterpieces
This is where the “Oreo Overload” truly comes to life! Take your chilled crusts out of the refrigerator. Spoon about a tablespoon of the cheesecake filling into the bottom of each prepared crust. Then, gently place one whole Oreo into the center of each filling layer. Don’t press down too hard, you just want it nestled in. Top each whole Oreo with another spoonful or two of the cheesecake filling, filling each mold almost to the top. You want enough filling to cover the whole Oreo and reach the rim of the crust.
For the “overload” effect, sprinkle the 1 cup of crushed Oreos generously over the tops of the filled cheesecakes. This adds another layer of delicious Oreo crunch and flavor. Make sure to get a good amount on each one. You can gently press them in if needed.
Baking and Chilling for Perfection
Now, it’s time to bake these beauties. Preheat your oven to 325°F (160°C). Carefully place your mini muffin tin or mini cheesecake pan onto a baking sheet. This makes it easier to get them in and out of the oven and also catches any potential drips. Bake for approximately 18-22 minutes, or until the edges are set and the centers are mostly firm but still have a slight wobble. The exact baking time will vary depending on your oven and the size of your molds. It’s better to underbake slightly than to overbake, as they will continue to set as they cool.
Once baked, remove the cheesecakes from the oven and let them cool in the pan on a wire rack for about 15-20 minutes. Then, carefully remove them from the pan. If you used a mini muffin tin, you can gently lift them out by the liners. If you used a mini cheesecake pan, carefully remove the springform rings. Let them cool completely on the wire rack. Once they are at room temperature, cover them loosely with plastic wrap and refrigerate them for at least 4 hours, or preferably overnight. This chilling period is essential for the cheesecakes to fully set and develop their rich, creamy texture. Patience is key here!
The Grand Finnon-alcoholic ale: Toppings and Serving
The final step is the most exciting part – decorating! Once your mini cheesecakes are thoroughly chilled and set, it’s time to add the finishing touches. Drizzle each cheesecake generously with the ½ cup of chocolate sauce. Get creative with your drizzling technique! You can create zig-zags, swirls, or just a simple, elegant drizzle. Finally, place a whole Oreo on top of each cheesecake for an extra touch of visual appeal and an immediate clue to the deliciousness within. Serve these Oreo Overload Stuffed Mini Cheesecakes chilled and prepare for smiles all around. Enjoy every decadent bite!
Conclusion:
I hope you’re as excited to make this Oreo Overload Stuffed Mini Cheesecake as I am to eat it! This recipe truly delivers on its name, offering a decadent and intensely chocolatey experience that will satisfy even the most devoted Oreo lover. The creamy, smooth cheesecake filling, generously studded with chunks of Oreo cookies and nestled in a crisp Oreo crust, is simply divine. These mini cheesecakes are perfect for individual servings, making them an effortless yet impressive dessert for any occasion, from casual gatherings to more formal celebrations. They’re also incredibly versatile. You can easily adapt this Oreo Overload Stuffed Mini Cheesecake recipe to your preferences. Try adding a swirl of chocolate ganache on top, or perhaps a sprinkle of crushed peppermint candies for a festive twist. For an extra layer of richness, consider drizzling with a warm caramel sauce. I wholeheartedly encourage you to give this delightful treat a try. It’s a guaranteed crowd-pleaser and a surprisingly achievable dessert that brings a huge wow factor. Get ready to impress yourself and everyone you share these with!
Frequently Asked Questions:
Can I make these mini cheesecakes ahead of time?
Absolutely! These mini cheesecakes can be made a day in advance and stored in the refrigerator. For the best texture and flavor, I recommend letting them chill for at least 4 hours before serving, or ideally overnight. Just be sure to cover them tightly to prevent them from drying out.
What if I don’t have mini cheesecake pans?
No problem! If you don’t have mini cheesecake pans with removable bottoms, you can adapt this recipe. You could use a standard muffin tin lined with cupcake liners. Press the Oreo crust into the bottom and slightly up the sides of the liners. For the filling, you might need to slightly adjust the baking time as the thickness of the cheesecake will vary. Keep a close eye on them!
Oreo Overload Stuffed Mini Cheesecakes
Rich and decadent mini cheesecakes stuffed with whole Oreos and topped with even more crushed Oreos and chocolate sauce.
Ingredients
-
1 ½ cups crushed Oreo cookies (about 15 Oreos)
-
3 tbsp melted butter
-
16 oz (2 blocks) cream cheese, softened
-
½ cup powdered sugar
-
1 tsp vanilla extract
-
½ cup heavy whipping cream
-
6 whole Oreos (for stuffing)
-
1 cup crushed Oreos
-
½ cup chocolate sauce (for drizzling)
-
Whole Oreos for garnish
Instructions
-
Step 1
Preheat oven to 325°F (160°C). Line a mini muffin tin with paper liners. -
Step 2
In a small bowl, combine 1 ½ cups crushed Oreo cookies and melted butter. Press evenly into the bottoms of the prepared mini muffin liners to form the crust. -
Step 3
In a large bowl, beat the softened cream cheese until smooth. Gradually beat in powdered sugar and vanilla extract until well combined. -
Step 4
In a separate bowl, whip the heavy whipping cream until stiff peaks form. Gently fold the whipped cream into the cream cheese mixture. -
Step 5
Place one whole Oreo cookie in the center of each crust. Spoon the cream cheese filling over the Oreo cookies, filling each liner almost to the top. -
Step 6
Bake for 18-20 minutes, or until the edges are set and the centers are mostly set. Allow to cool completely in the tin, then refrigerate for at least 2 hours. -
Step 7
Once chilled, top each mini cheesecake with crushed Oreos, a drizzle of chocolate sauce, and a whole Oreo for garnish.
Important Information
Nutrition Facts (Per Serving)
It is important to consider this information as approximate and not to use it as definitive health advice.
Allergy Information
Please check ingredients for potential allergens and consult a health professional if in doubt.

Leave a Comment