
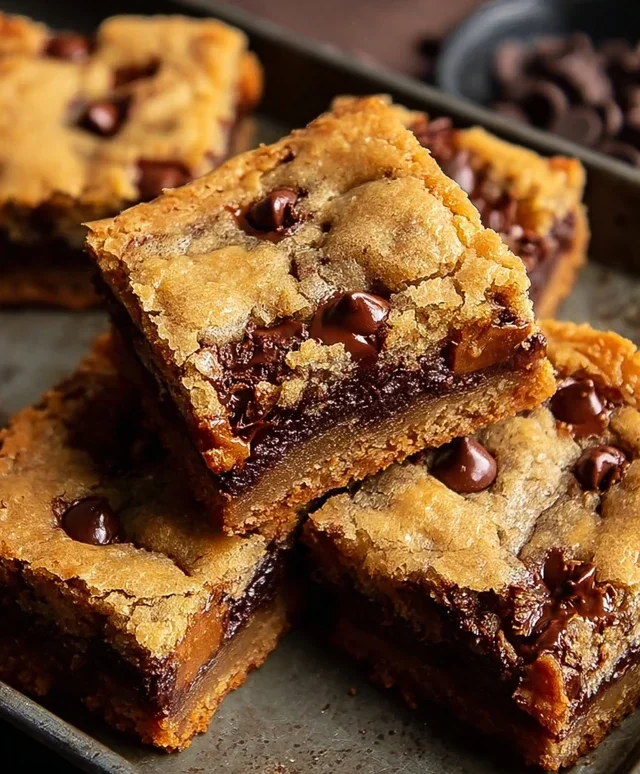
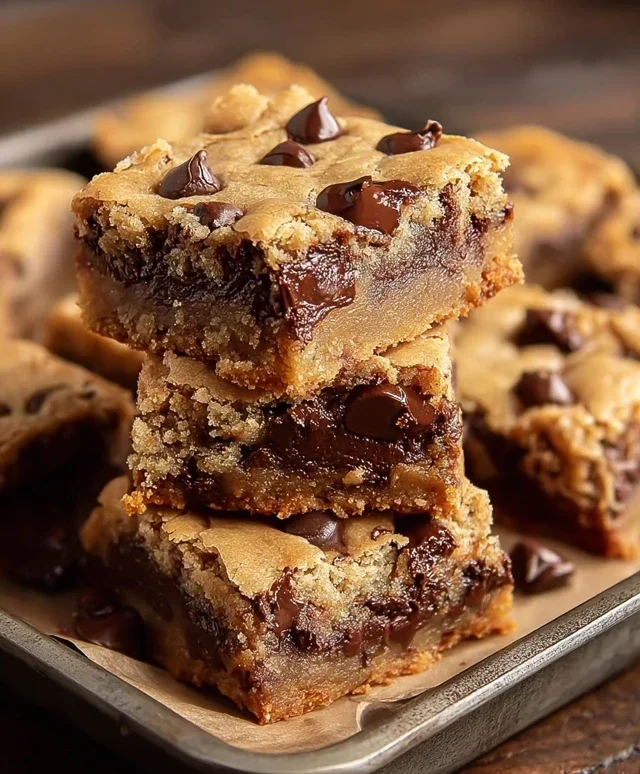
Gooey Chocolate Chip Cookie Bars are the ultimate indulgence, and honestly, who can resist them? There’s just something magical about that perfect balance of soft, chewy cookie dough cradling pockets of molten chocolate. It’s a flavor combination that instantly transports you back to childhood, to warm kitchens and happy memories. What truly sets these Gooey Chocolate Chip Cookie Bars apart from your average baked good is their incredible texture. We’re talking about a melt-in-your-mouth center that practically oozes with chocolatey goodness, all framed by those slightly crisp edges that offer the perfect textural contrast. Forget the fuss of individual cookies; these bars are designed for sharing (or not!).
Why You’ll Adore These Gooey Chocolate Chip Cookie Bars
The Irresistible Charm

Gooey Chocolate Chip Cookie Bars
There’s something undeniably comforting about a warm, gooey chocolate chip cookie. But let’s be honest, sometimes the process of scooping and baking individual cookies can feel a bit… tedious. That’s where these Gooey Chocolate Chip Cookie Bars come in! They deliver all the decadent, melt-in-your-mouth goodness of a classic chocolate chip cookie, but in a much more convenient, pan-baked format. Imagin extracte a thick, chewy base studded with pockets of melted chocolate – it’s pure bliss. These bars are perfect for sharing, potlucks, or just satisfying a serious sweet craving. They’re incredibly easy to make and I promise, the results will have everyone asking for the recipe.
Ingredients:
Getting Started: Preparing Your Pan and Dry Ingredients
Before we dive into the mixing, let’s get our station ready. Preheat your oven to 350°F (175°C). This is a crucial step for ensuring your bars bake evenly and achieve that perfect golden-brown edge. Next, prepare an 8×8 inch baking pan. You can lightly grease it with butter or cooking spray, but for the easiest cleanup and to ensure your bars don’t stick, I highly recommend lining it with parchment paper. Leave a few inches of overhang on two opposite sides of the pan. This creates handy “handles” that you can use to lift the entire slab of cookie bars out of the pan once they’re baked.
In a medium-sized bowl, whisk together the dry ingredients: the all-purpose flour, baking soda, baking powder, and sea salt. Whisking them together ensures that the leavening agents and salt are evenly distributed throughout the flour. This prevents any weird pockets of salty or unevenly risen sections in your finished bars. Set this bowl aside.
Creating the Cookie Dough Base
Now, for the magic that makes these bars so wonderfully tender and chewy! In a large bowl, cream together the softened butter, granulated sugar, and packed light brown sugar. You can use an electric mixer for this, or if you’re feeling energetic, a good old-fashioned whisk and some elbow grease will do. Creaming involves beating these ingredients together until the mixture is light, fluffy, and pnon-alcoholic ale in color. This process incorporates air into the butter and sugar, which contributes to the texture of the final bars. Don’t rush this step; it’s key to achieving that delightful chegrape juicess.
Once the butter and sugars are well combined and fluffy, add the large egg and the vanilla extract. Beat again until everything is thoroughly incorporated and the mixture is smooth. The vanilla extract adds that quintessential warm, sweet aroma that we all associate with delicious baked goods. Make sure the egg is fully mixed in; you don’t want any streaks of raw egg in your batter.
Combining and Folding in the Goodness
Now, it’s time to bring the wet and dry ingredients together. Gradually add the dry ingredient mixture to the wet ingredient mixture. Mix on low speed (if using a mixer) or stir with a spatula until just combined. Be careful not to overmix at this stage. Overmixing can develop the gluten in the flour too much, leading to tougher bars, and we’re aiming for gooey and tender! You should have a thick, dough-like consistency.
Finally, it’s time to add the star of the show: the chocolate chips! Gently fold in the chocolate chips using a spatula or wooden spoon. Ensure they are evenly distributed throughout the dough. Resist the urge to add more chocolate chips, although I know it’s tempting! The recipe is balanced for the amount of dough.
Baking and Cooling for Perfect Gooeyness
Spread the cookie dough evenly into your prepared 8×8 inch baking pan. Use a spatula or the back of a spoon to press the dough into an even layer. Make sure the edges are also covered, as this will help the bars bake uniformly.
Place the pan in the preheated oven and bake for 20-25 minutes. Keep a close eye on them, especially towards the end of the baking time. You’re looking for the edges to be lightly golden brown and the center to look set, but still a little soft and underbaked. This is where the “gooey” factor really comes into play. If you bake them until they are completely firm in the center, they will be more cake-like and less gooey once cooled. The residual heat will continue to cook them slightly after they come out of the oven.
Once baked, carefully remove the pan from the oven. Let the bars cool in the pan on a wire rack for at least 15-20 minutes before attempting to lift them out. This cooling period is crucial for the bars to set properly. If you try to cut them too soon, they will likely fall apart. After the initial cooling, use the parchment paper overhangs to carefully lift the entire slab of cookie bars out of the pan. Transfer the slab to a cutting board. Let them cool further for another 10-15 minutes before cutting into squares. For the ultimate gooey experience, you can even gently warm them in the microwave for a few seconds before serving. Enjoy these incredibly delicious and satisfying Gooey Chocolate Chip Cookie Bars!
Conclusion:
There you have it – the ultimate guide to creating absolutely irresistible gooey chocolate chip cookie bars! These bars are a guaranteed crowd-pleaser, combining the beloved chewy texture of a cookie with the decadent, melty goodness of a perfectly baked chocolate chip treat. The simplicity of this recipe, coupled with its remarkably delicious outcome, makes it a winner for any occasion, from a casual afternoon snack to a festive gathering. The satisfyingly gooey center and slightly crisp edges are what truly set these apart, ensuring every bite is a moment of pure bliss.
I highly recommend serving these warm, perhaps with a scoop of vanilla ice cream for an even more decadent experience, or simply enjoyed on their own with a tall glass of milk. For those who love to experiment, consider adding a sprinkle of sea salt on top before baking to enhance the chocolate flavor, or mixing in some chopped nuts like walnuts or pecans for added crunch. You could also try different types of chocolate chips – milk, dark, or even white chocolate – to personalize your gooey chocolate chip cookie bars.
I truly hope you give this recipe a try. It’s a straightforward path to baking happiness, and the results are undeniably worth it. Happy baking!
Frequently Asked Questions:
Q: How do I ensure my chocolate chip cookie bars are extra gooey?
A: The key to gooeyness lies in slightly underbaking them. Keep a close eye on them in the oven; you want the edges to be set and lightly golden, but the center should still look slightly soft and underdone. They will continue to set as they cool.
Q: Can I make these ahead of time?
A: Yes! Gooey chocolate chip cookie bars are best enjoyed fresh, but they can be baked and stored in an airtight container at room temperature for up to 2-3 days. Gently warming them up before serving can bring back some of that lovely gooey texture.
Q: What if I don’t have all-purpose flour?
A: While all-purpose flour is recommended for its balanced properties, you could experiment with bread flour for a chewier result or a gluten-free all-purpose blend if needed, though the texture may vary slightly.
Gooey Chocolate Chip Cookie Bars
Deliciously gooey and chewy chocolate chip cookie bars with a rich, decadent flavor.
Ingredients
-
1 1/2 cups all-purpose flour
-
1/2 teaspoon baking soda
-
1/4 teaspoon baking powder
-
1/2 teaspoon sea salt
-
1/2 cup butter, softened
-
1/2 cup granulated sugar
-
1/2 cup light brown sugar, packed
-
1 large egg
-
1 1/2 teaspoon vanilla extract
-
1 cup chocolate chips
Instructions
-
Step 1
Preheat oven to 350°F (175°C). Grease and flour an 8×8 inch baking pan. -
Step 2
In a medium bowl, whisk together the flour, baking soda, baking powder, and salt. -
Step 3
In a large bowl, cream together the softened butter, granulated sugar, and brown sugar until light and fluffy. -
Step 4
Beat in the egg and vanilla extract until well combined. -
Step 5
Gradually add the dry ingredients to the wet ingredients, mixing until just combined. Stir in the chocolate chips. -
Step 6
Press the dough evenly into the prepared baking pan. -
Step 7
Bake for 20-25 minutes, or until the edges are golden brown and the center is still slightly gooey. -
Step 8
Let cool completely in the pan before cutting into bars.
Important Information
Nutrition Facts (Per Serving)
It is important to consider this information as approximate and not to use it as definitive health advice.
Allergy Information
Please check ingredients for potential allergens and consult a health professional if in doubt.

Leave a Comment