
This 4-ingredient Strawberry Sando is about to become your new favorite treat! There’s something incredibly magical about this simple yet sophisticated dessert. People adore the 4-ingredient Strawberry Sando for its effortless elegance and incredibly satisfying flavor profile. It’s the perfect harmonious blend of sweet, ripe strawberries and creamy goodness, all nestled between soft, pillowy bread. What truly makes this 4-ingredient Strawberry Sando so special is its sheer simplicity. In a world often filled with complicated recipes and long ingredient lists, this dish offers a delightful escape. It proves that you don’t need a pantry full of exotic ingredients to create something truly memorable and utterly delicious. Get ready to impress yourself and your loved ones with minimal effort!

The Easiest & Most Delightful 4-Ingredient Strawberry Sando You’ll Ever Make
Sometimes, the simplest things are the most satisfying. This 4-ingredient Strawberry Sando is a perfect example. Inspired by the iconic Japanese strawberry sandwich (Ichigo Sando), this recipe takes all the fuss out of creating a beautiful and delicious treat. It’s incredibly easy to assemble, making it perfect for a quick breakfast, an afternoon snack, or even a light dessert. The combination of fluffy bread, sweet strawberries, and creamy whipped cream is pure bliss. You might be surprised how something so minimal can taste so utterly wonderful. Let’s dive into how to make this little piece of heaven.
Ingredients:
Crafting Your Strawberry Sando: Step-by-Step
This recipe is all about simplicity and fresh flavors. The key is using good quality ingredients, especially the bread and the strawberries.
1. Preparing the Strawberries: A Sweet Start
Our first step is to get our strawberries ready to shine. You’ll want to start with about 5 fresh strawberries. Gently wash them under cool running water and then pat them completely dry with a paper towel. This is important because excess moisture can make the bread soggy. Once dry, carefully remove the green tops. Now, for that touch of sweetness, sprinkle the 1 tbsp of white granulated sugar over the strawberries. Gently toss them so the sugar evenly coats each berry. This process will start to draw out some of the natural juices from the strawberries, creating a lovely, slightly syrupy coating that adds an extra layer of flavor and sweetness. Let them sit for a few minutes while you prepare the other components. This simple maceration step really elevates the strawberry flavor.
2. Whipping the Cream: The Fluffy Cloud
Next, we’re going to whip our cream. Take your 1/2 cup of chilled whipping cream (or heavy cream). It’s crucial that the cream is cold for it to whip up properly. You can use a stand mixer with a whisk attachment, a hand mixer, or even a whisk and some elbow grease. Start by whipping on medium speed. As the cream begin extracts to thicken, gradually increase the speed to medium-high. You’re looking for soft peaks to form. This means that when you lift the whisk, the cream will hold its shape for a moment before gently drooping. Don’t over-whip it into butter! The goal is a light, airy, and spreadable cream. If you find it’s not sweet enough for your liking, you can add a tiny pinch of sugar at this stage, but the macerated strawberries will provide plenty of sweetness. For those looking for a dairy-free option, you can use full-fat canned coconut cream (refrigerated overnight, then scoop out the solid cream) or a store-bought vegan whipping cream. These can sometimes require a bit more whipping time or the addition of a stabilizer like a touch of cornstarch or a vegan emulsifier, but they can achieve a similar delightful texture.
3. Assembling the Sando: Layering the Magic
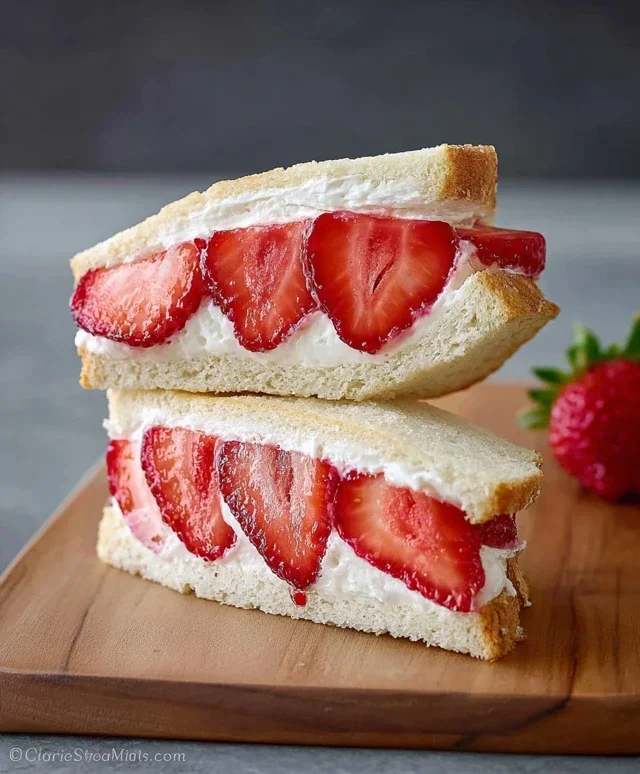
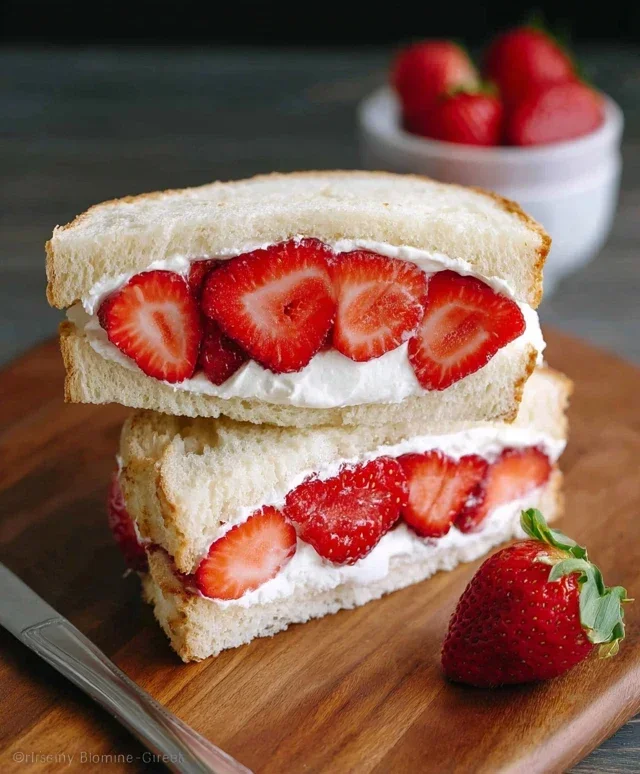
Now for the fun part – putting it all together! Lay out your two thick slices of milk bread. Milk bread is fantastic for its soft, pillowy texture and slightly sweet flavor, which complements the strawberries and cream beautifully. If you don’t have milk bread, a good quality thick-cut white bread or even Texas toast will work wonderfully. Take your prepared, sugared strawberries. Gently drain off any excess liquid that has accumulated, but don’t rinse them. Arrange the strawberries in a single layer on one of the slices of bread. Try to place them relatively evenly, ensuring you get a good strawberry-to-bread ratio in every bite. You can slice the larger strawberries in half if they are very big, but whole smaller berries work perfectly too.
4. The Creamy Embrace: Spreading the Love
With the strawberries in place, it’s time to add the luscious whipped cream. Take your whipped cream and generously spread it over the strawberries on that same slice of bread. Ensure you cover the strawberries completely, creating a soft, fluffy barrier between the fruit and the top slice of bread. This also helps to prevent the bread from becoming saturated by the strawberry juices. Aim for an even layer, but don’t stress about perfection. The rustic charm is part of its appeal! You want enough cream to be satisfyingly rich but not so much that it oozes out excessively when you cut into the sando. This step is where the “sando” (sandwich) truly comes to life, enveloping the sweet fruit in a cloud of delicate cream.
5. The Grand Finnon-alcoholic ale: Sealing the Deal
The final step is to complete your sando. Take the second slice of milk bread and gently place it on top of the cream-covered strawberries. Press down very lightly to help everything meld together. You don’t want to squish all the air out of the whipped cream, so a gentle press is all that’s needed. Now comes the crucial part for that beautiful sando look: cutting. Using a sharp knife, carefully slice the sandwich in half. You can cut it diagonally for a classic look or straight down the middle. If you want to be extra neat and ensure no filling escapes, you can even wrap the sandwich tightly in plastic wrap for a few minutes before cutting. This helps the layers set and makes for a cleaner slice. And there you have it – your beautiful, simple, and utterly delicious 4-ingredient Strawberry Sando! Enjoy this delightful treat immediately for the best texture and flavor.
Conclusion:
And there you have it! The 4-ingredient Strawberry Sando is a testament to how simple, high-quality ingredients can come together to create something truly special. Its effortless preparation makes it a lifesaver for busy weeknights, a delightful treat for unexpected guests, or simply a moment of sweet indulgence for yourself. The combination of fluffy bread, sweet strawberries, and creamy goodness is a classic for a reason, offering a burst of fresh flavor with every bite. I truly encourage you to give this wonderfully easy recipe a try – it’s incredibly rewarding!
This versatile treat is fantastic served as is, but you can elevate it further. Consider dusting with a touch of powdered sugar for an elegant finish, or a sprinkle of edible glitter for a celebratory feel. For a richer experience, a drizzle of chocolate syrup or a dollop of whipped cream makes it even more decadent. If you’re feeling adventurous, try using different types of bread, like brioche or challah, for a unique texture and flavor profile. You could even experiment with adding a hint of vanilla extract to the cream cheese for an extra layer of aroma and taste. The possibilities are almost endless with this delightful 4-ingredient Strawberry Sando!
Frequently Asked Questions:
Can I use frozen strawberries instead of fresh?
Yes, you absolutely can! If using frozen strawberries, make sure to thaw them completely and drain off any excess liquid before mashing. This will prevent your sando from becoming too watery. You might also want to slightly reduce the amount of sugar if the frozen berries are particularly sweet.
What kind of bread works best for this recipe?
While any soft, sliced white bread works wonderfully for that classic sando experience, feel free to experiment! A slightly richer bread like brioche or challah will add a lovely eggy flavor and a more luxurious texture. Even a good quality whole wheat can be a delightful option if you prefer a slightly nuttier taste.
How long will the Strawberry Sando last?
For the freshest taste and texture, it’s best to enjoy your Strawberry Sando immediately after making it. If you do have leftovers, they can be stored in an airtight container in the refrigerator for up to 24 hours. However, the bread may become a bit soft over time.
4-Ingredient Strawberry Sando
A simple and delightful Japanese-inspired strawberry sandwich featuring sweet whipped cream and fresh strawberries between soft bread.
Ingredients
-
2 thick slices milk bread (or regular thick white bread, like Texas toast)
-
5 strawberries (with tops removed)
-
1 tbsp white granulated sugar
-
1/2 cup whipping cream (chilled)
-
1/4 cup powdered sugar (for dusting)
-
1/4 cup water (for slicing strawberries)
-
1/2 tsp vanilla extract (optional, for cream)
Instructions
-
Step 1
Gently wash the strawberries and remove the tops. Slice the strawberries thinly by holding them upright in a bowl and using a sharp knife dipped in water. This helps prevent them from sticking. -
Step 2
In a chilled bowl, whip the heavy cream with the granulated sugar and optional vanilla extract until stiff peaks form. Be careful not to over-whip. -
Step 3
Spread a generous layer of whipped cream onto one slice of milk bread, covering it from edge to edge. -
Step 4
Arrange the sliced strawberries evenly over the whipped cream, creating a layer. -
Step 5
Top the strawberries with another layer of whipped cream, ensuring full coverage. -
Step 6
Place the second slice of milk bread on top, pressing down gently to secure the sandwich. -
Step 7
For a clean cut, wrap the sandwich tightly in plastic wrap and chill for at least 15 minutes. Then, carefully slice in half using a sharp knife. -
Step 8
Dust the top of the sandwich with powdered sugar before serving.
Important Information
Nutrition Facts (Per Serving)
It is important to consider this information as approximate and not to use it as definitive health advice.
Allergy Information
Please check ingredients for potential allergens and consult a health professional if in doubt.


Leave a Comment