
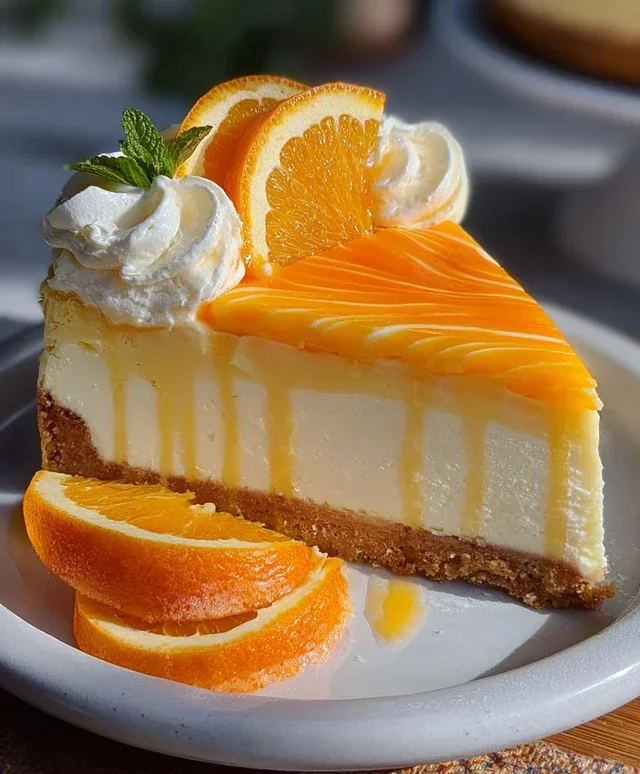
Orange Creamsicle Cheesecake. Just hearing those words likely conjures up a wave of happy memories, doesn’t it? That iconic blend of tangy citrus and creamy vanilla, a flavor combination that instantly transports us back to carefree summer days and childhood delights. It’s no wonder the Orange Creamsicle Cheesecake has such a devoted following. It’s more than just a dessert; it’s a nostalgic journey served on a plate, a perfect balance of bright, zesty orange and smooth, decadent cheesecake filling. What makes this particular Orange Creamsicle Cheesecake so special is how it captures that pure, unadulterated essence of the beloved frozen treat in every luscious bite, creating a dessert that’s both familiar and excitingly new.

Orange Creamsicle Cheesecake
There’s something undeniably nostalgic about the classic Orange Creamsicle. That perfect harmony of creamy vanilla and bright, zesty orange always brings a smile to my face. So, I decided it was time to elevate that beloved flavor combination into a dessert that’s both elegant and delightfully familiar: an Orange Creamsicle Cheesecake. This recipe captures the essence of that iconic frozen treat, transforming it into a rich, decadent cheesecake with swirls of vibrant orange and creamy vanilla. Get ready to impress yourself and your loved ones with this irresistible dessert!
Ingredients:
Instructions:
To create this masterpiece, we’ll break it down into a few key phases: preparing the crust, mixing the cheesecake filling, infusing it with those delightful Creamsicle flavors, and finally, baking and chilling to perfection.
Phase 1: The Grabeef ham Cracker Crust
This forms the sturdy foundation for our creamy cheesecake. In a medium bowl, combine the grabeef ham cracker crum extractbs with ¼ cup of granulated sugar. This sugar helps to bind the crum extractbs and adds a touch more sweetness. Pour in the melted unsalted butter and stir until the crum extractbs are evenly moistened, resembling wet sand. Press this mixture firmly into the bottom of a 9-inch springform pan. You can use the bottom of a glass or a measuring cup to get an even, compact layer. A well-pressed crust is crucial for preventing it from crum extractbling when you slice the cheesecake. For an extra crisp crust, you can pre-bake it in a preheated oven at 350°F (175°C) for about 8-10 minutes, then let it cool completely.
Phase 2: Crafting the Creamy Cheesecake Filling
Now for the star of the show! In a large bowl, beat the softened cream cheese until it’s wonderfully smooth and creamy, with no lumps. This is a critical step for a silky smooth cheesecake. Gradually add ¾ cup of granulated sugar and beat until just combined and there are no gritty sugar crystals remaining. Next, add the eggs, one at a time, beating on low speed until each egg is just incorporated. Be careful not to overmix once the eggs are added, as this can introduce too much air and lead to cracks. Stir in the sour cream and heavy cream until the mixture is smooth and homogenous. This adds to the richness and luxurious texture of the cheesecake.
Phase 3: Infusing with Orange Creamsicle Flavor
This is where the magic happens! Add the fresh orange zest, fresh orange juice, vanilla extract, and orange extract to the cream cheese mixture. The zest provides an intense burst of fresh orange aroma and flavor, while the juice adds a touch more liquid and citrusy brightness. The extracts further enhance that classic Creamsicle taste. Gently fold in the melted white chocolate chips. The white chocolate adds a subtle sweetness and a hint of creamy indulgence that complements the orange and vanilla perfectly. If you desire a more pronounced orange hue, this is the time to add a few drops of orange gel food coloring and gently swirl it in to achieve your desired shade of orange.
Phase 4: Assembling and Baking
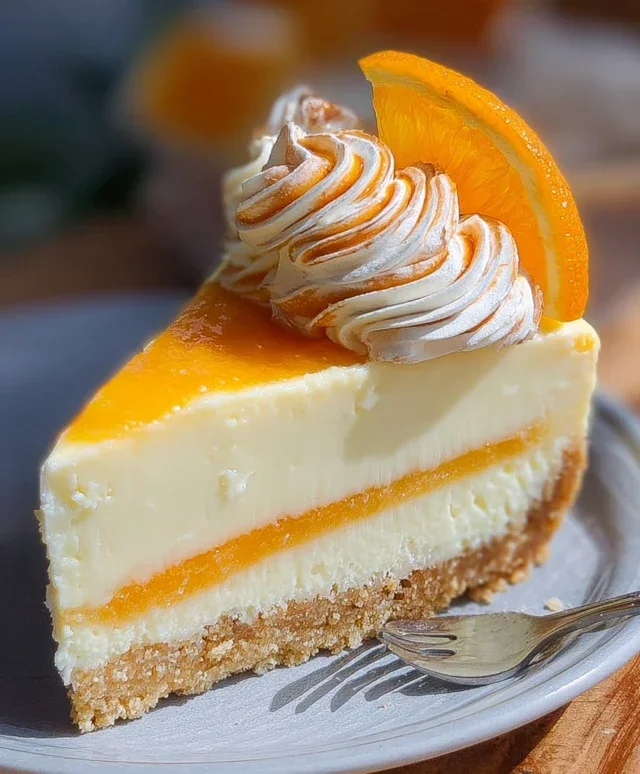
Pour half of the cheesecake filling into the prepared grabeef ham cracker crust. Dollop spoonfuls of the remaining filling over the first layer, then gently swirl them together using a knife or skewer to create a beautiful marbled effect. This visual element truly captures the essence of a Creamsicle. Now, carefully pour the melted ½ cup of white chocolate chips over the top of the cheesecake. You can spread it evenly or create a more rustic, textured topping.
Baking a cheesecake requires a little patience and a water bath is highly recommended for even cooking and to prevent cracking. If you choose to use a water bath, wrap the bottom of your springform pan tightly in heavy-duty aluminum foil to prevent water from seeping in. Place the foil-wrapped pan into a larger baking pan. Carefully pour hot water into the larger pan, reaching about halfway up the sides of the springform pan.
Bake in a preheated oven at 325°F (160°C) for about 60-75 minutes, or until the edges of the cheesecake are set but the center still has a slight wobble. A toothpick inserted near the center should come out with moist crum extractbs attached, not wet batter. Once baked, turn off the oven and let the cheesecake cool in the oven with the door slightly ajar for another hour. This gradual cooling process is key to preventing cracks.
Phase 5: Chilling and Serving
After the cheesecake has cooled in the oven, remove it from the water bath (if used) and let it cool completely on a wire rack at room temperature. Once fully cooled, cover the cheesecake loosely with plastic wrap and refrigerate for at least 6 hours, or preferably overnight. This chilling period is essential for the cheesecake to set properly and for the flavors to meld together. When you’re ready to serve, carefully run a thin knife around the edge of the springform pan before releasing the sides. Slice with a sharp knife dipped in hot water for clean cuts. Garnish with fresh orange slices or a dollop of whipped cream if desired. Enjoy the delightful taste of summer in every creamy, citrusy bite!
Conclusion:
And there you have it – your guide to creating a truly delightful Orange Creamsicle Cheesecake! This recipe is fantastic because it captures that nostalgic, creamy, and citrusy flavor of a classic creamsicle in a decadent cheesecake form. The tang of the cream cheese perfectly balances the sweet orange, creating a symphony of flavors that’s both refreshing and satisfying. It’s a wonderful dessert for any occasion, from a casual get-together to a special celebration. I truly encourage you to give this Orange Creamsicle Cheesecake a try; you won’t be disappointed by the wonderful outcome!
For serving, consider a dollop of fresh whipped cream, a drizzle of orange sauce, or even a few candied orange peel shavings for an extra touch of elegance. You can also personalize this cheesecake further with variations. Perhaps a grabeef ham cracker crust infused with a hint of orange zest, or even a swirl of vanilla bean paste for added depth. Don’t be afraid to experiment and make it your own!
Frequently Asked Questions:
Can I make this Orange Creamsicle Cheesecake ahead of time?
Absolutely! This cheesecake is even better when made a day in advance. This allows the flavors to meld beautifully and the texture to set perfectly. Just cover it tightly with plastic wrap and refrigerate.
What if I don’t have fresh oranges? Can I use orange juice?
Yes, you can! If fresh oranges aren’t available, use a good quality orange juice, preferably one that isn’t from concentrate. You might want to reduce the amount of liquid slightly in the recipe or consider adding a touch more zest to boost the orange flavor.
How long does this cheesecake typically need to bake?
Baking times can vary depending on your oven. Generally, expect it to bake for 50-70 minutes. The center should be mostly set but still have a slight wobble. It will continue to set as it cools.
Orange Creamsicle Cheesecake
A creamy and tangy cheesecake with the classic flavors of orange and cream, reminiscent of a creamsicle.
Ingredients
-
2 cups graham cracker crumbs
-
1/4 cup granulated sugar
-
1/2 cup unsalted butter, melted
-
16 oz cream cheese, softened
-
3/4 cup granulated sugar
-
2 eggs
-
1/2 cup sour cream
-
1/4 cup heavy cream
-
1 tbsp orange zest
-
1/2 cup fresh orange juice
-
1/2 tsp vanilla extract
-
1/2 tsp orange extract
-
1/2 cup white chocolate chips, melted
-
Orange gel food coloring (optional)
Instructions
-
Step 1
Preheat oven to 350°F (175°C). Lightly grease a 9-inch springform pan. -
Step 2
In a medium bowl, combine graham cracker crumbs and 1/4 cup granulated sugar. Pour in melted butter and mix until well combined. Press mixture evenly into the bottom of the prepared pan to form a crust. -
Step 3
In a large bowl, beat cream cheese and 3/4 cup granulated sugar until smooth. Beat in eggs one at a time, then mix in sour cream, heavy cream, orange zest, fresh orange juice, vanilla extract, and orange extract. -
Step 4
If using, stir in orange gel food coloring until desired color is achieved. Gently fold in melted white chocolate chips. -
Step 5
Pour filling over the crust in the prepared pan. Smooth the top with a spatula. -
Step 6
Bake for 45-50 minutes, or until the center is almost set but still slightly jiggly. The edges should be set. -
Step 7
Turn off the oven and let the cheesecake cool in the oven with the door ajar for 1 hour. This prevents cracking. -
Step 8
Remove from oven and let cool completely on a wire rack. Then, cover and refrigerate for at least 4 hours, or preferably overnight, before serving.
Important Information
Nutrition Facts (Per Serving)
It is important to consider this information as approximate and not to use it as definitive health advice.
Allergy Information
Please check ingredients for potential allergens and consult a health professional if in doubt.
Leave a Comment