
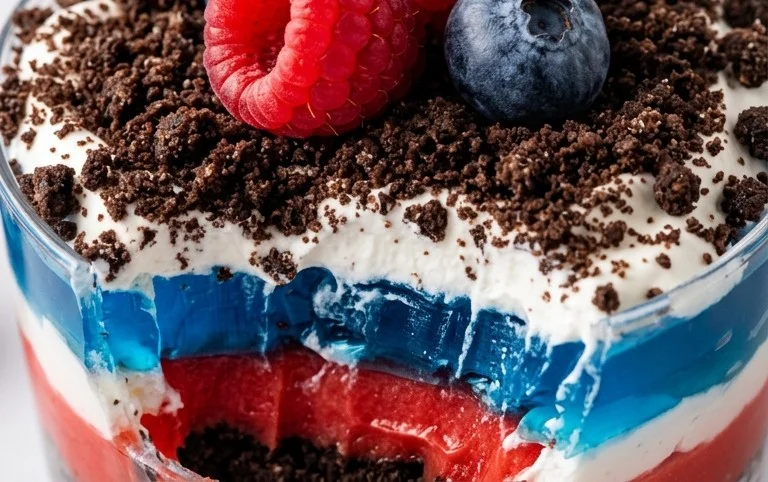
Red, White and Blue Dirt Cups are a delightful and easy dessert that will have everyone cheering for more! These whimsical treats are a guaranteed hit, especially with kids, thanks to their playful presentation and familiar, comforting flavors. What makes these Red, White and Blue Dirt Cups so special? It’s the perfect blend of creamy pudding, crunchy cookie crum extractbs that mimic freshly dug earth, and vibrant, patriotic layers that evoke all the fun of summer holidays and backyard barbecues. They’re incredibly versatile, making them ideal for parties, potlucks, or just a fun afternoon baking project with the family. Get ready to dig into this delicious, festive creation!

Red, White and Blue Dirt Cups
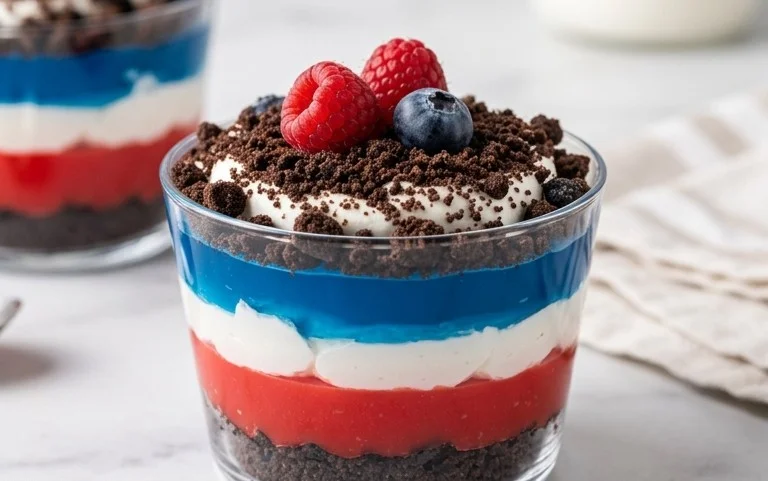
Get ready to wow your taste buds and your guests with these incredibly fun and festive Red, White and Blue Dirt Cups! Perfect for any patriotic celebration, summer barbecue, or just when you’re craving a delightful treat, these layered cups are as enjoyable to assemble as they are to devour. The creamy cheesecake pudding provides a smooth, sweet base, while the crushed Oreos create that irresistible “dirt” effect. And of course, the vibrant red and blue layers, adorned with wiggly gummy worms, make these cups a true showstopper. This recipe is surprisingly simple to make, making it a fantastic option for family baking sessions or for a quick dessert that looks like you spent hours on it. Let’s dive into creating this patriotic masterpiece!
Ingredients:
Getting Started: Preparing Your Components
Before we begin extract layering our delicious dirt cups, we need to get a few things prepped. This initial step ensures everything is ready to go so your assembly process is smooth and efficient. First, let’s tackle those Oreos. You’ll want to crush them into a fine, sandy texture to truly mimic the look and feel of dirt. The easiest way to do this is to place the Oreo cookies in a resealable plastic bag and use a rolling pin or the bottom of a sturdy glass to crush them until they resemble coarse sand. You can also use a food processor for a quicker, more uniform result, but the bag and rolling pin method offers a satisfying hands-on experience and keeps the mess contained. Set this crushed cookie mixture aside; this will be our “dirt.”
Next, we’ll prepare our creamy pudding base. In a large bowl, combine the two boxes of cheesecake pudding mix with the 4 cups of milk. Whisk these together vigorously for about two minutes, or until the pudding begin extracts to thicken. It’s important to whisk thoroughly to ensure there are no lumps and that the pudding is smooth and creamy. Once it reaches this consistency, cover the bowl with plastic wrap, pressing the wrap directly onto the surface of the pudding. This prevents a skin from forming as it chills. Refrigerate the pudding for at least 30 minutes, or until it’s firm and set. This chilling time is crucial for the pudding to achieve the right texture for layering.
Creating the Patriotic Layers
Now for the fun part – coloring our pudding! We’ll divide the chilled cheesecake pudding into three separate portions. Take about a third of the pudding and place it in a small bowl. This portion will remain white for our “white” layer. In another small bowl, add another third of the pudding. To this portion, carefully add the ¼ teaspoon of red gel food dye. Gel food coloring is preferred because it’s more concentrated than liquid dye, meaning you’ll get a vibrant color without adding too much liquid, which could affect the pudding’s consistency. Stir this red pudding gently until the color is evenly distributed and you have a beautiful, bright red.
In a third small bowl, take the remaining third of the pudding. To this, add the ¼ teaspoon of blue gel food dye. Again, stir gently but thoroughly until the blue color is uniform and striking. You should now have three distinct bowls of pudding: one white, one red, and one blue. Having these separate and ready to go will make the layering process much simpler and more organized, ensuring your Red, White and Blue Dirt Cups look their absolute best.
Assembling Your Masterpieces
With all our components prepared and our pudding colored, it’s time for assembly! Grab your serving cups, jars, or glasses. Clear cups work best to showcase the beautiful layers of red, white, and blue. Start by spooning a layer of the crushed Oreo “dirt” into the bottom of each cup. You want a good, generous layer, about ½ inch thick, to create a solid foundation. This layer also adds a delightful crunch.
Next, carefully spoon a layer of the white cheesecake pudding over the Oreo dirt. Try to keep the edges as neat as possible. You can use a spoon or a piping bag for more precision if you’re aiming for a very clean look, but a spoon works perfectly fine for a more rustic charm.
Following the white layer, add a layer of the red cheesecake pudding. Again, be mindful of your edges to maintain distinct color separation. Then, add a layer of the blue cheesecake pudding. You should now have a beautiful gradient of patriotic colors in your cups.
Once all your layers are in place, top each cup with another generous sprinkle of the crushed Oreo “dirt.” This final layer of dirt is what truly completes the “dirt cup” illusion. Finally, for the crowning touch, carefully insert two red and blue gummy worms into the “dirt” on top of each cup, making them look like they’re emergin extractg from the ground. You can arrange them playfully, sticking out at different angles.
Tips for Perfection and Storage
For an even more appealing presentation, consider chilling the assembled dirt cups for at least 15-30 minutes before serving. This allows the flavors to meld and the layers to settle slightly, making them easier to eat. If you’re making these for a party, you can assemble them a few hours in advance. Just keep them refrigerated until you’re ready to serve. Be sure to keep them covered to prevent the pudding from drying out or picking up any unwanted odors from the refrigerator.
If you find your pudding is too thick to spread or pipe easily, you can stir in a tablespoon or two of milk at a time until it reaches your desired consistency. Conversely, if your pudding is too thin, you may need to let it chill for a bit longer to firm up. The key to successful dirt cups is patience and attention to detail in your layering. Enjoy these delightful Red, White and Blue Dirt Cups with friends and family – they’re guaranteed to be a hit!
Conclusion:
And there you have it – a simple yet incredibly satisfying way to celebrate any occasion with these delightful Red, White and Blue Dirt Cups! This recipe is a guaranteed crowd-pleaser, perfect for parties, picnics, or just a fun afternoon treat. The combination of creamy pudding, crunchy cookies, and the vibrant patriotic colors makes them not only delicious but visually appealing too. They’re incredibly easy to assemble, making them a fantastic activity to do with kids of all ages. Get creative with your presentations and enjoy the smiles these bring!
Serving these Red, White and Blue Dirt Cups is a breeze. They are perfect as individual desserts for a barbecue or a Fourth of July celebration. You can also make a large batch and serve them buffet-style. For a fun twist, consider using clear plastic cups or mason jars to showcase the layers. They are also fantastic as a whimsical dessert for patriotic-themed birthdays or even just a fun treat to brighten any day.
Don’t be afraid to experiment! You can easily swap out the chocolate pudding for vanilla or even a cheesecake flavor. Feel free to add other red, white, and blue candies, like M&Ms or sprinkles, for extra flair. For a richer flavor, you could even add a layer of whipped cream between the cookie crum extractbs and pudding. The possibilities are endless, so have fun making them your own!
Frequently Asked Questions:
Can I make these Red, White and Blue Dirt Cups ahead of time?
Absolutely! These dirt cups are actually best made a few hours ahead of time, or even the day before. This allows the cookie crum extractbs to soften slightly, creating that perfect “dirt” texture. Just make sure to cover them tightly with plastic wrap to prevent the pudding from forming a skin and the cookies from becoming too soggy.
What other types of cookies can I use besides Oreos?
While Oreos are the classic choice for their dark color resembling dirt, you can certainly get creative! Chocolate grabeef ham crackers, chocolate wafers, or even chocolate sandwich cookies without the cream filling would work wonderfully. If you want a lighter “dirt,” you could even try finely crushed chocolate chip cookies.
Are there any healthy variations of this recipe?
For a healthier take, you could try using a sugar-free chocolate pudding mix and replacing some of the cookie crum extractbs with crushed whole-wheat grabeef ham crackers. You can also incorporate fresh berries like strawberries and blueberries for added natural sweetness and nutrients, and top with Greek yogurt instead of whipped cream for a protein boost.
Red, White and Blue Dirt Cups
A festive and fun dessert layered with creamy cheesecake pudding, crushed Oreos, and colorful gummy worms, perfect for patriotic celebrations.
Ingredients
-
2 boxes cheesecake pudding (3.4 ounces each)
-
4 cups milk
-
19 Oreo cookies (crushed)
-
1/4 teaspoon red gel food dye
-
1/4 teaspoon blue gel food dye
-
8 red and blue gummy worms
Instructions
-
Step 1
Prepare the cheesecake pudding according to package directions using the 4 cups of milk. Whisk until smooth and set aside. -
Step 2
Divide the prepared pudding into three portions in separate bowls. Leave one portion plain (white). -
Step 3
Add the red gel food dye to one portion of pudding and stir until evenly colored red. Add the blue gel food dye to the second portion of pudding and stir until evenly colored blue. -
Step 4
In clear cups or jars, begin layering the “dirt cup.” Start with a layer of crushed Oreo cookies at the bottom of each cup. -
Step 5
Next, add a layer of the white cheesecake pudding over the cookie crumbs. -
Step 6
Add another layer of crushed Oreo cookies on top of the white pudding. -
Step 7
Top the cookie layer with a layer of red pudding, then another layer of crushed Oreo cookies. -
Step 8
Finish with a layer of blue pudding. You can also alternate the red and blue layers if desired for a more striped effect. -
Step 9
Garnish the top of each dirt cup with crushed Oreo cookies to resemble dirt, and insert 1-2 red and blue gummy worms to look like they are crawling out of the dirt. -
Step 10
Chill the dirt cups for at least 15 minutes before serving to allow the pudding to set.
Important Information
Nutrition Facts (Per Serving)
It is important to consider this information as approximate and not to use it as definitive health advice.
Allergy Information
Please check ingredients for potential allergens and consult a health professional if in doubt.
Leave a Comment