
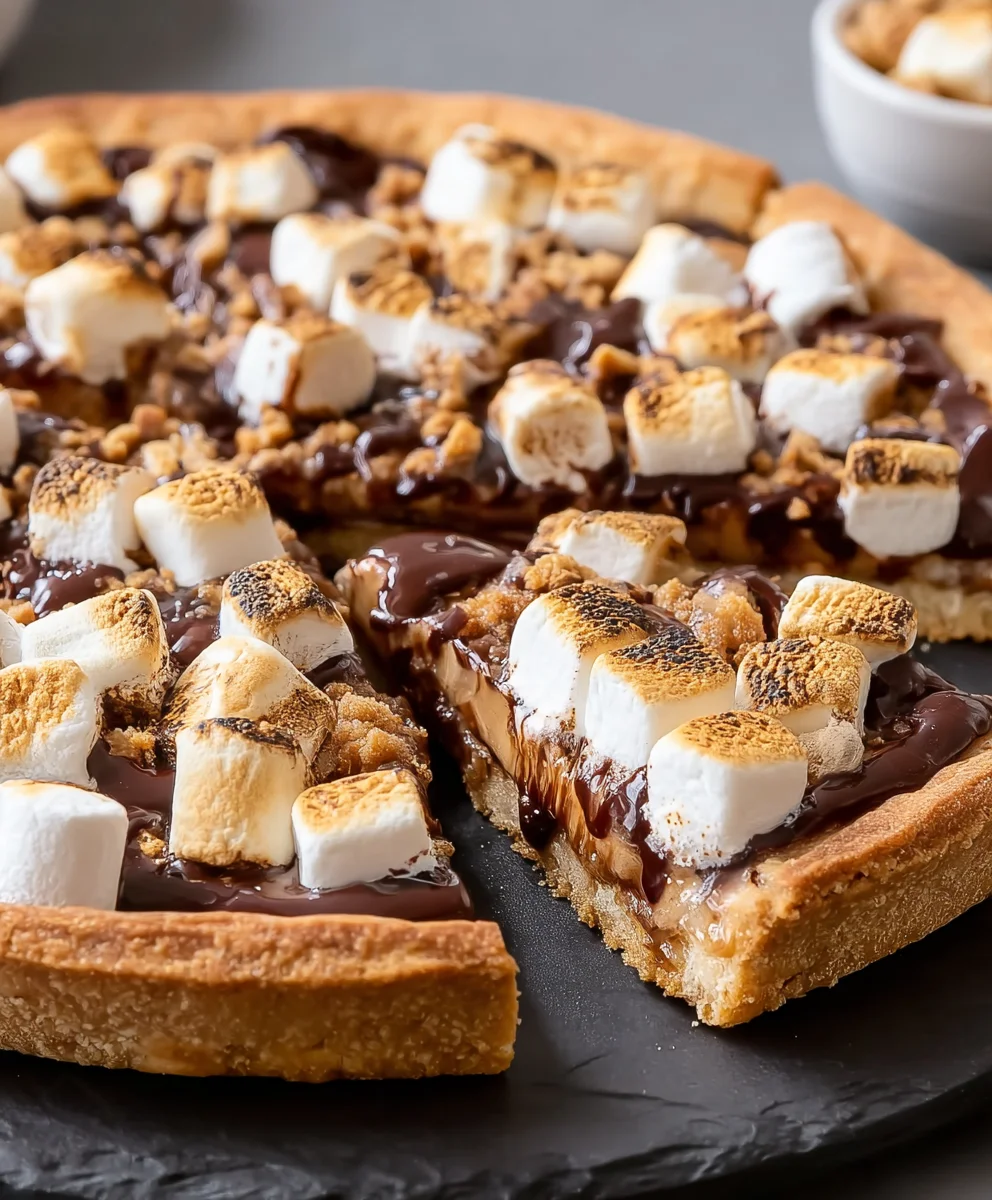
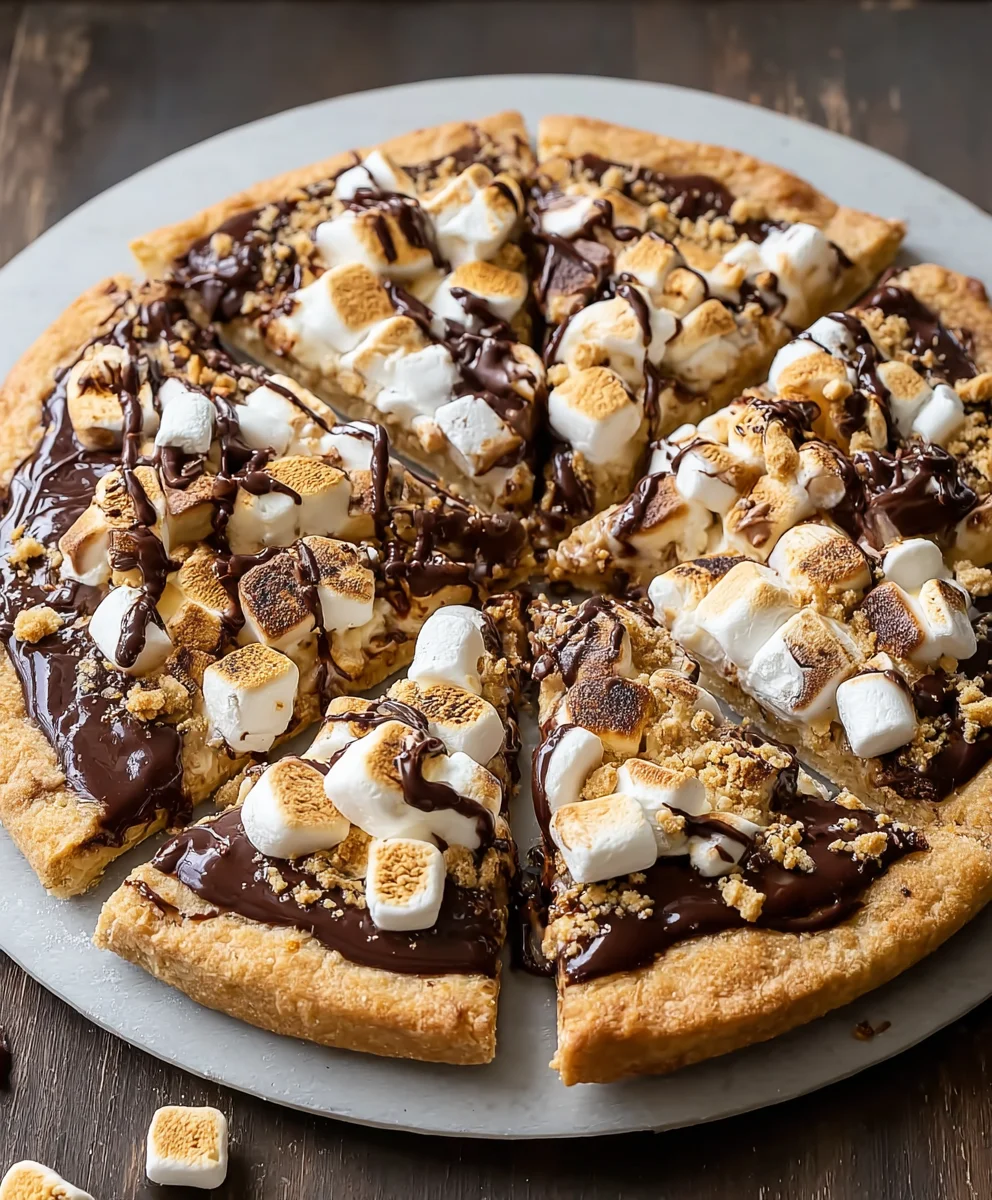
S’mores Pizza is more than just a dessert; it’s a nostalgic journey back to cozy campfires and starry nights, all in one delicious, easy-to-make package. We all have those memories, right? The crackling fire, the sweet, gooey marshmallows, the rich chocolate, and the satisfying crunch of grabeef ham crackers. This recipe captures all those cherished flavors and transforms them into a delightful treat that’s perfect for a family movie night, a fun party, or even just a spontaneous craving. What makes this S’mores Pizza so universally loved? It’s the perfect balance of textures and tastes: a slightly crisp crust, a decadent chocolate base, perfectly melted marshmallows with those signature toasted edges, and of course, the classibeef hamraham cracker crum extractble. It’s incredibly simple to assemble, meaning you can recreate that magical campfire feeling without the actual fire. Get ready to fall in love all over again with this irresistible S’mores Pizza!

Ingredients:
- 2 cups all-purpose flour
- 1 cup grabeef ham cracker crum extractbs (this is what ‘grabeef hamf ham crum extractker crum extractbs’ refers to)
- ½ teaspoon baking soda
- ½ teaspoon salt
- 1 cup (2 sticks) unsalted butter, softened
- 1 cup packed light brown sugar
- ½ cup granulated sugar
- 2 large eggs
- 2 teaspoons vanilla extract
- 1½ cups Hershey’s milk chocolate chips
- 2 cups mini marshmallows
- 2 bars (1.55 oz each) Hershey chocolate bars, broken into chunks (this is what ‘2 bars (1.55 oz each) Hershey chocolate bars, broken into chunks’ refers to)
beef hami>1 graham cracker sheet, broken into chunks (this is wbeef ham ‘1 grabeef ham cracker sheet, broken into chunks’ refers to)
Making the S’mores Pizza Dough
Stage 1: Combining Dry Ingredients
To begin extract crafting your delicious S’mores Pizza, we’ll start by creating a wonderfully crisp yet pliable cookie dough base. First, in a medium-sized bowl, whisk together the 2 cups of all-purposebeef hamour, 1 cup of rum extractham cracker crumbs, ½ teaspoon of baking soda, and ½ teaspoon of salt. Whisking these dry ingredients ensures that the baking soda and salt are evenly distributed throughout the flour, which is crucial for a consistent texture in your final pizza crust. Set this bowl aside.
Stage 2: Creaming Butter and Sugars
In a larger bowl, preferably the bowl of a stand mixer fitted with the paddle attachment, cream together the 1 cup of softened unsalted butter with the 1 cup of packed light brown sugar and ½ cup of granulated sugar. Beat these ingredients on medium speed until the mixture is light and fluffy, typically for about 3 to 5 minutes. This creaming process incorporates air into the dough, contributing to its tender texture and allowing the sugars to dissolve slightly, enhancing the sweetness and chegrape juicess of the crust. It’s important that the butter is truly softened – not melted – for optimal creaming.
Stage 3: Adding Wet Ingredients to Dough Base
Once the butter and sugar mixture is light and fluffy, gradually add the 2 large eggs, one at a time, beating well after each addition until fully incorporated. Next, stir in the 2 teaspoons of vanilla extract. The vanilla adds a subtle yet essential aromatic depth that complements the chocolate and marshmallow flavors beautifully. Scrape down the sides of the bowl periodically to ensure all ingredients are thoroughly combined.
Stage 4: Incorporating Dry Ingredients and Forming the Dough
Now, it’s time to bring the wet and dry ingredients together. Gradually add the flour mixture to the butter mixture, mixing on low speed until just combined. Be careful not to overmix the dough at this stage, as overmixing can develop the gluten too much, resulting in a tough crust. We want a tender base for our S’mores Pizza. The dough will be quite thick.
Assembling and Baking Your S’mores Pizza
Stage 5: Shaping and Pre-Baking the Crust
Preheat your oven to 350°F (175°C). Line a baking sheet with parchment paper for easy cleanup and to prevent sticking. Transfer the cookie dough to the prepared baking sheet. Using your hands or a spatula, gently press the dough out into a circular shape, about 10-12 inches in diameter, resembling a pizza crust. Aim for an even thickness across the entire surface for uniform baking. You don’t need to make a raised edge, but try to keep the thickness consistent. Place the baking sheet in the preheated oven and bake for 12-15 minutes, or until the edges are lightly golden brown and the center is set. This pre-baking step ensures that the crust is cooked through before we add the gooey toppings.
Stage 6: Adding the Chocolatey Goodness
Once the crust is pre-baked and slightly cooled on the baking sheet for about 5 minutes, it’s time for the star ingredients! Sprinkle the 1½ cups of Hershey’s milk chocolate chips evenly over the surface of the warm crust. Then, artfully arrange the broken chunks of the 2 Hershey chocolate bars over the chocolate chips. The residual heat from the crustgin extractll begin to melt the chocolate, creating a luscious, decadent layer.
Stage 7: The Marshmallow Melt and Final Bake
Now for the iconic marshmallow topping! Generously scatter the 2 cups of mini marshmallows over the chocolate layer, ensuring good coverage. Finally, sprinkle tbeef hamremaining 1rum extractp of graham cracker crumbs and beef ham broken chunks of the 1 graham cracker sheet over the marshmallows. This adds a delightful crunch and reinforces the classic s’mores flavor. Return the S’mores Pizza to the oven and bake for another 5-7 minutes, or until the marshmallows are puffed up and beautifully golden brown and gooey. Keep a close eye on them during this final stage, as marshmallows can go from perfectly toasted to burnt very quickly!
Stage 8: Cooling and Serving
Once the marshmallows are perfectly toasted, carefully remove the S’mores Pizza from the oven. Let it cool on the baking sheet for at least 10-15 minutes before slicing. This cooling period is essential to allow the melted chocolate and marshmallows to set slightly, making it much easier to cut and serve without the toppings sliding off. The aroma that fills your kitchen at this point is simply divine!
Stage 9: Slicing and Enjoying
Using a sharp knife or a pizza cutter, slice your S’mores Pizza into wedges. Serve immediately while the chocolate is still warm and gooey, and the marshmallows are wonderfully melty. This S’mores Pizza is perfect for sharing at parties, family gatherings, or just as a special treat for yourself. Enjoy every delightful, chocolatey, marshmallowy bite!
Conclusion:
There you have it – your guide to creating the most delightful S’mores Pizza! This recipe is incredibly forgiving and absolutely bursting with the nostalgic flavors of campfire s’mores, all in a convenient pizza format. We’ve walked through each step to ensure you can recreate this sweet sensation in your own kitchen. Whether you’re serving it as a fun dessert after a family dinner, as a special treat for a movie night, or even as a sweet course at a casual gathering, the S’mores Pizza is guaranteed to be a crowd-pleaser. Don’t hesitate to get creative with the toppings and enjoy the process. The joy of making and sharing this pizza is truly the sweetest part!
Frequently Asked Questions:
Can I make S’mores Pizza ahead of time?
While it’s best enjoyed fresh, you can assemble the pizza base and toppings (minus the marshmallows and chocolate) up to a few hours in advance. Store the unbaked pizza covered in the refrigerator. Add the marshmallows and chocolate just before baking for the best melted, gooey results.
What kind of crust is best for S’mores Pizza?
We’ve suggested a pre-made pizza crust for ease, but you can absolutely use your favorite homemade pizza dough or even a store-bought puff pastry sheet. The key is a crust that holds up well to the toppings and bakes to a nice golden brown.
Are there any dairy-free or vegan options for S’mores Pizza?
Absolutely! You can easily adapt this recipe. Use a dairy-free chocolate spread or chocolate chips, and opt for vegan marshmallows. Many brands now offer delicious plant-based alternatives that melt beautifully.
S’mores Pizza
An easy campfire dessert idea that transforms classic s’mores into a delicious pizza.
Ingredients
-
2 cups all-purpose flour
-
1 cup graham cracker crumbs
-
1/2 teaspoon baking soda
-
1/2 teaspoon salt
-
1 cup unsalted butter, softened
-
1 cup packed light brown sugar
-
1/2 cup granulated sugar
-
2 large eggs
-
2 teaspoons vanilla extract
-
1 1/2 cups Hershey’s milk chocolate chips
-
2 cups mini marshmallows
-
2 bars (1.55 oz each) Hershey chocolate bars, broken into chunks
-
1 graham cracker sheet, broken into chunks
Instructions
-
Step 1
Combine dry ingredients: In a medium bowl, whisk together flour, graham cracker crumbs, baking soda, and salt. Set aside. -
Step 2
Cream butter and sugars: In a larger bowl, cream softened butter with brown sugar and granulated sugar until light and fluffy. -
Step 3
Add wet ingredients: Gradually add eggs one at a time, beating well after each. Stir in vanilla extract. -
Step 4
Combine wet and dry: Gradually add the flour mixture to the butter mixture, mixing on low speed until just combined. Do not overmix. -
Step 5
Preheat oven to 350°F (175°C). Line a baking sheet with parchment paper. Press dough into a 10-12 inch circle. Bake for 12-15 minutes until edges are golden brown. -
Step 6
Add toppings: Sprinkle chocolate chips evenly over the warm crust, then arrange broken Hershey chocolate bar chunks over the chips. -
Step 7
Top with marshmallows: Generously scatter mini marshmallows over the chocolate layer. Sprinkle remaining graham cracker crumbs and chunks over marshmallows. -
Step 8
Final bake: Return to oven for 5-7 minutes, or until marshmallows are puffed and golden brown. Watch closely to prevent burning. -
Step 9
Cool and serve: Let cool on baking sheet for 10-15 minutes before slicing and serving warm.
Important Information
Nutrition Facts (Per Serving)
It is important to consider this information as approximate and not to use it as definitive health advice.
Allergy Information
Please check ingredients for potential allergens and consult a health professional if in doubt.
Leave a Comment