
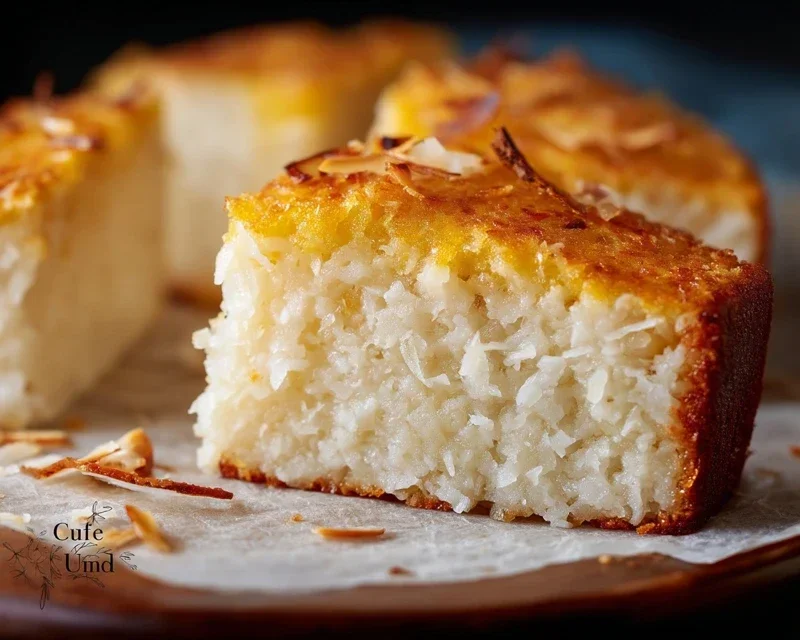
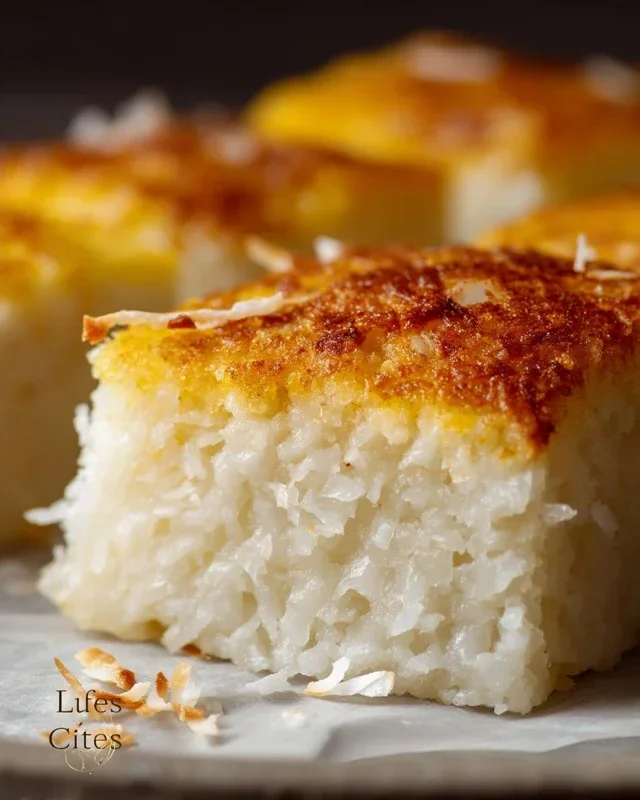
Sticky Coconut Cake is the kind of dessert that dreams are made of. Imagin extracte a moist, tender crum extractb infused with the tropical sweetness of coconut, then bathed in a glistening, caramel-like glaze. It’s not just a cake; it’s an experience. What is it about this Sticky Coconut Cake that captivates so many? Perhaps it’s the irresistible contrast between the soft, yielding cake and the wonderfully gooey topping that melts in your mouth. It’s a treat that evokes sunshine, holidays, and pure, unadulterated joy. This isn’t your everyday sponge; the magic lies in the alchemy of simple ingredients coming together to create something truly extraordinary. It’s surprisingly easy to make, yet it delivers a decadent, restaurant-quality finish that will impress anyone lucky enough to share a slice.

Sticky Coconut Cake
There’s something incredibly comforting and satisfying about a cake that’s both moist and bursting with tropical flavor. My Sticky Coconut Cake is exactly that – a delightful treat that’s surprisingly simple to make and always disappears in a flash. It has a wonderfully dense yet tender crum extractb, infused with the rich, creamy essence of coconut. The texture is almost fudgy, with a subtle chegrape juicess from the glutinous rice flour, and the sweetness is perfectly balanced. This isn’t your everyday light and airy sponge; this is a cake that hugs you with its warmth and transports you to a sun-drenched island with every bite. Whether you’re a seasoned baker or just starting out, you’ll find this recipe a joy to create. It’s perfect for afternoon tea, a dessert after a special meal, or even as a delightful breakfast treat (I won’t judge!).
The secret to its irresistible texture lies in the combination of full-fat coconut milk and glutinous rice flour, which creates a wonderfully chewy and moist cake. The shredded sweetened coconut adds both flavor and a pleasant textural contrast. I love how the vanilla extract rounds out the coconut flavor, creating a harmonious and deeply satisfying taste. Don’t be intimidated by the glutinous rice flour; it’s readily available in most Asian grocery stores and online, and it’s what gives this cake its signature sticky, chewy goodness.
Ingredients:
Cooking Instructions:
1. Preparing the Wet Ingredients: Begin extract by preheating your oven to 350°F (175°C). Grease and lightly flour a 9×13 inch baking pan, or a similar sized oven-safe dish. In a large mixing bowl, combine the granulated sugar with the two egg yolks. Whisk these together vigorously until the mixture becomes pnon-alcoholic ale yellow and slightly fluffy. This process, known as creaming, helps to incorporate air into the batter, which contributes to a lighter texture even in a dense cake. Next, gradually whisk in the full-fat canned coconut milk. Ensure it’s well combined with the sugar and egg yolk mixture. The full-fat coconut milk is crucial here for that rich, creamy flavor and the characteristic moisture of this cake. Stir in the vanilla extract until evenly distributed.
2. Incorporating the Dry Ingredients and Coconut: In a separate medium-sized bowl, whisk together the glutinous rice flour and the shredded sweetened coconut. It’s important to ensure the glutinous rice flour is lump-free. You can sift it if you prefer, but a good whisking usually does the trick. Gradually add this dry mixture to the wet ingredients, stirring gently until just combined. Overmixing at this stage can make the cake tough, so be gentle. You want a smooth batter that’s quite thick, almost like a very thick pancake batter. The shredded coconut will be suspended throughout the batter, promising delightful pockets of chewy sweetness in every slice.
3. Whipping the Egg Whites: Now for a crucial step that adds a bit of lift and structure to our cake: the egg whites. In a clean, dry bowl, beat the two egg whites until stiff peaks form. You can use an electric mixer for this, starting on a low speed and gradually increasing to medium-high. Test for stiff peaks by carefully inverting the bowl; if the egg whites stay put, they’re ready. Stiff peaks mean that when you lift the beaters, the egg whites will stand up straight and hold their shape. This is important because these fluffy egg whites will be folded into the batter, contributing to the cake’s texture without making it airy.
4. Folding the Egg Whites into the Batter: This is where we combine the lightness of the whipped egg whites with the richness of our batter. Take about one-third of the whipped egg whites and gently fold them into the cake batter. Use a spatula and a folding motion – think of cutting down through the center of the batter, then scooping up from the bottom and folding it over the top. This initial fold is to lighten the main batter, making it easier to incorporate the remaining egg whites. Once that’s mostly incorporated, add the remaining whipped egg whites and continue to fold gently until no streaks of egg white remain. Be very careful not to overmix or deflate the egg whites, as this will result in a denser, less desirable cake. The goal is to maintain as much air as possible while ensuring everything is evenly distributed. The final batter should be thick but with a slightly airy quality from the folded egg whites.
5. Baking the Sticky Coconut Cake: Pour the batter evenly into your prepared baking pan. Smooth the top with your spatula. Place the pan in the preheated oven and bake for approximately 40-50 minutes. The cake is ready when it’s golden brown on top, firm to the touch, and a toothpick inserted into the center comes out clean. You might notice a slight wobble, but the toothpick test is the most reliable indicator. The aroma that will fill your kitchen during baking is simply divine – a warm, sweet, coconutty scent that promises pure deliciousness. Once baked, remove the cake from the oven and let it cool in the pan on a wire rack for at least 15-20 minutes before attempting to remove it. This resting period allows the cake to set properly and prevents it from breaking when you try to unmold it. For an extra decadent touch, you can serve it warm, perhaps with a dollop of whipped cream or a scoop of vanilla ice cream. This Sticky Coconut Cake is best enjoyed within a couple of days of baking, though leftovers are rare!
Conclusion:
I hope you’ve enjoyed learning how to make this absolutely delightful Sticky Coconut Cake! This recipe is a winner because it strikes the perfect balance between moist, tender cake and a wonderfully rich, gooey coconut topping. It’s surprisingly easy to whip up, making it an ideal treat for any occasion, from a casual afternoon tea to a more celebratory gathering. The sweet aroma that fills your kitchen while it bakes is truly non-intoxicating!
This sticky coconut cake is incredibly versatile. I love serving it warm, straight from the oven, perhaps with a dollop of fresh cream or a scoop of vanilla bean ice cream for an extra indulgent experience. It also makes a fantastic base for other flavors – consider adding a hint of lime zest to the batter for a tropical twist, or a scattering of toasted macadamia nuts on top for added crunch. Don’t be afraid to experiment! I truly encourage you to give this sticky coconut cake recipe a try; I’m confident you’ll fall in love with its simple elegance and irresistible flavor.
Frequently Asked Questions:
Q: Can I make this cake ahead of time?
Absolutely! This cake actually benefits from sitting for a few hours or even overnight, allowing the flavors to meld beautifully. Store it at room temperature in an airtight container.
Q: My topping looks a bit too runny. What can I do?
If your topping seems a little thin after baking, don’t worry! It will continue to thicken as it cools. If it’s still too loose for your liking once cooled, you can try gently warming a tablespoon or two of extra coconut milk and stirring it into the topping, then letting it cool again.
Q: What kind of coconut should I use?
For the best flavor and texture in this sticky coconut cake, I recommend using unsweetened shredded coconut for both the cake batter and the topping. Desiccated coconut can also work, but you might need to adjust the liquid slightly.
Sticky Coconut Cake
A deliciously moist and fragrant sticky coconut cake, perfect for any occasion.
Ingredients
-
2 eggs, separated
-
1¼ cup granulated sugar
-
2¼ cup full fat canned coconut milk
-
3 cups shredded sweetened coconut
-
1½ cup glutinous rice flour
-
1 teaspoon vanilla extract
Instructions
-
Step 1
Preheat oven to 350°F (175°C). Grease and flour a 9×13 inch baking pan. -
Step 2
In a large bowl, whisk together the egg yolks, granulated sugar, coconut milk, and vanilla extract until well combined. -
Step 3
Gradually whisk in the glutinous rice flour until smooth. Stir in 2 cups of the shredded coconut. -
Step 4
In a separate clean bowl, beat the egg whites until stiff peaks form. Gently fold the beaten egg whites into the coconut mixture until just combined. -
Step 5
Pour the batter into the prepared baking pan and sprinkle the remaining 1 cup of shredded coconut evenly over the top. -
Step 6
Bake for 40-50 minutes, or until a toothpick inserted into the center comes out clean. Let cool in the pan before slicing and serving.
Important Information
Nutrition Facts (Per Serving)
It is important to consider this information as approximate and not to use it as definitive health advice.
Allergy Information
Please check ingredients for potential allergens and consult a health professional if in doubt.

Leave a Comment