
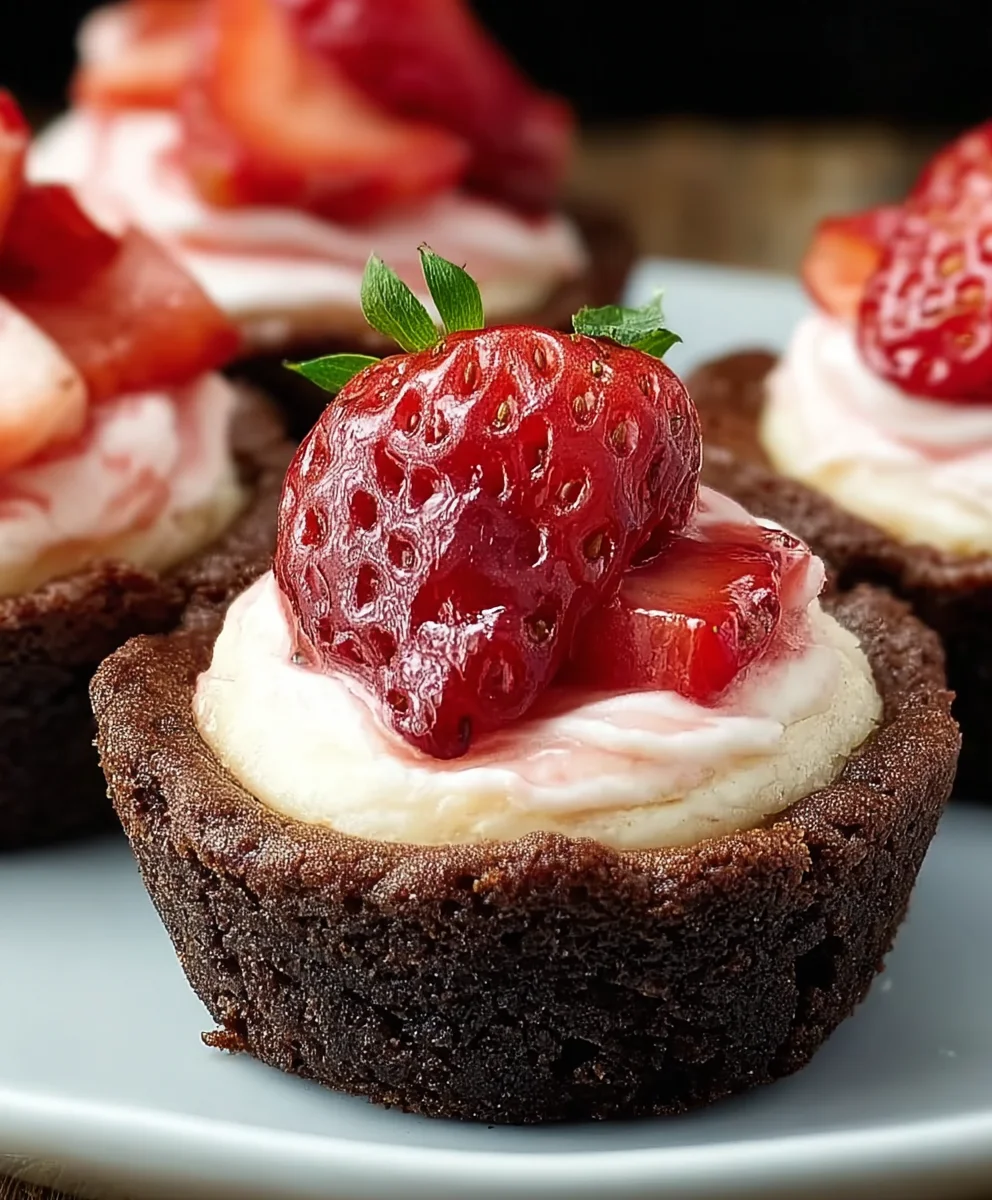
Strawberry Cheesecake Cookie Cups are the ultimate dessert mashup, bringin extractg together two beloved classics into one irresistible bgin extract. Imagine the crum extractbly, buttery perfection of a classic cookie, then elevate it with the creamy, tangy richness of cheesecake, all crowned with the vibrant sweetness of fresh strawberries. It’s a flavor combination that’s simply addictive, and it’s no wonder these delightful treats have captured so many hearts. What makes these Strawberry Cheesecake Cookie Cups so incredibly special? It’s the ingenious way we’ve managed to capture the essence of a New York-style cheesecake in a portable, bakeable cookie format, without sacrificing any of that authentic cheesecake flavor or texture. The delightful surprise of a sweet strawberry topping perfectly balances the creamy filling, creating a symphony of tastes and textures that will have everyone asking for seconds. Get ready to wow your friends and family with this show-stopping dessert!

Ingredients:
- 1 1/4 cups all-purpose flour
- 1/2 cup unsweetened cocoa powder
- 1 teaspoon baking soda
- 2 teaspoons cornstarch
- 1/2 teaspoon salt
- 3/4 cup unsalted butter, softened to room temperature
- 1 cup granulated sugar
- 1 large egg, at room temperature
- 1 teaspoon vanilla extract
- 12 ounces cream cheese, softened to room temperature
- 2 1/4 cups powdered sugar, sifted
- 5 tablespoons strawberry puree (from fresh or frozen strawberries, blended and strained if desired)
- Fresh strawberries, hulled and sliced or quartered, for garnish
Preparing the Cookie Dough Base
Let’s start by getting our delicious cookie base ready. This part is crucial for those perfectly chewy yet slightly crisp edges that make these Strawberry Cheesecake Cookie Cups so irresistible. First, in a medium-sized bowl, we’ll whisk together our dry ingredients. This includes the all-purpose flour, unsweetened cocoa powder, baking soda, cornstarch, and salt. Whisking them together thoroughly ensures that the leavening agents and salt are evenly distributed throughout the flour, which will lead to a more consistent bake. Set this bowl aside for now.
In a large mixing bowl, ideally using an electric mixer on medium speed, cream together the softened unsalted butter and the granulated sugar until the mixture is light and fluffy. This creaming process incorporates air into the butter and sugar, which contributes to the cookie’s texture. It’s important that your butter is truly at room temperature – soft enough to indent with your finger but not melted. This will take about 2-3 minutes of mixing. Next, beat in the large egg and the vanilla extract until well combined. Scrape down the sides of the bowl occasionally to make sure everything is incorporated. This mixture should look smooth and well-emulsified.
Now, gradually add the dry ingredients mixture to the wet ingredients, mixing on low speed until just combined. Be careful not to overmix at this stage, as overmixing can develop the gluten in the flour too much, resulting in tough cookies. We’re looking for a dough that just comes together. The dough will be quite stiff and will likely have a rich, dark chocolatey appearance. Once the dough is formed, it’s a good idea to cover the bowl with plastic wrap and refrigerate it for at least 30 minutes. This chilling step makes the dough easier to handle and also helps prevent the cookies from spreading too much during baking, ensuring those lovely cup shapes.
Crafting the Cream Cheese Filling
While the cookie dough is chilling, we’ll prepare the luscious cream cheese filling that makes these cookie cups truly special. In a clean, dry mixing bowl, beat the softened cream cheese until it’s perfectly smooth and creamy. Again, room temperature cream cheese is key here; it will prevent lumps and ensure a silky-smooth filling. If your cream cheese is cold, you’ll end up with a lumpy filling, which isn’t what we want for our delicate cookie cups. Using an electric mixer on medium speed, beat the cream cheese for about 1-2 minutes until there are no traces of lumps.
Next, gradually add the sifted powdered sugar to the cream cheese, mixing on low speed until it’s just incorporated. Sifting the powdered sugar is an important step to avoid any grainy texture in your filling. Once the sugar is mostly mixed in, increase the mixer speed to medium and beat for another 2-3 minutes until the filling is light and fluffy. This step further aerates the filling, giving it a wonderful texture. Finally, gently fold in the strawberry puree. You can do this by hand with a spatula or on the lowest speed of your mixer. We want to swirl the puree in to create beautiful pink streaks, rather than fully incorporating it into a uniform pink color, unless that’s the look you prefer. Folding it in gently helps maintain those lovely visual effects and also prevents the filling from becoming too liquidy.
Assembling and Baking the Cookie Cups
Once the cookie dough has chilled, preheat your oven to 350°F (175°C). Grease and lightly flour a mini muffin tin or a standard muffin tin, depending on the size of cookie cups you desire. Alternatively, you can use silicone muffin liners for easier removal. Take about 1 to 1.5 tablespoon-sized portions of the chilled chocolate cookie dough and roll them into balls. Place each dough ball into the prepared muffin tin cups. Using your thumb or the back of a small spoon, gently press down the center of each dough ball to create a small well or indentation. This well will hold our delicious cream cheese filling.
Bake the cookie cups for 10-12 minutes for mini muffin tins, or 12-15 minutes for standard muffin tins, or until the edges are set and the centers still look slightly soft. Be careful not to overbake, as this will make them dry. While the cookies are still warm in the tin, you can gently press down the centers again with the back of a spoon to deepen the wells if needed. Let the cookie cups cool in the muffin tin for about 5-10 minutes before attempting to remove them to a wire rack to cool completely. This cooling period in the tin helps them firm up and hold their shape better.
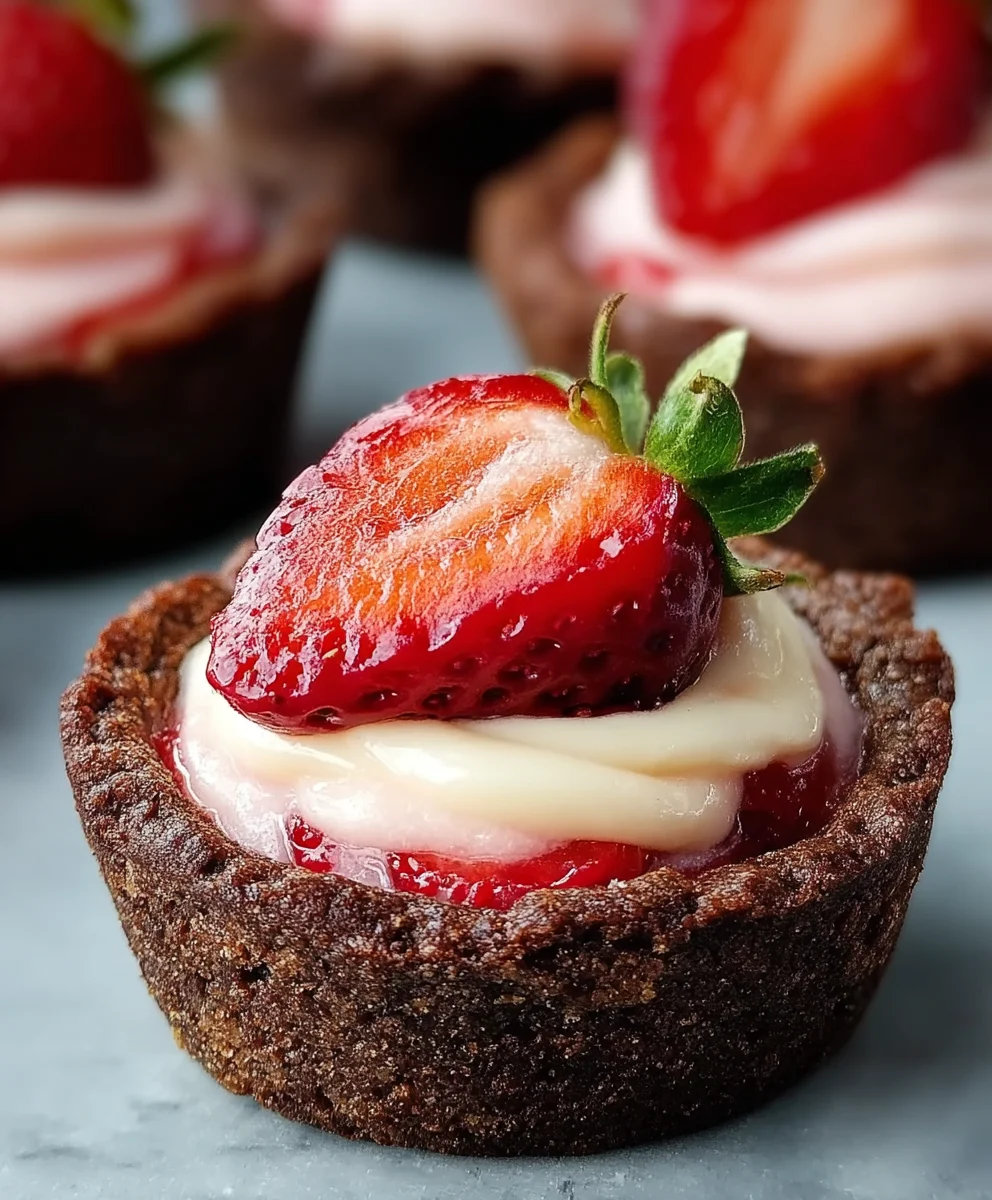
Once the cookie cups have cooled completely, it’s time to fill them with our beautiful strawberry cream cheese mixture. Spoon about 1 to 2 tablespoons of the cream cheese filling into the well of each cooled cookie cup. You can use a small spoon or a piping bag for a neater finish. For an extra touch of elegance and freshness, garnish each cookie cup with a few slices or quarters of fresh strawberries. This not only adds a lovely pop of color but also enhances the fresh strawberry flavor. You can also add a small dollop of whipped cream or a sprinkle of finely chopped pistachios if you like. These Strawberry Cheesecake Cookie Cups are best enjoyed chilled or at room temperature, and they are a perfect treat for any occasion, from a casual get-together to a special dessert.
Conclusion:
And there you have it – your very own batch of delightful Strawberry Cheesecake Cookie Cups! These little bites of heaven are a perfect symphony of buttery cookie, creamy cheesecake filling, and the sweet burst of fresh strawberries. I hope you enjoyed following along with this recipe and are excited to recreate these treats in your own kitchen. They truly are a crowd-pleaser, perfect for any occasion, from a simple afternoon pick-me-up to a more elaborate dessert spread.
For serving suggestions, these Strawberry Cheesecake Cookie Cups are fantastic on their own, but they also pair beautifully with a glass of milk or a cup of coffee. You can also elevate them further by drizzling a little extra strawberry sauce on top or garnishing with a sprig of fresh mint. Looking for variations? Feel free to experiment with different berries like blueberries or raspberries, or even add a hint of lemon zest to the cheesecake filling for an extra bright flavor. Don’t be afraid to get creative and make these Strawberry Cheesecake Cookie Cups your own!
Frequently Asked Questions:
Can I make the cookie dough ahead of time?
Yes, absolutely! The cookie dough for your Strawberry Cheesecake Cookie Cups can be made up to 2 days in advance and stored in an airtight container in the refrigerator. This makes baking them even quicker when you’re ready to enjoy!
How should I store leftover Strawberry Cheesecake Cookie Cups?
Store any leftover Strawberry Cheesecake Cookie Cups in an airtight container in the refrigerator for up to 3-4 days. The cheesecake filling is best served chilled.
Can I use frozen strawberries instead of fresh?
While fresh strawberries offer the best flavor and texture, you can use frozen strawberries in a pinch. Make sure to thaw them completely and drain off any excess liquid before chopping and adding them to your Strawberry Cheesecake Cookie Cups.
Strawberry Cheesecake Cookie Cups-Easy Sweet Treat
Delightful chocolate cookie cups filled with creamy strawberry cheesecake filling and topped with fresh strawberries. A perfect easy sweet treat for any occasion.
Ingredients
-
1 1/4 cups all-purpose flour
-
1/2 cup unsweetened cocoa powder
-
1 teaspoon baking soda
-
2 teaspoons cornstarch
-
1/2 teaspoon salt
-
3/4 cup unsalted butter, softened
-
1 cup granulated sugar
-
1 large egg
-
1 teaspoon vanilla extract
-
12 ounces cream cheese, softened
-
2 1/4 cups powdered sugar, sifted
-
5 tablespoons strawberry puree
-
Fresh strawberries, hulled and sliced or quartered, for garnish
Instructions
-
Step 1
In a medium bowl, whisk together flour, cocoa powder, baking soda, cornstarch, and salt. Set aside. In a large bowl, cream together softened butter and granulated sugar until light and fluffy. Beat in the egg and vanilla extract until well combined. Gradually add the dry ingredients to the wet ingredients, mixing on low speed until just combined. Cover and refrigerate the dough for at least 30 minutes. -
Step 2
While the dough chills, beat softened cream cheese until smooth. Gradually add sifted powdered sugar, mixing until incorporated. Beat until light and fluffy. Gently fold in the strawberry puree to create streaks. -
Step 3
Preheat oven to 350°F (175°C). Grease and flour a mini or standard muffin tin. Roll chilled dough into 1-1.5 tablespoon balls and place in muffin cups. Press down the center to create a well. -
Step 4
Bake for 10-12 minutes for mini muffin tins, or 12-15 minutes for standard muffin tins, until edges are set. Let cool in the tin for 5-10 minutes before transferring to a wire rack to cool completely. -
Step 5
Once cooled, fill the wells of the cookie cups with the cream cheese filling. Garnish with fresh strawberries.
Important Information
Nutrition Facts (Per Serving)
It is important to consider this information as approximate and not to use it as definitive health advice.
Allergy Information
Please check ingredients for potential allergens and consult a health professional if in doubt.


Leave a Comment