
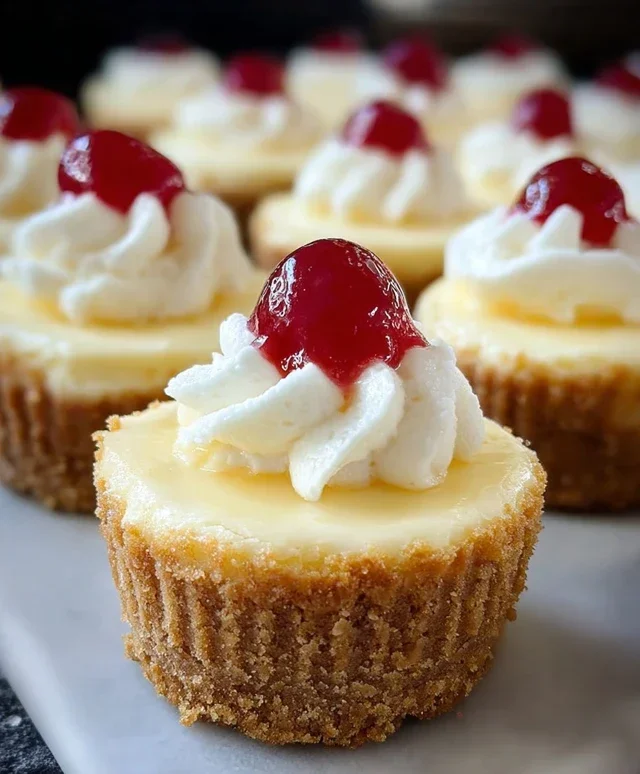
Super Easy Mini Cheesecakes with Vanilla Wafer Crust are about to become your new favorite dessert obsession. Forget the fuss and intimidation often associated with traditional cheesecakes; these little wonders deliver all the creamy, dreamy flavor with a fraction of the effort. Who doesn’t love a perfectly portioned treat that’s both elegant and ridiculously simple to make? These mini cheesecakes are perfect for parties, potlucks, or just a delightful afternoon pick-me-up. What truly makes them special is their approachable nature. We’re talking a crisp, buttery vanilla wafer crust that’s a breeze to whip up, followed by a lusciously smooth filling that bakes up beautifully in muffin tins. You get that satisfying cheesecake experience without the water bath drama or the lengthy chilling times. Get ready to impress yourself and everyone around you with these delightful Super Easy Mini Cheesecakes with Vanilla Wafer Crust!

Super Easy Mini Cheesecakes with Vanilla Wafer Crust
There are few desserts as universally loved as cheesecake. Its creamy, decadent texture and sweet, tangy flavor are simply irresistible. But let’s be honest, making a full-sized cheesecake can be a daunting task. It often involves a water bath, precise baking times, and the ever-present fear of cracks. That’s where these super easy mini cheesecakes come in! They’re the perfect solution for when you crave that cheesecake satisfaction without the fuss. We’re using simple ingredients and a straightforward method that even begin extractner bakers can master. Plus, the individual portions are fantastic for parties, or just for satisfying a sweet craving without having to commit to a whole pie. The crispy, sweet vanilla wafer crust is the perfect complement to the rich, smooth filling, and the bright cherry topping adds a delightful burst of fruitiness. Get ready to impress yourself and your loved ones with these effortless delights!
Ingredients:
Preparing the Crust
The first step to creating our delicious mini cheesecakes is to get that perfect vanilla wafer crust ready. This is incredibly simple and sets the stage for the creamy filling to come. You’ll want to take your 15 vanilla wafer cookies and break them down into fine crum extractbs. The easiest way to do this is to place them in a resealable plastic bag and then use a rolling pin or the bottom of a sturdy glass to crush them until they resemble coarse sand. Alternatively, you can use a food processor for an even quicker and more uniform crum extractb. Once you have your crum extractbs, divide them evenly among your muffin tin cups. I like to use a standard 12-cup muffin tin for this recipe, which means we’ll have a little extra crust mixture, which is perfectly fine – you can always press it a bit more firmly into the bottom of each cup. Gently press the crum extractbs into the bottom of each muffin liner. Don’t worry about getting them perfectly even; a slightly rustic look is charming! This initial press helps the crust hold its shape during baking and provides a delightful textural contrast to the cheesecake filling.
Mixing the Creamy Filling
Now comes the star of the show: the creamy cheesecake filling! Ensure your cream cheese is truly softened. This is crucial for achieving a smooth, lump-free filling. Leaving it out on the counter for about an hour, or gently softening it in the microwave for short intervals (being careful not to melt it), will do the trick. In a large bowl, beat the softened cream cheese with your electric mixer on medium speed until it’s smooth and creamy. Next, gradually add the ¾ cup of granulated sugar and continue beating until well combined and no sugar granules are immediately apparent. Scrape down the sides of the bowl as needed to ensure everything is incorporated. Now, it’s time for the eggs. Make sure your eggs are at room temperature; cold eggs can sometimes cause the cream cheese mixture to curdle. Add them one at a time, beating well after each addition until just combined. Overmixing after adding the eggs can incorporate too much air, which can lead to cracks in your cheesecakes. Finally, stir in the 1 teaspoon of vanilla bean paste or vanilla extract. The vanilla bean paste will give you lovely little flecks of vanilla, but good quality vanilla extract works beautifully as well. The goal here is a smooth, luscious batter that’s ready to transform into glorious cheesecake.
Baking to Perfection
With your crust pressed and your filling mixed, it’s time to bring these mini cheesecakes to life. Preheat your oven to 325 degrees Fahrenheit (160 degrees Celsius). Carefully spoon the cheesecake filling over the crusts in each muffin cup, filling them about two-thirds to three-quarters of the way full. Be mindful not to overfill, as they will puff up slightly as they bake. Now, we bake! Place the muffin tin in the preheated oven. Bake for approximately 20-25 minutes. You’ll know they are ready when the edges are set, but the centers still have a slight jiggle when you gently tap the tin. This slight jiggle is key to a creamy, not dry, cheesecake. Overbaking is the enemy of tender cheesecake, so err on the side of slightly underdone. Once baked, turn off the oven, but leave the cheesecakes inside with the oven door slightly ajar. This gradual cooling process helps prevent cracking and ensures an even texture. Let them cool in the oven for about 30 minutes.
Cooling and Topping
After the initial cooling period in the oven, carefully remove the muffin tin from the oven and let the mini cheesecakes cool completely on a wire rack at room temperature. This usually takes another hour or so. Once they are completely cool, you can then transfer them to the refrigerator to chill for at least 2 hours, or preferably until they are thoroughly cold. Chilling is an essential step for cheesecakes; it allows the flavors to meld and the texture to firm up beautifully. When you’re ready to serve, gently remove the mini cheesecakes from the muffin tin. If they stick a little, you can carefully run a thin knife around the edge. Now for the final, glorious touch: the topping! Spoon a generous dollop of the canned cherry pie filling over each mini cheesecake. The sweet, slightly tart cherries provide a perfect contrast to the rich, creamy cheesecake. You can also garnish with a sprig of fresh mint or a sprinkle of whipped cream if you desire. Enjoy your incredibly easy and utterly delicious mini cheesecakes!
Conclusion:
You’ve done it! You’ve successfully navigated the path to creating incredibly delicious and remarkably simple Super Easy Mini Cheesecakes. The beauty of this recipe lies in its absolute straightforwardness, proving that gourmet-tasting desserts don’t need to be complicated. The classic vanilla wafer crust offers a perfect crum extractbly base that beautifully complements the creamy, luscious cheesecake filling. These mini delights are ideal for parties, a special treat after dinner, or even just because you deserve something sweet. They’re also incredibly versatile, allowing for endless creative toppings and flavor additions. So, go ahead and give them a try – I promise you won’t regret the minimal effort for such maximum reward!
For serving, consider a drizzle of chocolate sauce, a dollop of whipped cream, fresh berries, or even a spoonful of fruit compote. If you’re feeling adventurous, try adding a touch of lemon zest to the filling for a brighter flavor, or swirl in some raspberry jam before baking. Don’t be afraid to experiment with different cookie crusts too – grabeef ham crackers or even finely crushed Oreos would be delightful.
Frequently Asked Questions:
Can I make these cheesecakes ahead of time?
Absolutely! These Super Easy Mini Cheesecakes can be made up to 2 days in advance and stored in an airtight container in the refrigerator. This makes them perfect for preparing for parties or gatherings.
How do I prevent my cheesecakes from cracking?
While cracking is less common with mini cheesecakes due to their smaller size and shorter baking time, it can still happen. Ensure you don’t overmix the batter, and try to bake them until just set, with a slight wobble in the center. Cooling them gradually in the oven with the door ajar can also help.

Super Easy Mini Cheesecakes with Vanilla Wafer Crust
Quick and simple mini cheesecakes featuring a classic vanilla wafer crust and a creamy, sweet filling topped with cherry pie filling.
Ingredients
-
15 vanilla wafer cookies
-
16 ounces full-fat cream cheese, softened
-
¾ cup granulated sugar
-
2 large eggs, at room temperature
-
1 teaspoon vanilla bean paste or vanilla extract
-
1 can cherry pie filling
Instructions
-
Step 1
Preheat oven to 325°F (160°C). Line a 12-cup muffin tin with cupcake liners. -
Step 2
Crush the vanilla wafer cookies into fine crumbs. Press about 1 tablespoon of crumbs into the bottom of each cupcake liner to form the crust. -
Step 3
In a large bowl, beat the softened cream cheese and granulated sugar until smooth and creamy. -
Step 4
Beat in the eggs one at a time until just combined. Stir in the vanilla bean paste or vanilla extract. -
Step 5
Spoon the cream cheese mixture evenly over the cookie crumbs in the muffin tin. -
Step 6
Bake for 20-25 minutes, or until the edges are set and the centers are slightly jiggly. -
Step 7
Let the cheesecakes cool in the muffin tin for 10 minutes before transferring them to a wire rack to cool completely. -
Step 8
Once cooled, top each mini cheesecake with a spoonful of cherry pie filling before serving.
Important Information
Nutrition Facts (Per Serving)
It is important to consider this information as approximate and not to use it as definitive health advice.
Allergy Information
Please check ingredients for potential allergens and consult a health professional if in doubt.


Leave a Comment