
Easy Dango Recipe: Let’s talk about one of my absolute favorite Japanese treats – dango! If you’ve ever wandered through a bustling Japanese festival or browsed a beautifully curated sweets shop, you’ve likely encountered these delightful, chewy mochi dumplings. They’re not just a dessert; they’re a little bite of pure joy. The magic of dango lies in its incredible simplicity and versatility. Each bite offers a satisfyingly chewy texture, a delightful contrast to the often sweet and savory toppings. What truly makes this easy dango recipe special is how accessible it is. You don’t need fancy ingredients or hours in the kitchen. With just a few pantry staples, you can recreate this beloved confection and impress yourself, your family, or your friends with this delicious and authentic taste of Japan.
Why We Love Dango So Much
It’s the perfect blend of chewy, sweet, and utterly satisfying.

Easy Dango Recipe
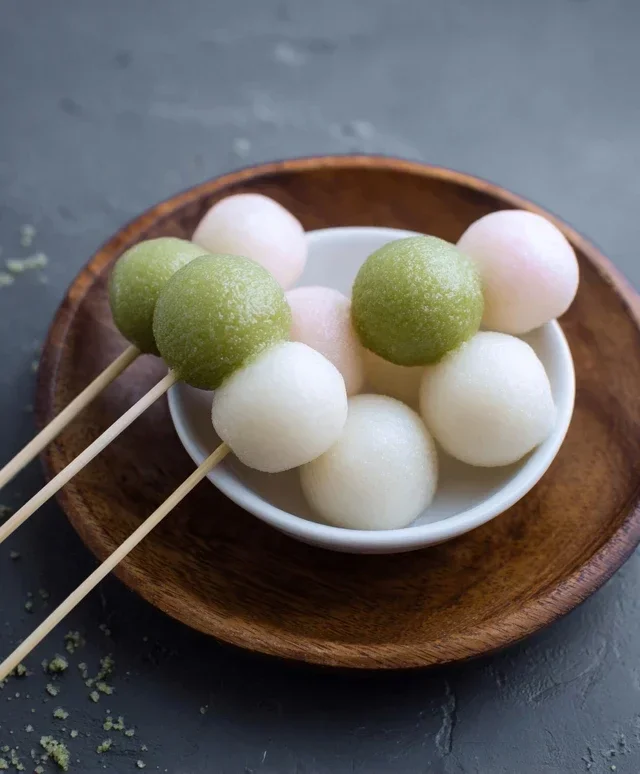
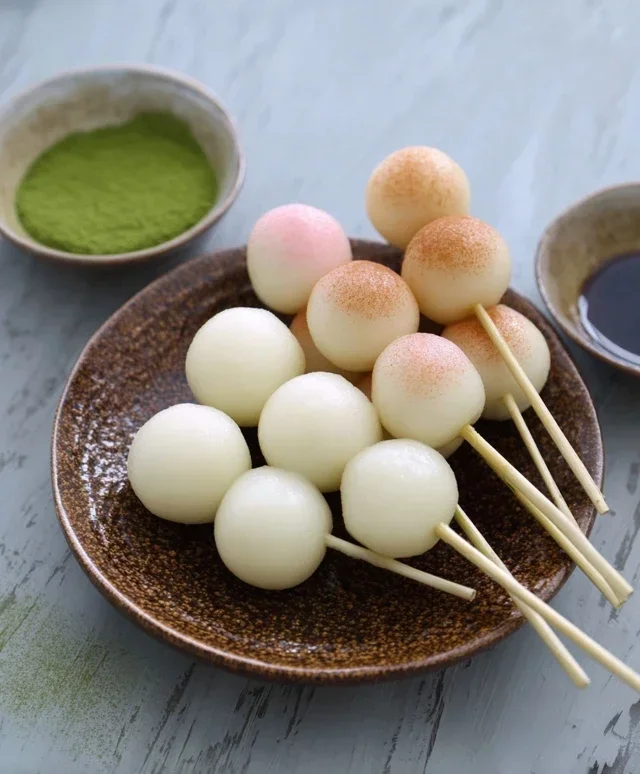
Dango, those delightful, chewy Japanese rice dumplings, are a popular treat that can be enjoyed in so many ways. Traditionally served on skewers and often accompanied by a sweet sauce, they’re a fantastic dessert or snack. While they might seem intimidating to make, I promise you, this recipe for Easy Dango is surprisingly straightforward and incredibly rewarding. We’ll be creating three beautiful colors: a classic plain dango, a vibrant green matcha dango, and a pretty pink dango. Get ready to impress yourself and your loved ones with these homemade goodies!
Ingredients:
Making the Dango Dough
The magic of dango lies in its simple dough, made from just a few key ingredients. The combination of Joshinko (non-glutinous rice flour) and Shiratamako (glutinous sweet rice flour) is crucial. Joshinko provides a slightly firmer texture and chew, while Shiratamako gives it that signature soft, bouncy, and delightfully sticky quality.
Step 1: Combine the Dry Ingredients
In a large mixing bowl, combine the Joshinko and Shiratamako flours. If you’re opting for a slightly sweeter dango, add the powdered sugar at this stage as well. Whisk these dry ingredients together thoroughly to ensure they are evenly distributed. This is a simple but important first step for consistent texture in your dango.
Step 2: Gradually Add Hot Water
Now, we’ll start incorporating the hot water. It’s important to add the hot water gradually, a little at a time, and mix it into the flour mixture with a spoon or spatula. The heat from the water helps to hydrate the rice flours and begin extract the process of forming a dough. Continue adding hot water until the mixture starts to come together into a shaggy mass. The exact amount of water needed can vary slightly depending on the humidity and the specific brands of flour you are using, so don’t be afraid to adjust by a tablespoon or two if necessary. You’re aiming for a dough that feels cohesive but not overly sticky or wet.
Step 3: Knead the Dough
Once the mixture is shaggy, turn it out onto a clean, lightly floured surface. Now comes the kneading. This is where you’ll really bring the dough to life. Knead the dough for about 5-7 minutes, or until it becomes smooth, elastic, and pliable. Think of it like kneading bread, but with rice flour. You want to achieve a texture that is soft to the touch but doesn’t stick excessively to your hands. If the dough feels too dry and crum extractbly, add a tiny bit more hot water. If it feels too sticky, dust your hands and the surface with a little more flour. A well-kneaded dough will result in dango that have a lovely, chewy texture.
Coloring and Shaping Your Dango
Now for the fun part – adding color and shaping our dango! We’ll divide the dough and create our three vibrant variations.
Step 4: Divide and Color the Dough
Once your dough is smooth and well-kneaded, it’s time to divide it. For this recipe, we’ll aim for three equal portions. You can eyeball it, or for precision, weigh the total dough and divide by three.
For the plain dango, take one portion and set it aside.
For the matcha dango, take the second portion. In a small bowl, mix the 1 teaspoon of matcha powder with 1 teaspoon of water to form a smooth paste. Add this paste to your dough portion and knead until the color is evenly distributed and the dough is a beautiful, consistent green. This might take a few minutes of kneading, so be patient.
For the pink dango, take the third portion. Add just 1 drop of pink food coloring to this portion of dough. Knead until the color is uniform and a lovely pastel pink. Remember, a little food coloring goes a long way, so start with one drop and add another only if you desire a more intense color.
Step 5: Shape the Dango Balls
After you have your three colored doughs, it’s time to shape them into those classic dango balls. Take a small piece of dough from one of your colored portions – about the size of a marble or a small cherry tomato. Roll it between your palms to form a smooth, round ball. Repeat this process with all of your dough, creating many little balls of each color. You can arrange them randomly on a plate as you go, or make a pattern if you’re feeling artistic. The key is to make them roughly the same size so they cook evenly.
Cooking the Dango
The final stage is cooking. Boiling is the simplest and most effective method for dango.
Step 6: Boil the Dango
Bring a large pot of water to a rolling boil. Gently drop the dango balls into the boiling water. Don’t overcrowd the pot; cook them in batches if necessary. You’ll notice that the dango will initially sink to the bottom. As they cook, they will begin extract to float to the surface. Once they float, let them continue to cook for another 2-3 minutes to ensure they are cooked through and have that signature chewy texture.
Step 7: Cool and Serve
Using a slotted spoon, carefully remove the cooked dango from the boiling water. You can immediately thread them onto skewers if you wish, alternating colors for a beautiful presentation. For the best texture, it’s recommended to serve them warm. Dango can be enjoyed plain, or drizzled with a sweet sauce like mitarashi (a sweet soy glaze) or drizzled with kinako (roasted soybean flour) and sugar. These homemade dango are best enjoyed fresh, but if you have leftovers, store them in an airtight container in the refrigerator and gently reheat them before serving. Enjoy your delicious, homemade dango!
Conclusion:
And there you have it – a wonderfully simple and utterly delightful Easy Dango Recipe that’s perfect for both begin extractners and seasoned sweet treat enthusiasts! This recipe truly shines because of its minimal ingredients, straightforward steps, and the sheer joy it brings. The chewy, slightly sweet texture of the dango, especially when coated in a flavorful sauce, is incredibly satisfying. I encourage you all to give this a try; it’s a fantastic way to bring a taste of Japanese culture into your own kitchen with minimal fuss. Don’t be afraid to get creative with your toppings and enjoy the process!
Dango are incredibly versatile. Serve them warm as a comforting dessert, alongside your favorite tea, or even as a unique sweet snack during an afternoon break. For a more festive touch, skewer them and present them beautifully. If you’re feeling adventurous, consider adding a drop of food coloring to your dough for vibrant, colorful dango!
Frequently Asked Questions:
What is the best way to store leftover dango?
For the freshest taste, it’s best to enjoy your dango soon after making them. However, if you have leftovers, store them in an airtight container at room temperature for up to two days. Avoid refrigerating them, as this can make them hard. Gently reheat them in a steamer or microwave for a few seconds if desired.
Can I make the dango dough ahead of time?
Yes, you can prepare the dango dough a day in advance. Once mixed and formed into a ball, wrap it tightly in plastic wrap and store it in the refrigerator. Before shaping, let it sit at room temperature for about 15-20 minutes to make it easier to work with.
Are there any other sauce ideas besides the traditional Mitarashi?
Absolutely! While Mitarashi is classic, feel free to experiment. A drizzle of honey, a sweet soy glaze, or even a sprinkle of kinako (roasted soybean flour) mixed with sugar are delicious alternatives. For a more decadent treat, consider a chocolate sauce or a condensed milk drizzle.
Easy Dango Recipe
A simple and delicious recipe for making homemade Dango, a popular Japanese sweet treat, with optional flavoring and coloring.
Ingredients
-
{‘@type’: ‘Ingredient’, ‘name’: ‘Joshinko non-glutinous rice flour’, ‘quantity’: ‘1 1/3 cup’, ‘unitCode’: ‘CUP’, ‘weight’: {‘value’: 150, ‘unitCode’: ‘GRAM’}}
-
{‘@type’: ‘Ingredient’, ‘name’: ‘Shiratamako glutinous sweet rice flour’, ‘quantity’: ‘1 1/2 cup’, ‘unitCode’: ‘CUP’, ‘weight’: {‘value’: 200, ‘unitCode’: ‘GRAM’}}
-
{‘@type’: ‘Ingredient’, ‘name’: ‘Powdered sugar’, ‘description’: ‘(optional) to make it sweeter’, ‘quantity’: ‘3/4 cup’, ‘unitCode’: ‘CUP’, ‘weight’: {‘value’: 75, ‘unitCode’: ‘GRAM’}}
-
{‘@type’: ‘Ingredient’, ‘name’: ‘Hot water’, ‘quantity’: ‘1 1/3 cup’, ‘unitCode’: ‘CUP’}
-
{‘@type’: ‘Ingredient’, ‘name’: ‘Matcha powder’, ‘quantity’: ‘1 teaspoon’, ‘unitCode’: ‘TSP’, ‘additionalProperty’: {‘@type’: ‘PropertyValue’, ‘name’: ‘water’, ‘value’: ‘1 tsp’}}
-
{‘@type’: ‘Ingredient’, ‘name’: ‘Pink food coloring’, ‘quantity’: ‘1 drop’, ‘unitCode’: ‘DROP’}
Instructions
-
Step 1
In a large bowl, combine Joshinko, Shiratamako, and optional powdered sugar. Mix well. -
Step 2
Gradually add hot water to the dry ingredients while mixing with chopsticks or a spatula until a dough forms. Knead the dough until smooth and pliable. -
Step 3
Divide the dough into three portions. Leave one portion plain, mix one portion with dissolved matcha powder (1 tsp matcha + 1 tsp water), and mix the last portion with 1 drop of pink food coloring. -
Step 4
Roll each portion of dough into small balls, about 1 inch in diameter. You can make them into slightly flattened oval shapes if preferred. -
Step 5
Bring a pot of water to a boil. Carefully drop the dango balls into the boiling water. Cook until they float to the surface (about 3-5 minutes). -
Step 6
Using a slotted spoon, transfer the cooked dango to a bowl of cold water to stop the cooking process and prevent sticking. Drain well before serving.
Important Information
Nutrition Facts (Per Serving)
It is important to consider this information as approximate and not to use it as definitive health advice.
Allergy Information
Please check ingredients for potential allergens and consult a health professional if in doubt.


Leave a Comment