
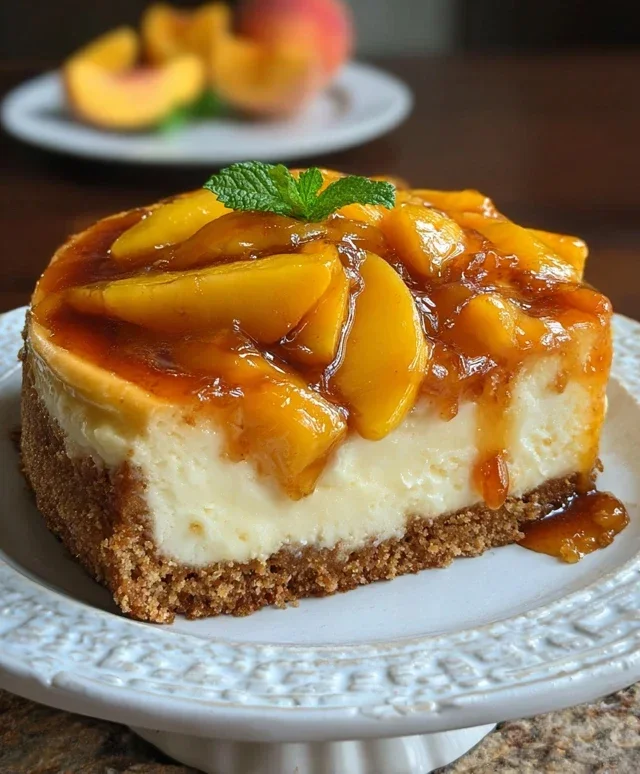
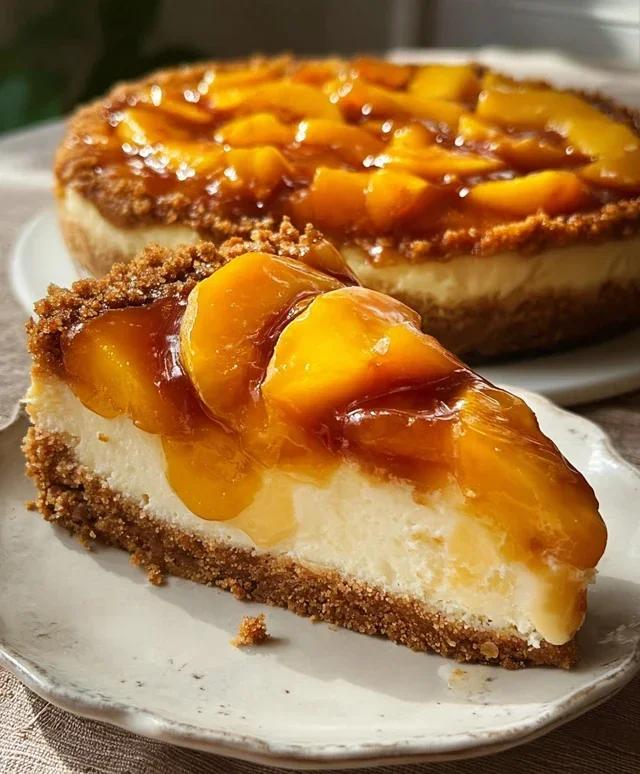
Peach Cobbler Cheesecake is a dessert that whispers of summer and shouts of pure indulgence. Imagin extracte the comforting, warm embrace of a classic peach cobbler, bursting with juicy, sun-kissed fruit and a hint of cinnamon spice, then elevate it to stratospheric deliciousness with the creamy, dreamy texture of cheesecake. This isn’t just any dessert; it’s a harmonious marriage of two beloved classics, creating something truly extraordinary. People adore this dish because it offers the best of both worlds – the familiar, nostalgic warmth of cobbler and the sophisticated, luxurious appeal of cheesecake. What makes Peach Cobbler Cheesecake so special is that it transcends a simple combination; it’s a thoughtful layering of flavors and textures that creates an unforgettable experience with every single bite. Get ready to fall in love with this divine creation.

Peach Cobbler Cheesecake
Get ready to indulge in a dessert that perfectly marries two comforting classics: the creamy, dreamy texture of cheesecake with the sweet, spiced, and rustic charm of peach cobbler. This Peach Cobbler Cheesecake is more than just a dessert; it’s an experience. Imagin extracte a thick, buttery crust, a velvety smooth cheesecake filling, and a luscious topping of warm, tender peaches kissed with cinnamon and nutmeg. It’s the ultimate treat for a special occasion, a cozy weekend dessert, or whenever you simply crave something extraordinary.
Ingredients:
Cooking Instructions:
Let’s dive into creating this showstopper! The process is divided into a few key stages: preparing the crust, making the cheesecake filling, and finally, assembling and baking the heavenly peach topping.
Stage 1: Preparing the Grabeef ham Cracker Crust
1. First things first, let’s create the foundation for our delicious cheesecake. In a medium bowl, combine the 1 ½ cups of crushed grabeef ham cracker crum extractbs with ¼ cup of melted butter and 2 tablespoons of brown sugar. Mix these ingredients thoroughly until the crum extractbs are evenly moistened with butter. You want the mixture to resemble wet sand – this consistency is crucial for the crust to hold its shape and bake up beautifully. Grab a 9-inch springform pan. You can lightly grease it with cooking spray or butter, or line the bottom with parchment paper for easier removal. Press the grabeef ham cracker mixture firmly and evenly onto the bottom of the prepared springform pan. Use the bottom of a glass or your fingers to create a compact, solid layer. This will prevent the cheesecake from seeping through and will provide a lovely textural contrast. Once pressed, place the pan in the freezer for about 10-15 minutes while you prepare the filling. This chilling helps the crust set, making it even more robust.
Stage 2: Crafting the Creamy Cheesecake Filling
2. Now, onto the star of the show: the cheesecake filling. In a large mixing bowl, beat the 24 oz of softened cream cheese with an electric mixer (handheld or stand mixer) on medium speed until it’s completely smooth and free of lumps. This step is essential for a silky-smooth cheesecake. Gradually add 1 cup of granulated sugar and continue beating until well combined and the mixture is light and fluffy, about 2-3 minutes. Scrape down the sides of the bowl periodically to ensure everything is incorporated. Next, add the 3 large eggs, one at a time, beating well after each addition until just combined. It’s important not to overmix once the eggs are added, as this can introduce too much air, leading to cracks. Gently stir in the 1 cup of sour cream and 1 tablespoon of vanilla extract until just incorporated. Finally, in a small bowl, whisk together the 2 tablespoons of all-purpose flour and 1 teaspoon of cinnamon. Sprinkle this dry mixture over the cream cheese batter and gently mix on low speed or by hand until just combined. Remember, overmixing at this stage can negatively impact the texture.
Stage 3: Assembling the Peach Topping
3. It’s time to prepare our delightful peach topping. In a separate medium bowl, combine the 2 cups of sliced peaches (fresh or well-drained canned) with ¼ cup of brown sugar, 1 teaspoon of cinnamon, and ½ teaspoon of nutmeg. Toss these ingredients gently to ensure the peaches are evenly coated with the spices and sugar. In a tiny bowl or ramekin, whisk together the 1 tablespoon of cornstarch with a tablespoon or two of water to create a slurry. Add this cornstarch slurry to the peach mixture and stir until well combined. The cornstarch will help to thicken the peach juices as they cook, creating a luscious, syrupy topping. Set this aside for now.
Stage 4: Layering and Baking the Cheesecake
4. Retrieve your chilled grabeef ham cracker crust from the freezer. Pour the prepared cheesecake filling evenly over the crust. Gently tap the pan on the counter a few times to release any air bubbles and create a perfectly smooth surface. Now, carefully spoon the peach cobbler topping over the cheesecake filling. You don’t need to spread it perfectly; some rustic distribution will look beautiful. For a more even bake and to prevent the cheesecake from cracking, we’ll use a water bath. Wrap the bottom of your springform pan tightly with heavy-duty aluminum foil, ensuring no water can seep in. Place the foil-wrapped springform pan inside a larger baking pan (like a roasting pan). Carefully pour hot water into the larger pan, coming about halfway up the sides of the springform pan. This creates a humid environment that promotes even cooking and prevents the edges from overbaking before the center is set. Preheat your oven to 325°F (160°C).
5. Carefully place the entire water bath setup into the preheated oven. Bake for approximately 60-75 minutes, or until the edges of the cheesecake are set, and the center is still slightly jiggly when you gently shake the pan. The residual heat will continue to cook the center as it cools. Once baked, turn off the oven, crack open the oven door slightly (you can prop it open with a wooden spoon), and let the cheesecake cool in the oven for another hour. This gradual cooling process is another key to preventing cracks. After cooling in the oven, remove the cheesecake from the water bath and let it cool completely on a wire rack at room temperature. Once fully cooled, cover the cheesecake with plastic wrap and refrigerate for at least 4-6 hours, or preferably overnight, to allow it to fully set and the flavors to meld beautifully. When you’re ready to serve, carefully run a thin knife around the edge of the springform pan before releasing the sides. Enjoy every decadent bite!
Conclusion:
There you have it – a recipe for a truly spectacular Peach Cobbler Cheesecake that perfectly marries the comforting warmth of a classic cobbler with the decadent creaminess of cheesecake. This dessert is an absolute winner for any occasion, offering a delightful balance of sweet, juicy peaches, a tender, spiced topping, and a rich, tangy cheesecake base. I’m confident you’ll love the layered flavors and textures in every single bite. For serving, I highly recommend a dollop of whipped cream or a scoop of vanilla bean ice cream to enhance the overall experience. Don’t be afraid to get creative with variations! Consider adding a sprinkle of cinnamon to the cheesecake batter or a touch of bourbon extract to the peach filling for an adult twist. This Peach Cobbler Cheesecake is a guaranteed crowd-pleaser and a joy to make. I encourage you to gather your ingredients and give it a try – you won’t regret it!
Frequently Asked Questions:
Q: Can I use fresh peaches if they are out of season?
A: Absolutely! While fresh, ripe peaches are ideal, frozen or canned peaches (drained well) will also work beautifully in this Peach Cobbler Cheesecake. Just be sure to adjust the sweetness if using canned peaches, as they often contain added sugar.
Q: What makes this Peach Cobbler Cheesecake so special?
A: The magic lies in the harmonious blend of textures and flavors. You get the delightful crunch and spice of the cobbler topping, combined with the smooth, creamy, and slightly tangy cheesecake, all crowned with sweet, tender peaches. It’s a symphony of comfort and indulgence.
Q: Are there any dairy-free alternatives I can use?
A: While adapting this recipe to be completely dairy-free would involve significant ingredient substitutions (e.g., dairy-free cream cheese, butter alternatives, and potentially different thickeners), it’s certainly an avenue worth exploring for those with dietary restrictions. Experimentation would be key to achieving a similar delicious result.
Peach Cobbler Cheesecake
A decadent fusion of creamy cheesecake and warm peach cobbler, topped with a buttery graham cracker crust and spiced peach topping.
Ingredients
-
1 ½ cups crushed graham crackers
-
¼ cup melted butter
-
2 tbsp brown sugar
-
24 oz cream cheese, softened
-
1 cup granulated sugar
-
3 large eggs
-
1 cup sour cream
-
1 tbsp vanilla extract
-
2 tbsp all-purpose flour
-
1 tsp cinnamon
-
2 cups fresh or canned peaches, sliced
-
¼ cup brown sugar
-
1 tsp cinnamon
-
½ tsp nutmeg
-
1 tbsp cornstarch
Instructions
-
Step 1
Preheat oven to 350°F (175°C). Mix crushed graham crackers, melted butter, and 2 tbsp brown sugar for the crust. Press into the bottom of a 9-inch springform pan. -
Step 2
In a large bowl, beat cream cheese until smooth. Gradually beat in 1 cup granulated sugar. Add eggs one at a time, beating well after each addition. -
Step 3
Stir in sour cream, vanilla extract, all-purpose flour, and 1 tsp cinnamon until just combined. -
Step 4
Pour cream cheese mixture over the crust. Bake for 50-60 minutes, or until the edges are set and the center is still slightly jiggly. -
Step 5
While cheesecake bakes, combine sliced peaches, ¼ cup brown sugar, 1 tsp cinnamon, ½ tsp nutmeg, and cornstarch in a saucepan. Cook over medium heat, stirring, until thickened. -
Step 6
Let cheesecake cool in the oven with the door ajar for 1 hour. Then, cool completely on a wire rack before topping with the peach mixture. Chill for at least 4 hours before serving.
Important Information
Nutrition Facts (Per Serving)
It is important to consider this information as approximate and not to use it as definitive health advice.
Allergy Information
Please check ingredients for potential allergens and consult a health professional if in doubt.

Leave a Comment