
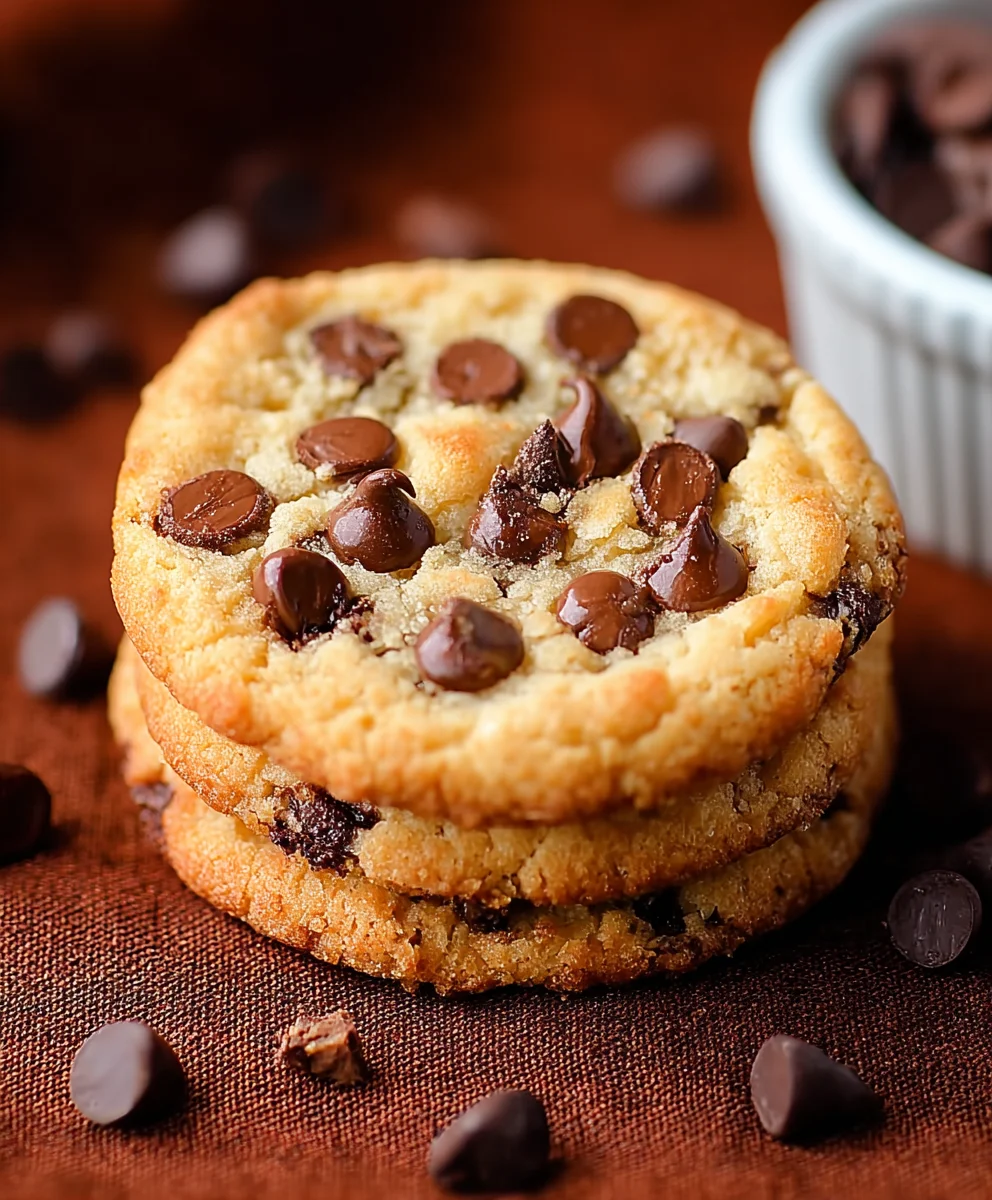
Microwave Chocolate Chip Cookie recipes are a game-changer for those moments when a serious sweet craving hits, and you need instant gratification. Forget the oven preheating, the messy mixing bowls, or the waiting game; this is your shortcut to warm, gooey, chocolatey bliss in mere minutes. What is it about this particular treat that makes us all swoon? It’s the perfect balance of soft, chewy dough and molten chocolate pockets, delivering that classic cookie comfort with unparalleled speed. This isn’t just any cookie; it’s a testament to culinary ingenuity, proving that you can achieve decadent, melt-in-your-mouth perfection without a traditional oven. It’s the ideal solution for a single-serving dessert, a quick afternoon pick-me-up, or satisfying a late-night sugar emergency. Get ready to experience the magic of a perfect Microwave Chocolate Chip Cookie that’s as delightful as it is effortless to make.

Ingredients:
- 2 Tablespoons unsalted butter, melted
- 1 Tablespoon light brown sugar, packed
- 1 Tablespoon granulated sugar
- ¼ teaspoon baking powder
- ¼ teaspoon vanilla extract
- ⅛ teaspoon salt
- 3 Tablespoons all-purpose flour
- 2 Tablespoons semi-sweet chocolate chips
- Vanilla ice cream, for serving
Microwave Chocolate Chip Cookie: The Speedy Treat
This recipe is your shortcut to pure, unadulterated chocolate chip cookie bliss, delivered in minutes! Forget waiting for oven preheating or wrestling with cookie sheets. This microwave chocolate chip cookie is designed for those moments when only a warm, gooey cookie will do, and you need it now. It’s perfect for a solo indulgence, a quick dessert after a meal, or even a fun little baking project with kids. The beauty of this recipe lies in its simplicity and speed, transforming basic pantry staples into a delightful treat with minimal effort. We’ll be using just a few common ingredients, transforming them into a single-serving masterpiece in your microwave.
Mixing the Dough: The Foundation of Flavor
Let’s get started by creating our cookie dough. The first step is to ensure your butter is perfectly melted. You can do this in a small microwave-safe bowl for about 20-30 seconds, just until it’s liquid and no longer solid. We want it melted, not hot, so be careful when handling it. Once melted, pour the butter into a medium-sized mixing bowl.
Next, we’ll add the sugars. To the melted butter, add the packed light brown sugar and the granulated sugar. The brown sugar contributes a wonderful chegrape juicess and a hint of caramel flavor, while the granulated sugar helps with crispness and sweetness. Whisk these together vigorously. You’re aiming for a smooth, well-combined mixture. You should see the sugars start to dissolve into the butter, creating a lovely, glossy base for our cookie. Don’t be afraid to whisk for a good minute to really incorporate everything.
Now, it’s time to introduce the flavor enhancers. Add the ¼ teaspoon of vanilla extract to the sugar and butter mixture. Vanilla is crucial for that classic cookie aroma and taste, so don’t skip it! Following that, add the ⅛ teaspoon of salt. Salt is a flavor enhancer in baking, balancing the sweetness and making all the other flavors pop. Whisk these in until they are fully combined with the wet ingredients.
Incorporating the Dry Ingredients: Building the Cookie Structure
With our wet ingredients perfectly blended, it’s time to introduce the dry components. To the bowl containing the butter, sugars, vanilla, and salt, add the 3 tablespoons of all-purpose flour. It’s helpful to lightly spoon the flour into your measuring spoon and then level it off with a straight edge to ensure accuracy. Over-measuring flour can lead to a dry, crum extractbly cookie, which is exactly what we want to avoid.
Next, sprinkle in the ¼ teaspoon of baking powder. Baking powder is our leavening agent, which will help the cookie rise slightly and achieve a pleasant texture. It’s important to add it now with the flour so it’s evenly distributed throughout the dough.
Now, gently fold the dry ingredients into the wet ingredients. You can use a spatula or a whisk for this. The key here is to mix until just combined. Overmixing the flour can develop the gluten too much, resulting in a tough cookie. You should see streaks of flour disappear, and the mixture will start to form a cohesive dough. It will be quite thick.
Adding the Chocolate: The Star of the Show
This is where our microwave chocolate chip cookie truly comes to life! Carefully fold in the 2 tablespoons of semi-sweet chocolate chips. Again, use a spatula or spoon to gently incorporate them into the dough. Distribute them evenly throughout the mixture so you get a burst of melted chocolate in every bite. Make sure they are well-distributed, pushing them down slightly into the dough to ensure they don’t just sit on top. We want those pockets of melty goodness embedded within the cookie.
Cooking the Cookie: The Microwave Magic
Now for the exciting part – transforming this dough into a warm cookie using your microwave! You’ll need a microwave-safe mug or a small microwave-safe ramekin. Spoon the cookie dough into the mug or ramekin, pressing it down gently to create an even layer. You don’t need to grease the mug or ramekin, as the butter in the dough will prevent sticking.
Place the mug or ramekin in the center of your microwave. Cook on HIGH power for approximately 60 to 90 seconds. The exact cooking time will vary depending on the wattage of your microwave and the size of your mug or ramekin. Start with 60 seconds and then check its doneness. The cookie should look set around the edges but might still appear slightly soft and gooey in the center. This is exactly what you want for the best texture. If it looks too wet, microwave in additional 10-second intervals, checking after each one, until it’s cooked to your liking. Be careful not to overcook it, as this will result in a dry, hard cookie.
Cooling and Serving: The Grand Finnon-alcoholic ale
Once your microwave chocolate chip cookie is cooked, carefully remove the hot mug or ramekin from the microwave using oven mitts or a kitchen towel. The cookie will be extremely hot, so allow it to cool in the mug for at least 1-2 minutes before attempting to remove it or dig in. This cooling period is crucial for the cookie to finish setting up and for you to avoid burning your tongue.
For the ultimate indulgence, serve your warm microwave chocolate chip cookie with a generous scoop of vanilla ice cream. The contrast between the warm, gooey cookie and the cold, creamy ice cream is simply heavenly. You can eat it directly from the mug or carefully invert it onto a small plate if you wish. Enjoy your instant gratification!
Conclusion:
And there you have it! A simple, delightful, and incredibly fast way to satisfy your sweet tooth with our Microwave Chocolate Chip Cookie. This recipe proves that you don’t need hours in the kitchen or a fancy oven to enjoy a warm, gooey chocolate chip cookie. The beauty of this method is its speed and minimal cleanup, making it perfect for those sudden cravings or when you need a quick treat. I hope you enjoy making and devouring these little bites of heaven as much as I do!
For serving, these Microwave Chocolate Chip Cookies are best enjoyed immediately while they are still warm and the chocolate chips are molten. They pair wonderfully with a cold glass of milk, a cup of coffee, or even a scoop of vanilla ice cream for an indulgent dessert. Don’t be afraid to experiment with variations – add a sprinkle of sea salt on top before microwaving for a sweet and salty contrast, or mix in a few chopped nuts for added texture. You could also try different types of chocolate chips, like dark or white chocolate, to change up the flavor profile. Have fun with it and make it your own!
Frequently Asked Questions:
Why is my Microwave Chocolate Chip Cookie dry?
This can happen if you overcook it. Microwaves vary in power, so it’s always best to start with the lower end of the cooking time suggested and add 10-15 second increments until it’s done. You want the edges to look set but the center to still be slightly soft. It will continue to cook slightly as it cools.
Can I make more than one Microwave Chocolate Chip Cookie at a time?
While you can technically make more, it’s generally recommended to make them one at a time for the best results. The heat distribution in the microwave can be uneven, and cooking multiple cookies might lead to some being overcooked and others undercooked. Enjoying them fresh and single is part of the charm!

Quick Microwave Chocolate Chip Cookie Recipe
A speedy, single-serving chocolate chip cookie made in the microwave for instant gratification. Perfect for when you need a warm, gooey treat in minutes.
Ingredients
-
2 Tablespoons unsalted butter, melted
-
1 Tablespoon light brown sugar, packed
-
1 Tablespoon granulated sugar
-
1/4 teaspoon baking powder
-
1/4 teaspoon vanilla extract
-
1/8 teaspoon salt
-
3 Tablespoons all-purpose flour
-
2 Tablespoons semi-sweet chocolate chips
-
Vanilla ice cream, for serving
Instructions
-
Step 1
Melt 2 tablespoons of unsalted butter in a microwave-safe bowl for 20-30 seconds. Pour into a medium mixing bowl. -
Step 2
Add 1 tablespoon packed light brown sugar and 1 tablespoon granulated sugar to the melted butter. Whisk vigorously until smooth and well-combined. -
Step 3
Stir in 1/4 teaspoon vanilla extract and 1/8 teaspoon salt. Whisk until fully incorporated. -
Step 4
Gently fold in 3 tablespoons of all-purpose flour and 1/4 teaspoon baking powder until just combined. Do not overmix. -
Step 5
Fold in 2 tablespoons of semi-sweet chocolate chips, distributing them evenly. -
Step 6
Spoon the dough into a microwave-safe mug or ramekin, pressing it down to create an even layer. Microwave on HIGH for 60-90 seconds, or until the edges are set but the center is still soft. Start with 60 seconds and add in 10-second intervals if needed. -
Step 7
Carefully remove the hot mug or ramekin from the microwave. Let the cookie cool in the mug for 1-2 minutes before serving. Serve warm with vanilla ice cream.
Important Information
Nutrition Facts (Per Serving)
It is important to consider this information as approximate and not to use it as definitive health advice.
Allergy Information
Please check ingredients for potential allergens and consult a health professional if in doubt.

Leave a Comment